Pre-register up to 200 guests at once using one of three methods: Manual Entry, Copy & Paste, or CSV Upload.
Tip: The more fields you fill in during pre-registration, the less your guests need to type when they check in on-site. Try to complete as many columns as possible for the smoothest arrival experience.
Step 1: Open the Bulk Invite Screen
Hosts / Employees — From the Host App, open Bulk Invite from the Dashboard or Visitors tab.

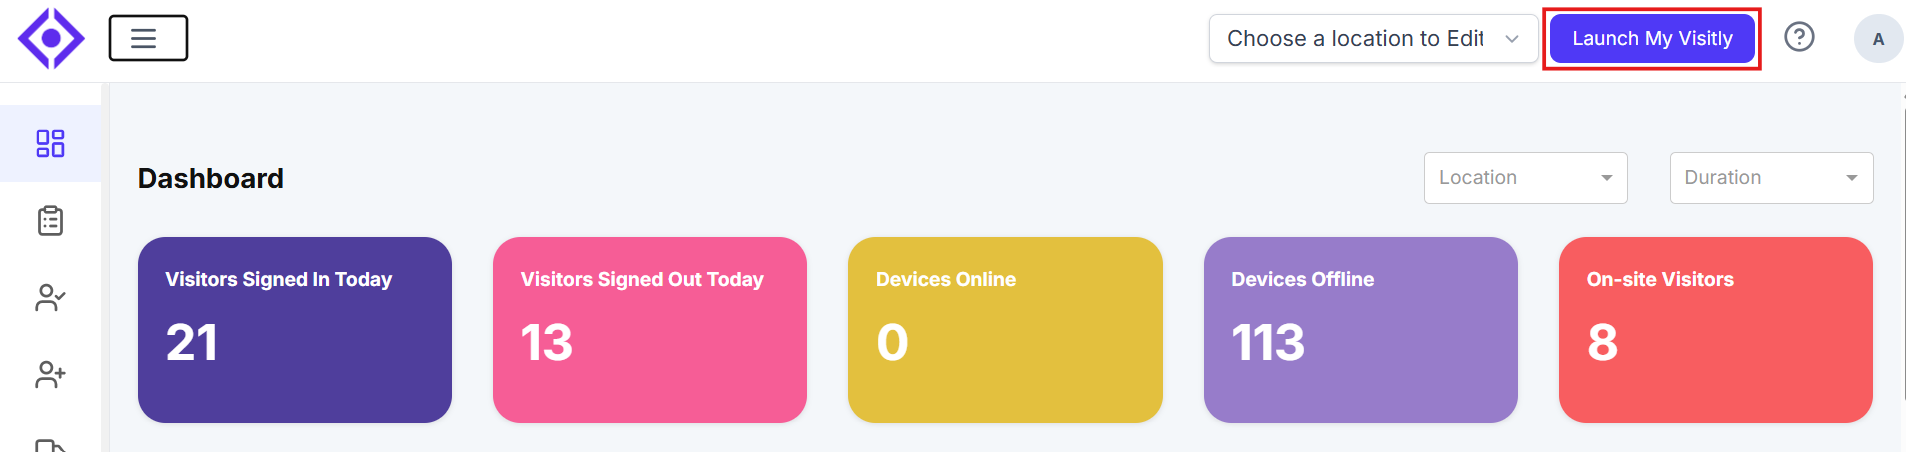
Admins — Click Launch My Visitly from the Admin Console first, then follow the same path above.
Step 2: Complete Invite Details
Fill in the Invite Details panel at the top of the screen before working with the grid.

The CSV upload and Visitor type stay locked until Location selected.
Tip: Collapse this panel using the collapse icon on the right to get more grid space.

Grid Columns:
Step 3: Add Your Guests
Method 1: Manual Entry
Click into the Full Name column and start typing.
Press Tab to move across columns. Enter at least a Full Name and Scheduled Check-In Date & Time per guest.

Press Enter to move to the next row, or Tab past Actions to add a new row.
If multiple guests share the same value (e.g., the same scheduled check-in date), select the cell and drag the fill handle across the target rows to apply it in one go.
Repeat for all guests, then continue to Step 4.
Method 2: Copy & Paste from a Spreadsheet
Click Download CSV Template at the top of the screen to see the correct column order. The template does not include "Override Host."

Match your spreadsheet columns to the template order.
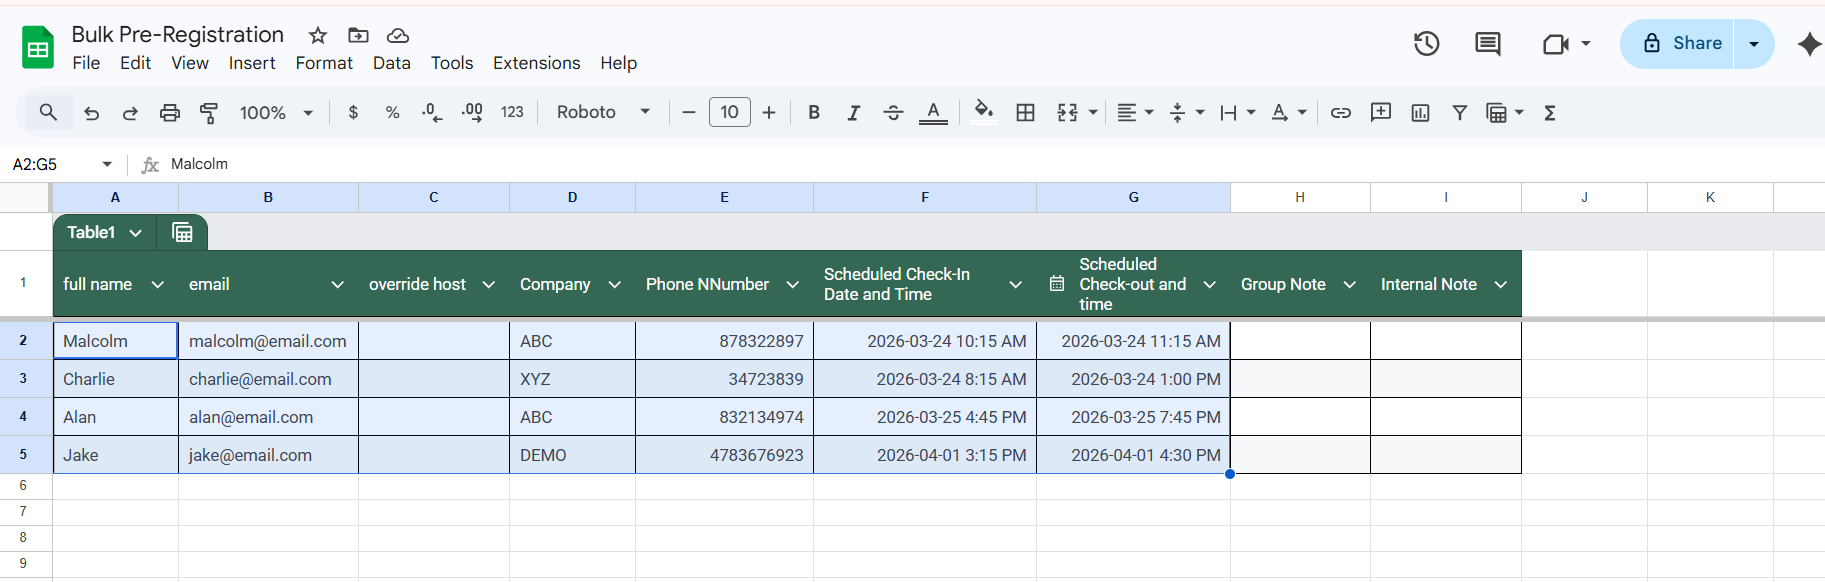
Select your guest rows (no header row) and copy (Ctrl + C / ⌘ + C).
Click the first cell in the grid's Full Name column and paste (Ctrl + V / ⌘ + V). Multi-row paste is supported.
Fill in Override Host in the grid if needed. You can also drag the fill handle on any cell to quickly apply the same value across multiple rows.
Continue to Step 4.

Note: If data lands in the wrong columns, check that your column order matches the template and that no header row was copied.
Method 3: Upload a CSV File
1. Click Download CSV Template, save it, and open it in any spreadsheet editor.

2. Fill in one guest per row — at minimum Full Name and Scheduled Check-In Date & Time. Save as .csv.
3. Click Upload CSV on the Bulk Invite screen and select your file.
4. Review the populated grid. Fill in Override Host if needed, then continue to Step 4.

Tip: Use the downloaded template rather than building a CSV from scratch — it guarantees the correct column order.
Step 4: Settings & Notifications
Review these settings at the Invite Details before saving. They apply to all guests in the batch.

Step 5: Save
Click Save to pre-register all guests. Notifications go out based on your settings above.
Keyboard Shortcuts:
These shortcuts work inside the Bulk Invite grid.
Navigation:
Selection:
Editing & Bulk Fill:
Note: If a shortcut doesn't respond as expected, it may not be supported in your browser or OS.
Managing Rows & Columns
Rows:
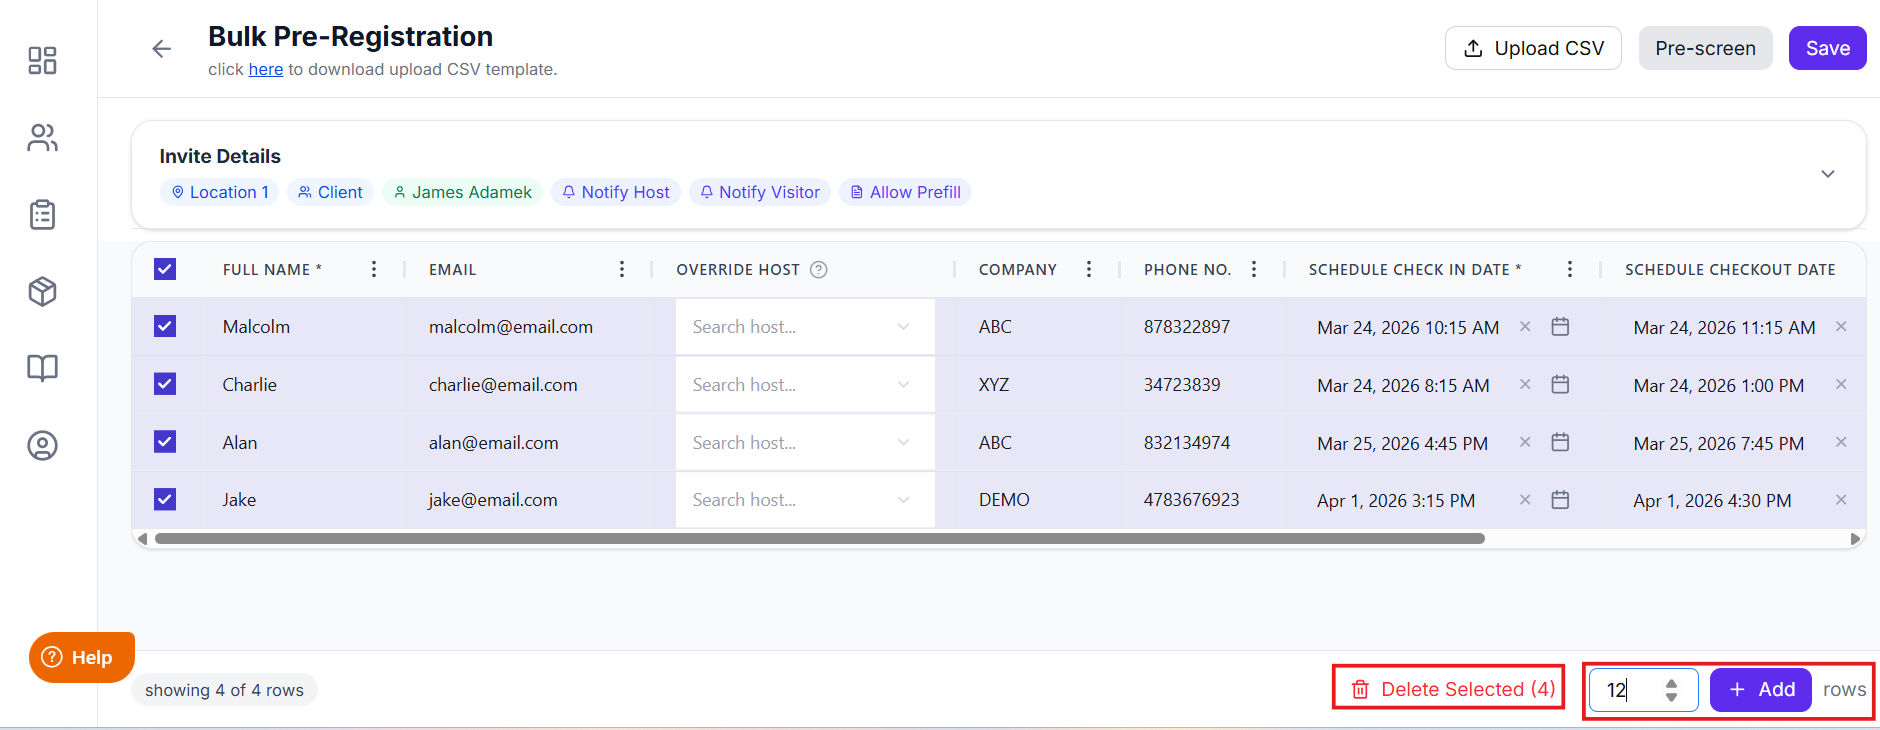
Add rows in bulk — bottom-right corner control (up to 200 total).
Add a single row — press Tab from the Actions column in the last row.
- Delete rows in bulk — select rows, then click Delete Selected.
Columns:

You can customize which columns appear in the visitor invite grid by clicking the Columns button at the top right of the screen.

Tip: The more fields you fill in during pre-registration, the less your guests need to type when they check in on-site. Try to complete as many columns as possible for the smoothest arrival experience.
Step 1: Open the Bulk Invite Screen
Hosts / Employees — From the Host App, open Bulk Invite from the Dashboard or Visitors tab.
Admins — Click Launch My Visitly from the Admin Console first, then follow the same path above.
Step 2: Complete Invite Details
Fill in the Invite Details panel at the top of the screen before working with the grid.
The CSV upload and Visitor type stay locked until Location selected.
Tip: Collapse this panel using the collapse icon on the right to get more grid space.
Grid Columns:
Step 3: Add Your Guests
Method 1: Manual Entry
Click into the Full Name column and start typing.
Press Tab to move across columns. Enter at least a Full Name and Scheduled Check-In Date & Time per guest.
Press Enter to move to the next row, or Tab past Actions to add a new row.
If multiple guests share the same value (e.g., the same scheduled check-in date), select the cell and drag the fill handle across the target rows to apply it in one go.
Repeat for all guests, then continue to Step 4.
Method 2: Copy & Paste from a Spreadsheet
Click Download CSV Template at the top of the screen to see the correct column order. The template does not include "Override Host."
Match your spreadsheet columns to the template order.
Select your guest rows (no header row) and copy (Ctrl + C / ⌘ + C).
Click the first cell in the grid's Full Name column and paste (Ctrl + V / ⌘ + V). Multi-row paste is supported.
Fill in Override Host in the grid if needed. You can also drag the fill handle on any cell to quickly apply the same value across multiple rows.
Continue to Step 4.
Note: If data lands in the wrong columns, check that your column order matches the template and that no header row was copied.
Method 3: Upload a CSV File
1. Click Download CSV Template, save it, and open it in any spreadsheet editor.
2. Fill in one guest per row — at minimum Full Name and Scheduled Check-In Date & Time. Save as .csv.
3. Click Upload CSV on the Bulk Invite screen and select your file.
4. Review the populated grid. Fill in Override Host if needed, then continue to Step 4.
Tip: Use the downloaded template rather than building a CSV from scratch — it guarantees the correct column order.
Step 4: Settings & Notifications
Review these settings at the Invite Details before saving. They apply to all guests in the batch.
Step 5: Save
Click Save to pre-register all guests. Notifications go out based on your settings above.
Keyboard Shortcuts:
These shortcuts work inside the Bulk Invite grid.
Navigation:
Selection:
Editing & Bulk Fill:
Note: If a shortcut doesn't respond as expected, it may not be supported in your browser or OS.
Managing Rows & Columns
Rows:
Add rows in bulk — bottom-right corner control (up to 200 total).
Add a single row — press Tab from the Actions column in the last row.
- Delete rows in bulk — select rows, then click Delete Selected.
Columns:
You can customize which columns appear in the visitor invite grid by clicking the Columns button at the top right of the screen.
This opens Column Settings, where you can select or deselect the fields you want to display. Full Name and Scheduled Check-in Date are mandatory and will always remain visible. For all other fields, choose as many or as few as you need:
- Override Host
- Company
- Phone No.
- Schedule Checkout Date
- Group Name
- Internal Notes
Once done, click Save to apply your column preferences.
Was this article helpful?
That’s Great!
Thank you for your feedback
Sorry! We couldn't be helpful
Thank you for your feedback
Feedback sent
We appreciate your effort and will try to fix the article