Overview
SmartPass gives your visitors a digital pass in Apple Wallet or Google Wallet. When they arrive, their phone reminds them to check in. They check in and out from their phone in a few taps, with their details already filled in. There's no kiosk line and no retyping.
Before You Begin
Complete all prerequisites before starting setup.
- SmartPass is on your plan. If you see "SmartPass is not available on your current plan," contact your Visitly account manager. Your plan also sets how many active passes you can have at once.
- You're a Global Admin. Branding is under Global Settings, which only Global Admins can see. Location Admins can configure their own locations.
- You know each location's address, so you can place its check-in area on the map.
Setup Guide
Step 1: Brand Your SmartPass
Your branding controls how the pass looks in your visitors' wallets. You configure it once for your whole organization.
- Go to Global Settings → SmartPass.
- In Display name (required), enter the name shown at the top of the pass. Use up to 50 characters.
- In Logo upload (required), upload your logo. Use a PNG or JPEG, 160×160 px recommended, max 2 MB.
- In Pass Background color, pick a preset or enter a hex code for the main color of the pass.
- In Pass Font color, choose the color of the text and key fields. Pick one with high contrast against the background.
- Check the Preview on the right. It shows the pass as your visitors will see it.
- Click Save.
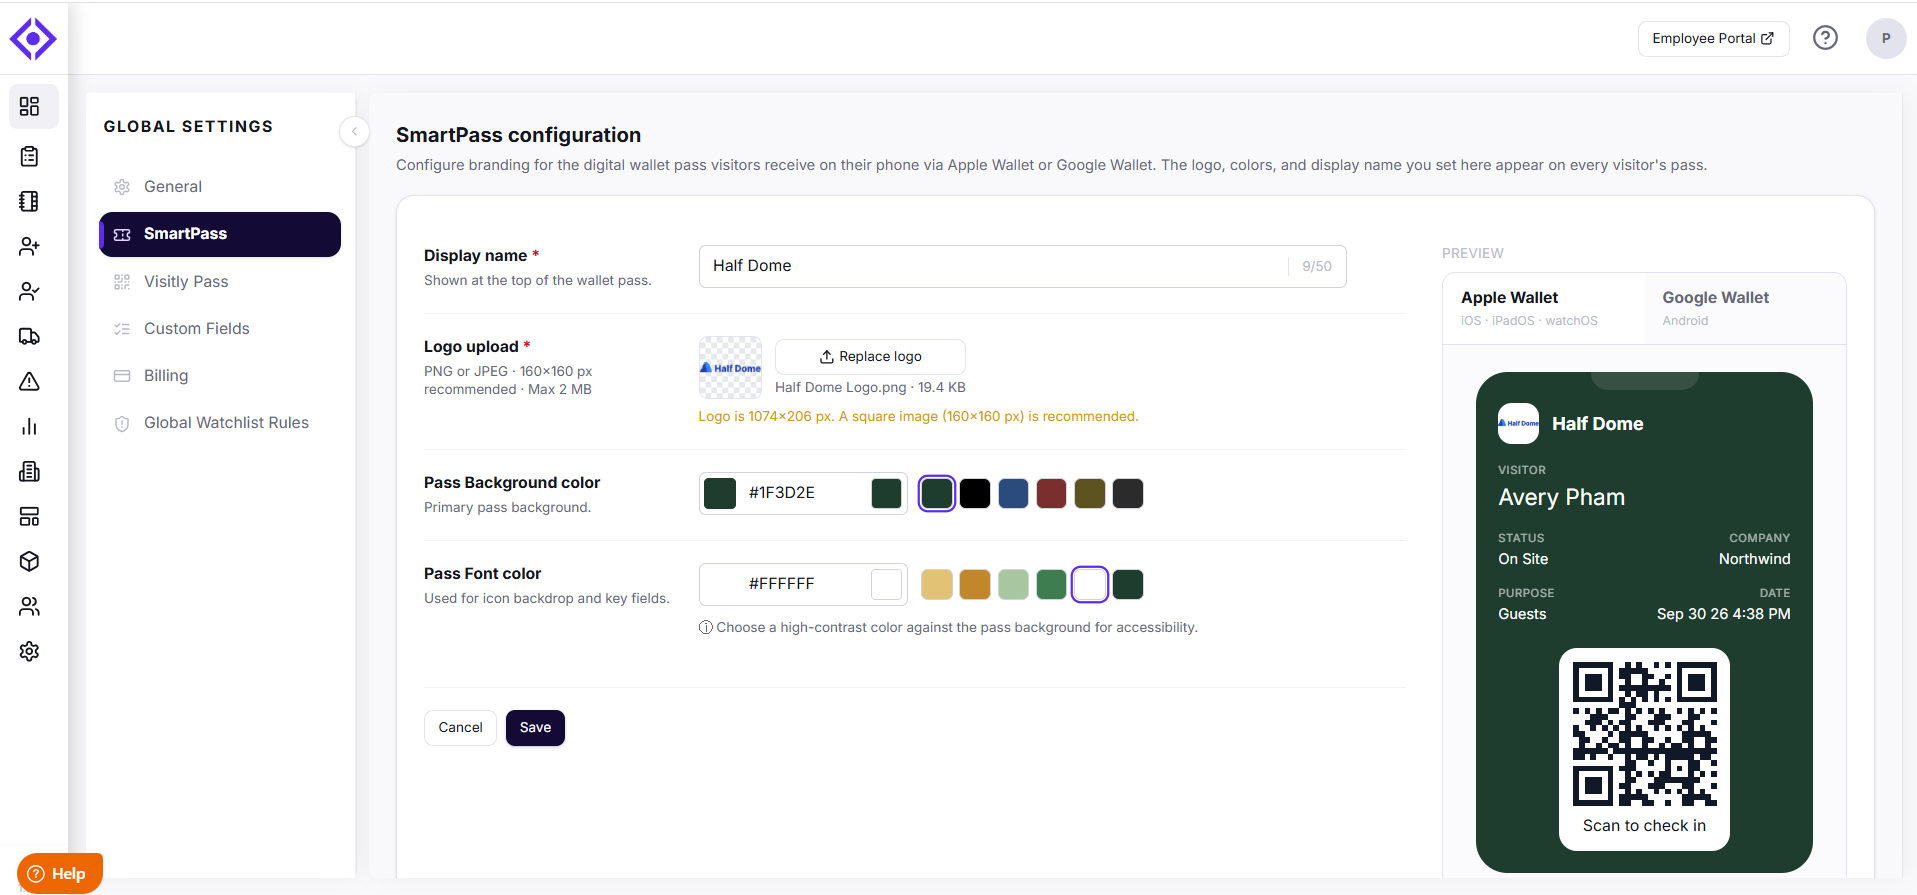
Tip: Use a logo with a transparent background, and test that the text is easy to read. Dark backgrounds with light text usually work best.
Your SmartPass branding is now saved for your organization.
Step 2: Configure Each Location
Every location where visitors will use SmartPass needs its own configuration.
- Go to Locations, select a location, then click SmartPass in the location menu.
- Turn on SmartPass enabled. This turns on SmartPass for the location and makes it available when you issue passes.
- Turn on Allow Contactless Check-in Using GeoFence. This turns on the check-in area. Visitors must be inside it to check in or out, and their phone shows the pass on the lock screen when they get close. It must be on for Visitly to issue passes automatically (see Step 3).
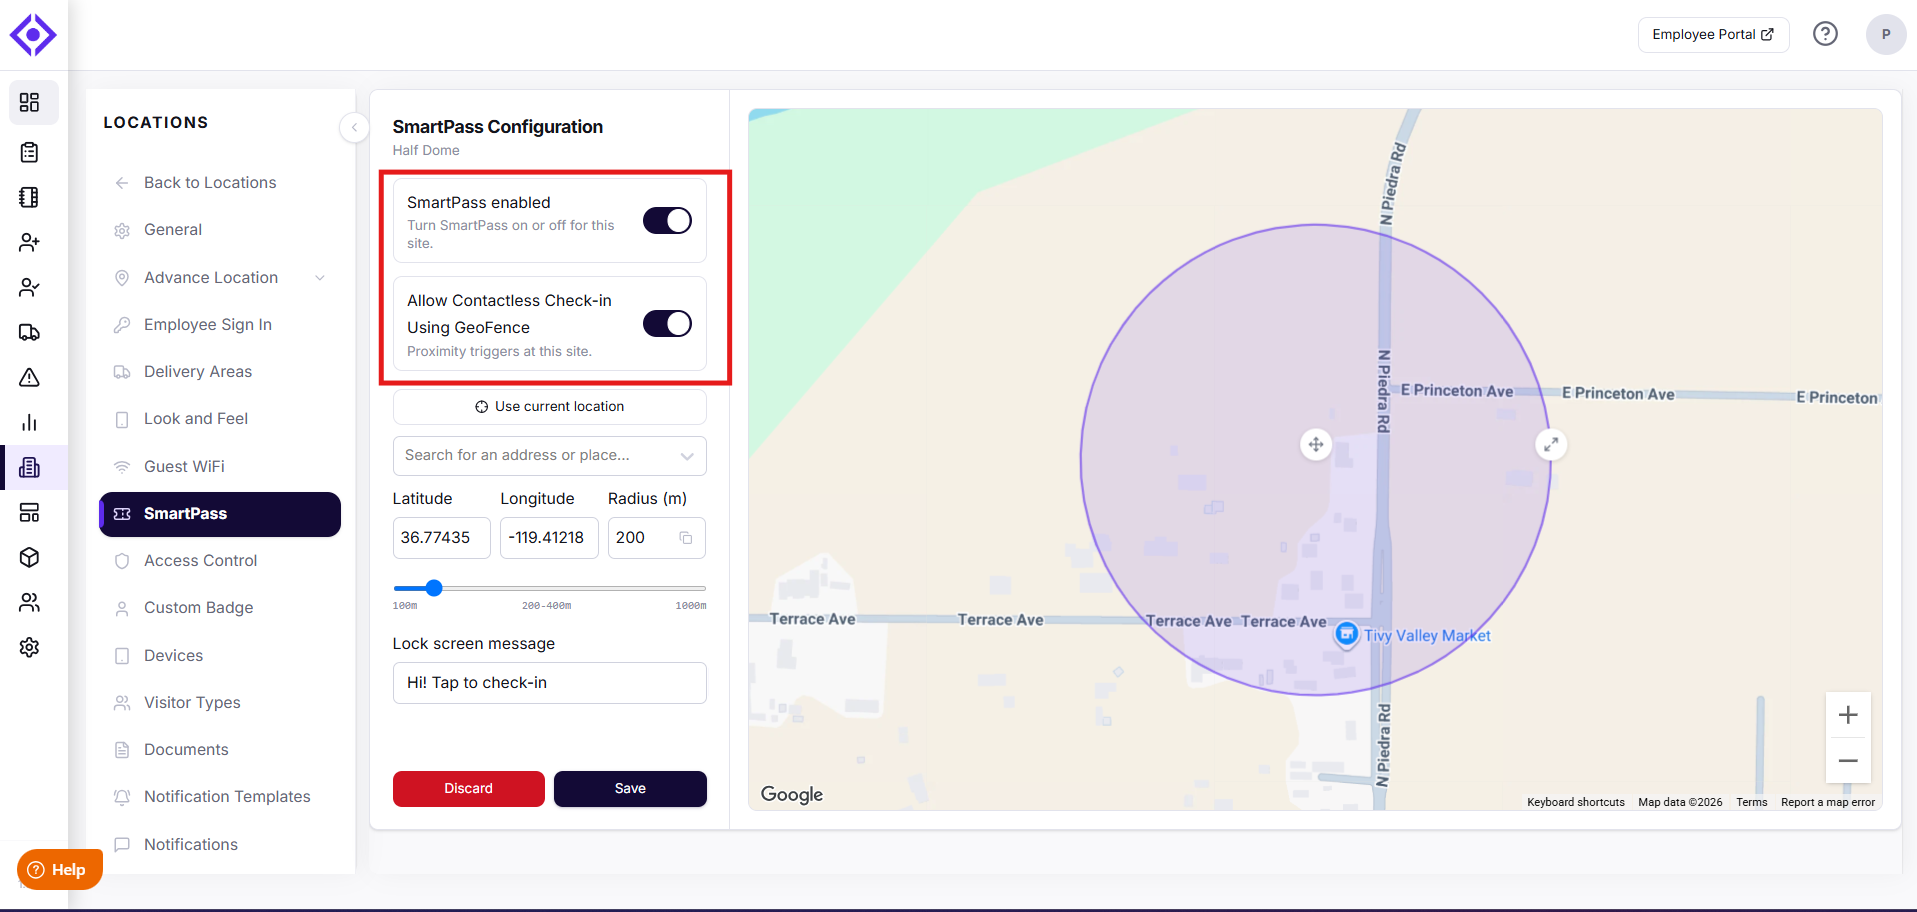
Draw your check-in area (geofence)
The check-in area is a circle on the map. Visitors can only check in or out from inside it.
- Find your building: type the address into Search for an address or place…, or enter the Latitude and Longitude.
- Fine-tune the center: drag the pin, or click the map, to place it on your main entrance.
- Set the size: use the Radius (m) slider, drag the circle's edge, or type a value. The minimum is 100 m and the maximum is 1,000 m.
Choose a radius that suits your site:
- Single office building in a city: 100–200 m
- Office park or building with a large parking lot: 200–400 m
- Campus, hospital or large site: 400–1,000 m
Too small, and visitors in the lobby or parking lot may see "You are outside the check-in area." Too large, and visitors can check in before they've actually arrived.
Write your lock-screen message
- In Lock screen message, enter the text visitors see on their lock screen when they arrive. Use up to 100 characters. For example: "Welcome to Acme HQ! Tap to check in." or "Arrived at Building 7? Tap your pass to check in."
- Click Save. To undo unsaved changes, click Discard.
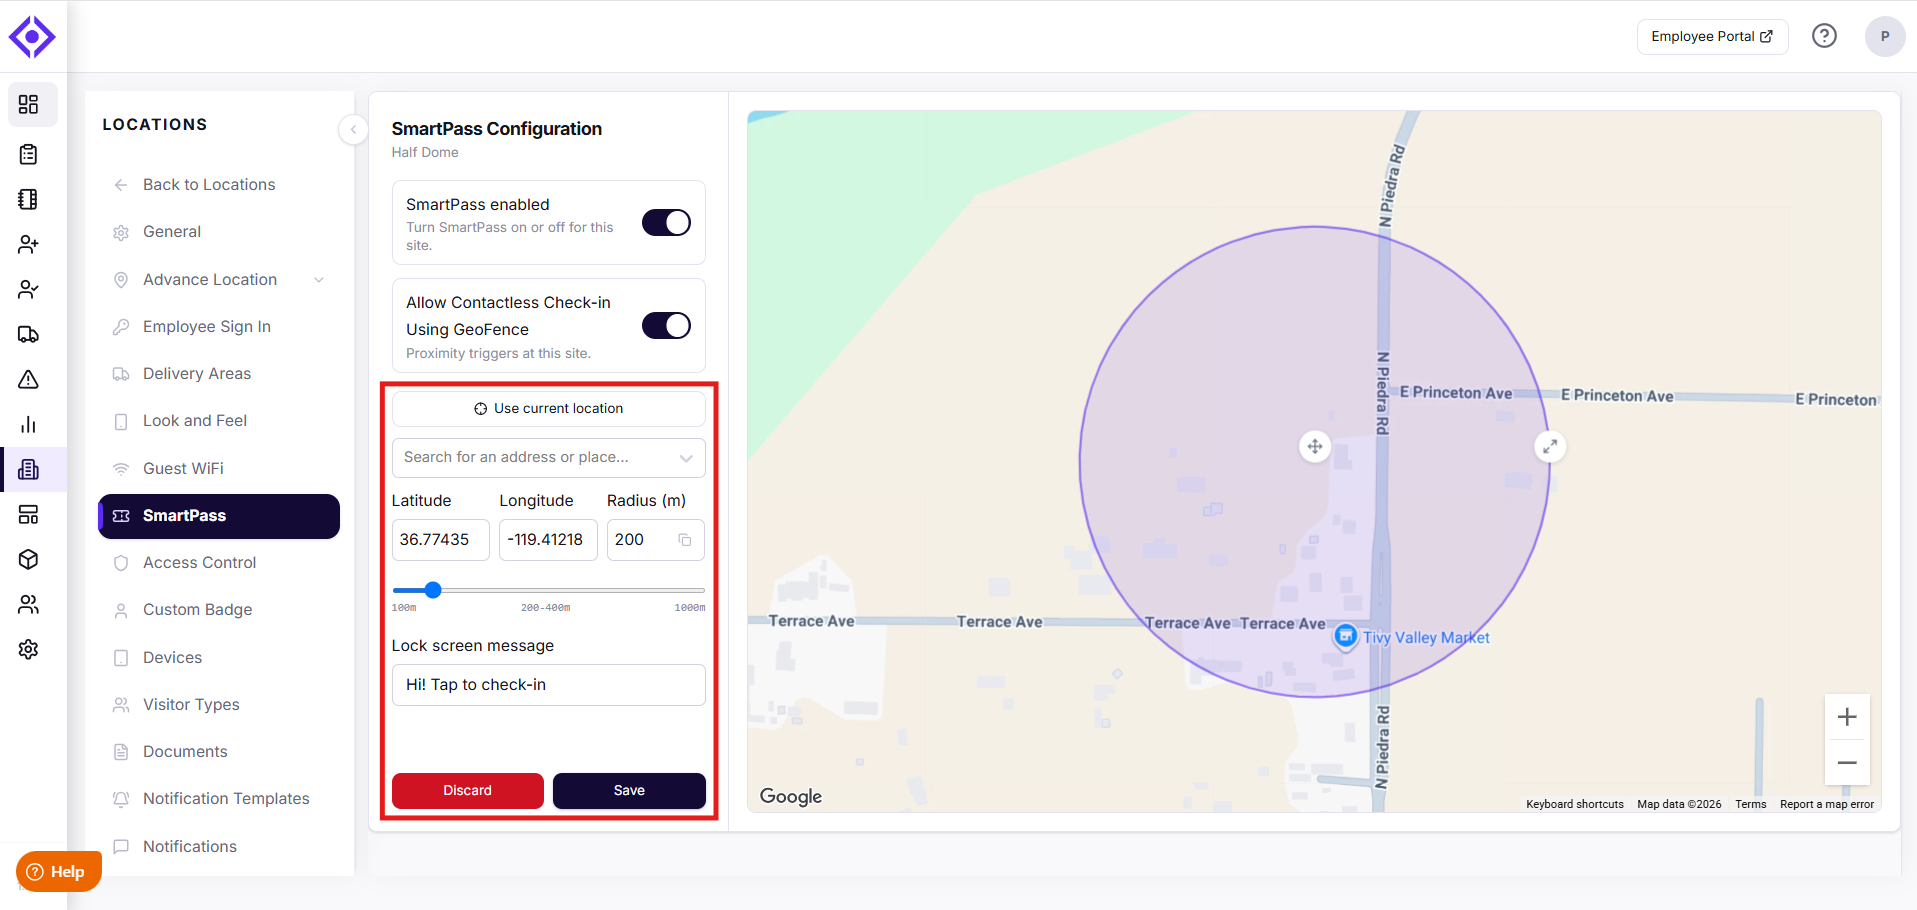
If you leave the message blank, visitors see "? You're near [Your Organization]! Tap to check in." When a visitor is on site, the message automatically changes to "Ready to leave [Your Organization]? Tap to check out."
How phones behave: iPhones show the lock-screen alert as soon as the visitor enters the area. Android phones may take 1–3 minutes, depending on battery-saving settings.
Managing multiple locations? Repeat this step for each location that will use SmartPass.
Your location is now ready for SmartPass check-in.
Step 3: Issue SmartPasses to Visitors
Visitors can get a pass in three ways. You can use any combination.
Option A: Issue a pass manually
Best for contractors, vendors, recurring visitors, or anyone you want to give a pass to ahead of time.
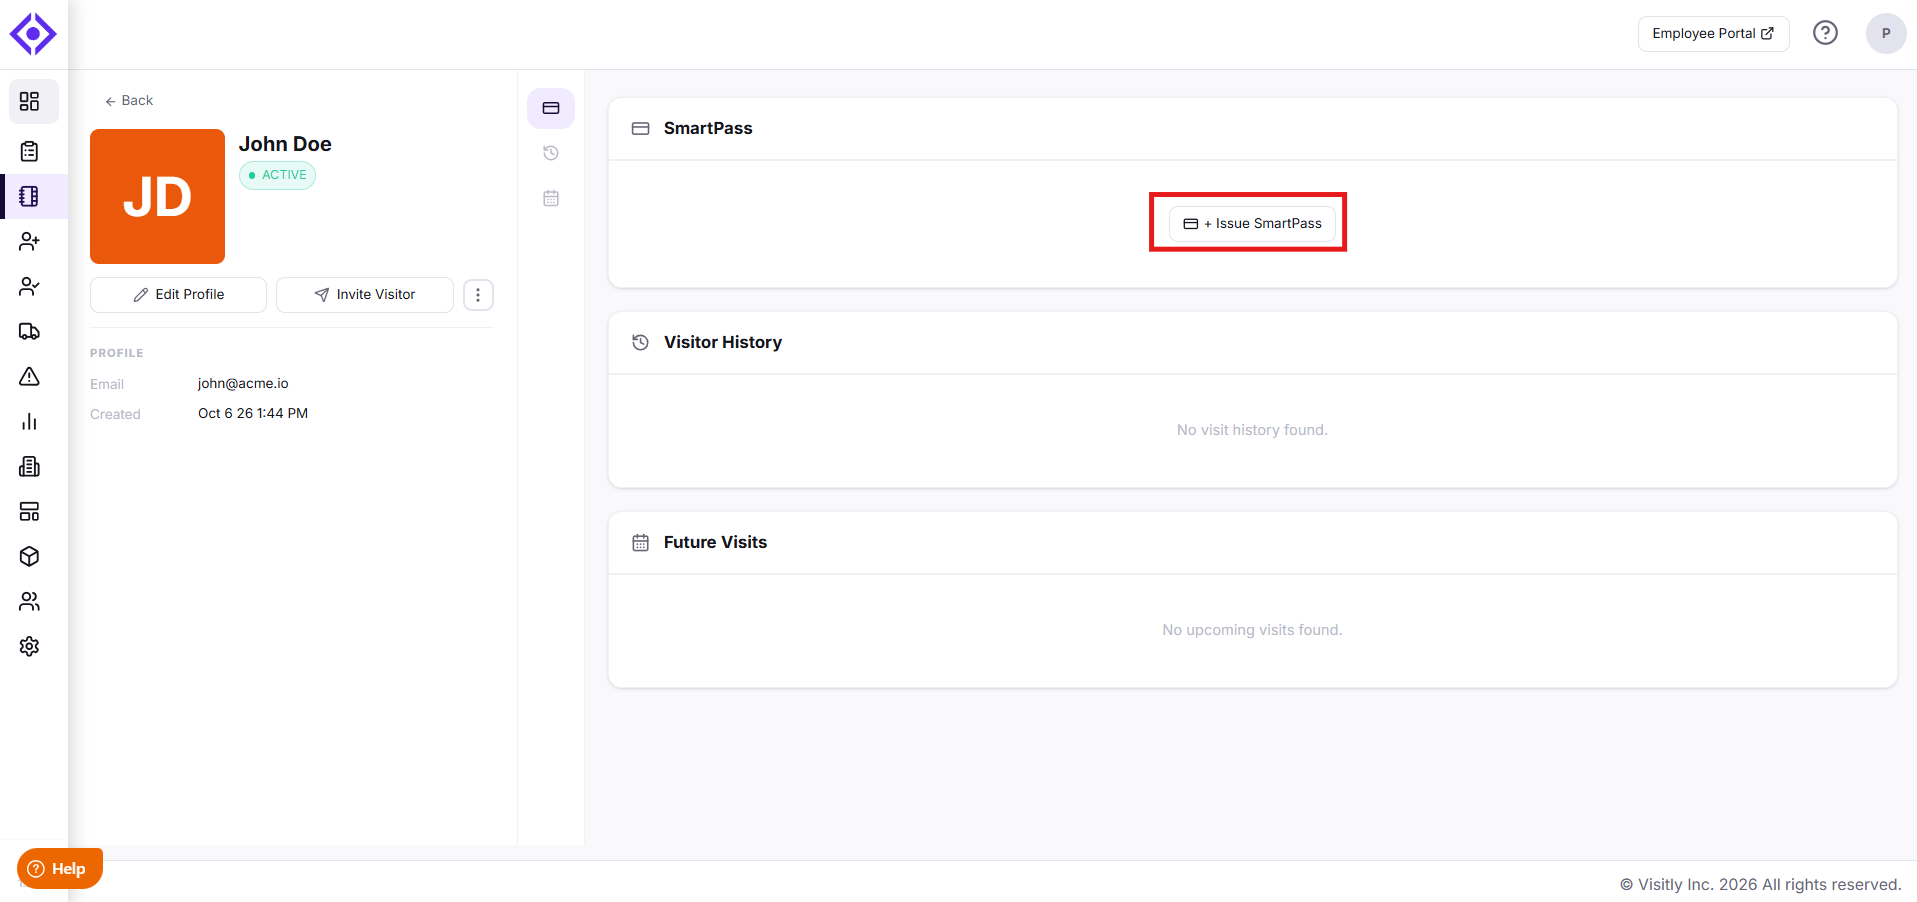
- Go to Visitors → Visitor Directory.
- Open the visitor's profile.
- In the SmartPass section, click + Issue SmartPass.
- Under Location, choose which locations the pass works at (up to 10). Only locations with SmartPass enabled appear here.
- Click Issue Pass.
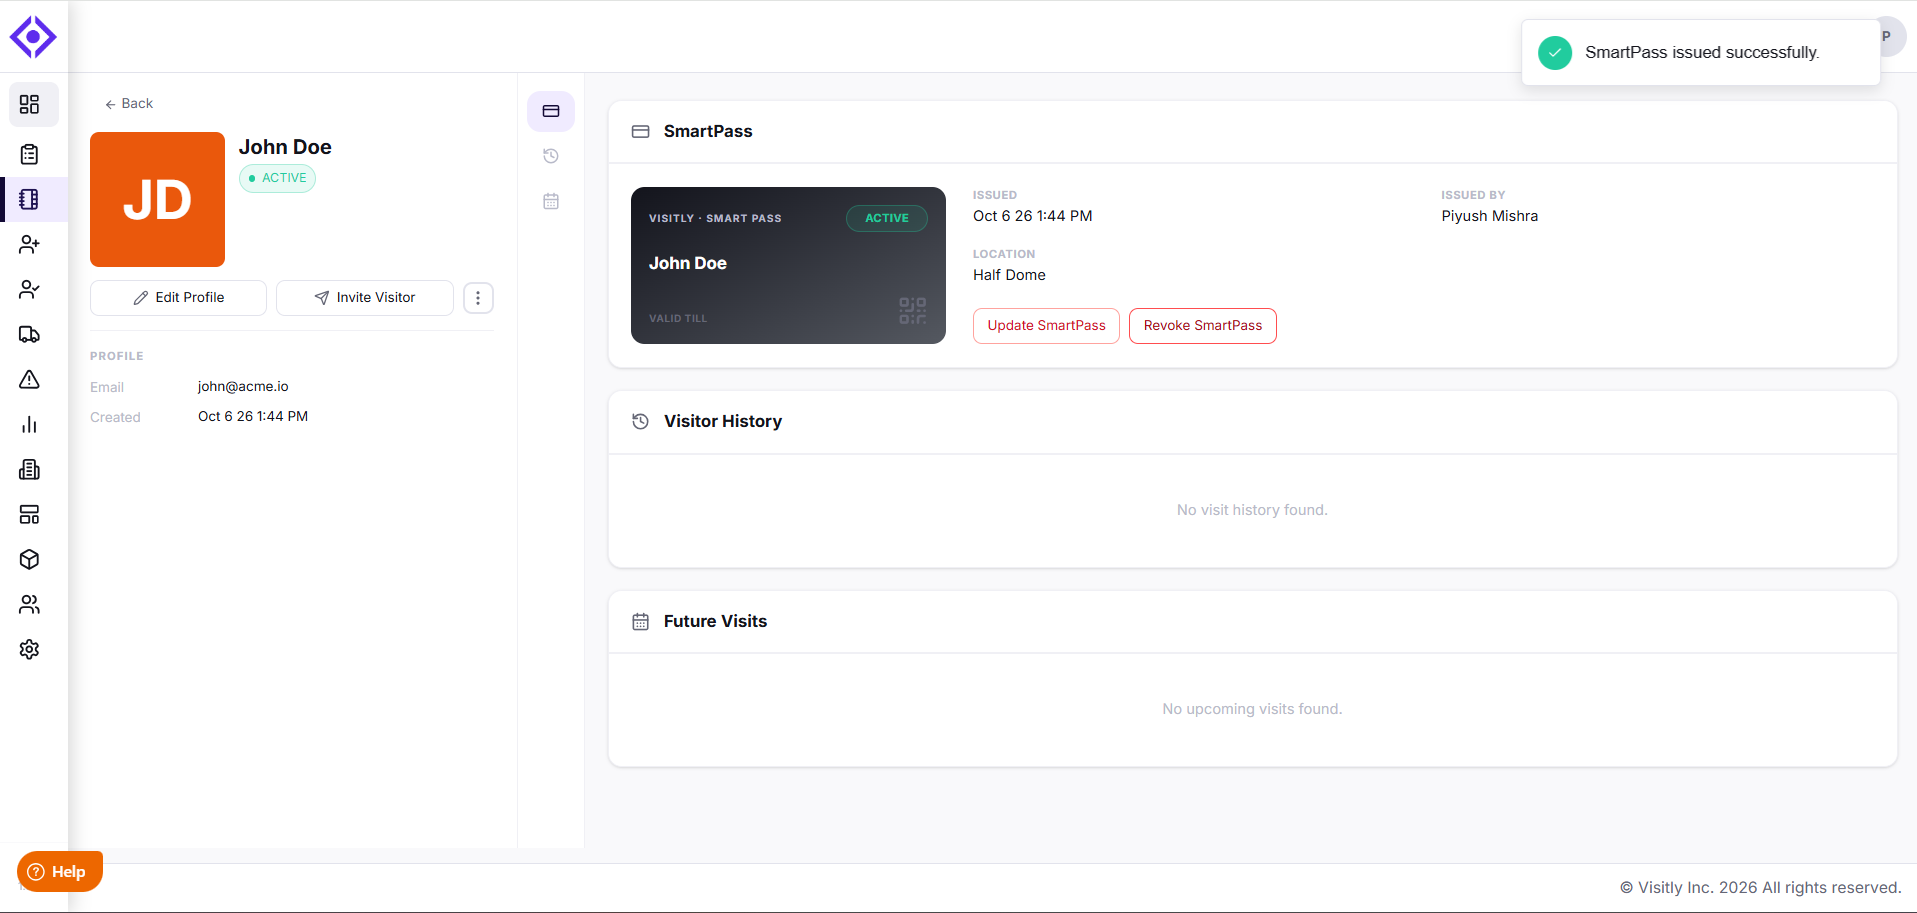
Visitly emails the visitor with the subject "You've been issued a SmartPass for [Your Organization]," including Add to Apple Wallet and Add to Google Wallet buttons.
Option B: Automatically, when you invite a visitor
When a host pre-registers (invites) a visitor to a location with SmartPass configured, Visitly creates a pass automatically and includes the wallet buttons in the invitation email.
Option C: Automatically, when a visitor checks in
When a visitor checks in at a location with SmartPass configured, Visitly creates a pass automatically, by default from their first visit, and includes the wallet buttons in the check-in confirmation email. On their next visit, they can use SmartPass instead of the kiosk.
Automatic passes need:
- Allow Contactless Check-in Using GeoFence turned on for the location
- An email address for the visitor
- Your organization under its active-pass limit
Each visitor has only one pass for your organization. If they already have one, Visitly doesn't create a new pass.
Make sure your emails show the wallet buttons
Invitation and check-in emails show the wallet buttons through the Wallet buttons shortcodes. If you've customized your email templates:
- Go to Locations → Notification Templates.
- Open your visitor invitation and visitor sign-in email templates.
- Insert the Wallet buttons shortcodes where the buttons should appear.
- Click Save.
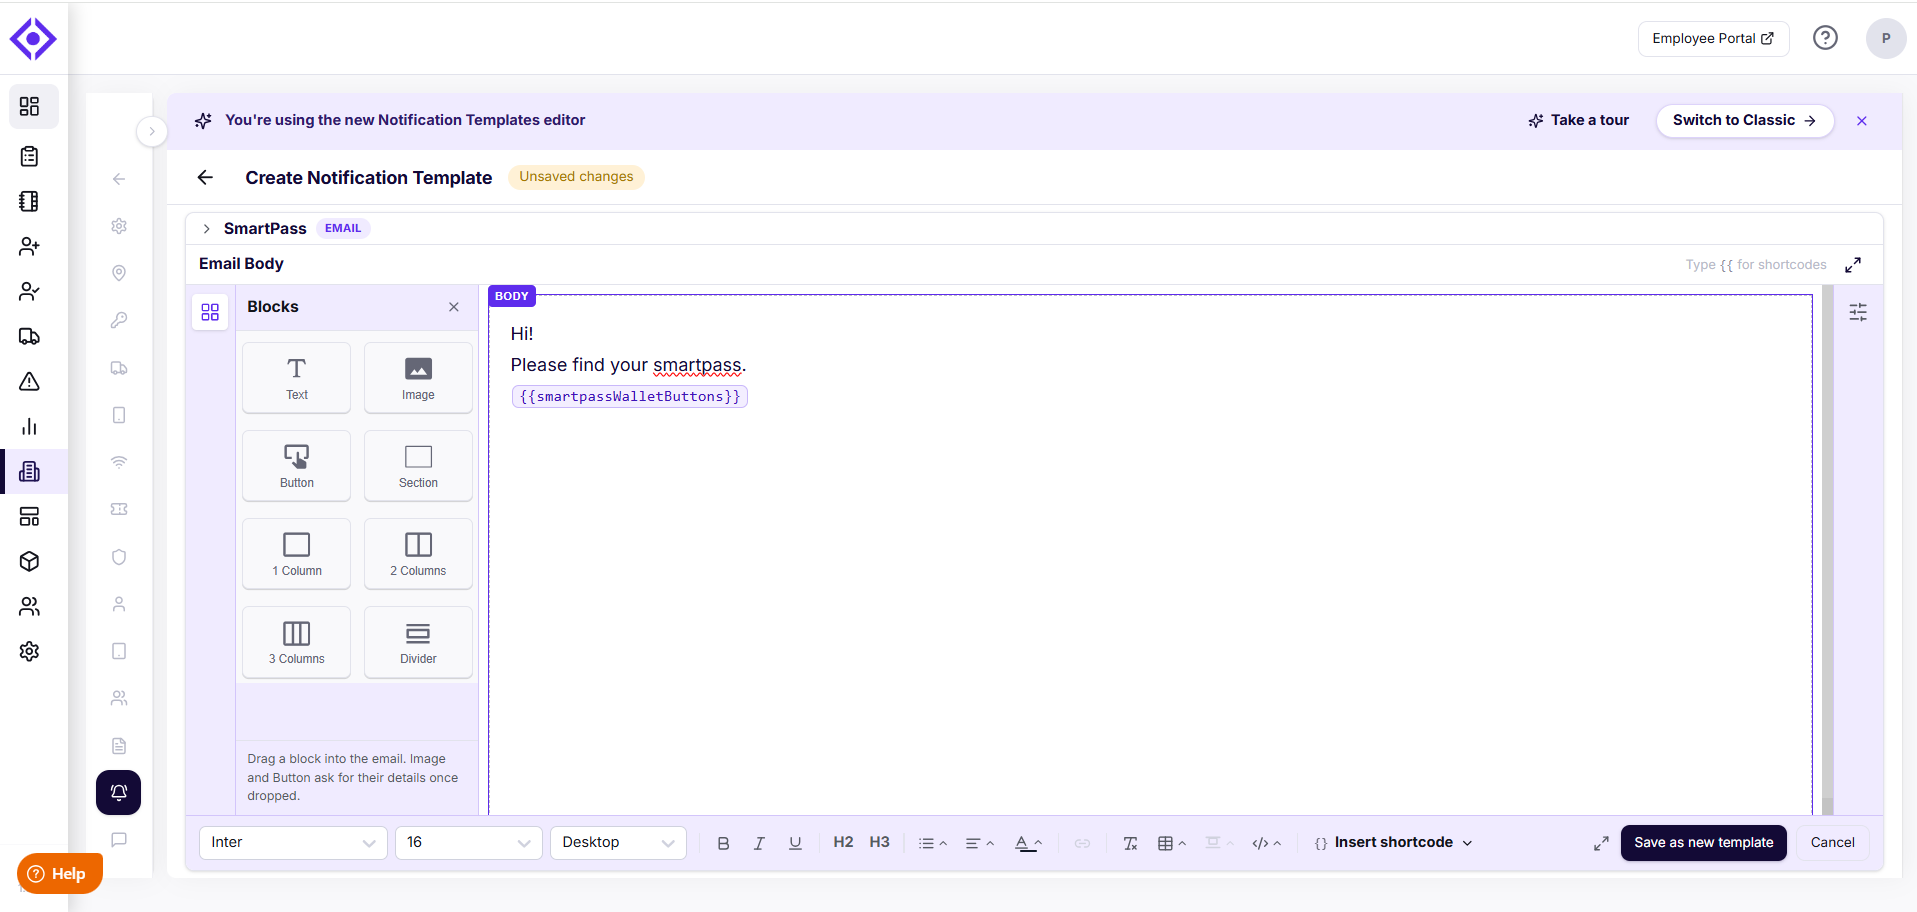
Wallet buttons only work in email, not SMS.
Your visitors can now receive SmartPasses.
Step 4: Manage Passes
Open any visitor in Visitors → Visitor Directory to see their SmartPass card:
- Status: Active or Expired
- Issued: the date the pass was created
- Issued By: who issued it
- Location: the locations the pass works at
Change which locations a pass works at
- Click Update SmartPass.
- Change the locations.
- Click Save.
The pass updates on the visitor's phone automatically. They don't need to download it again.
Revoke a pass
- Click Revoke SmartPass.
- Confirm.
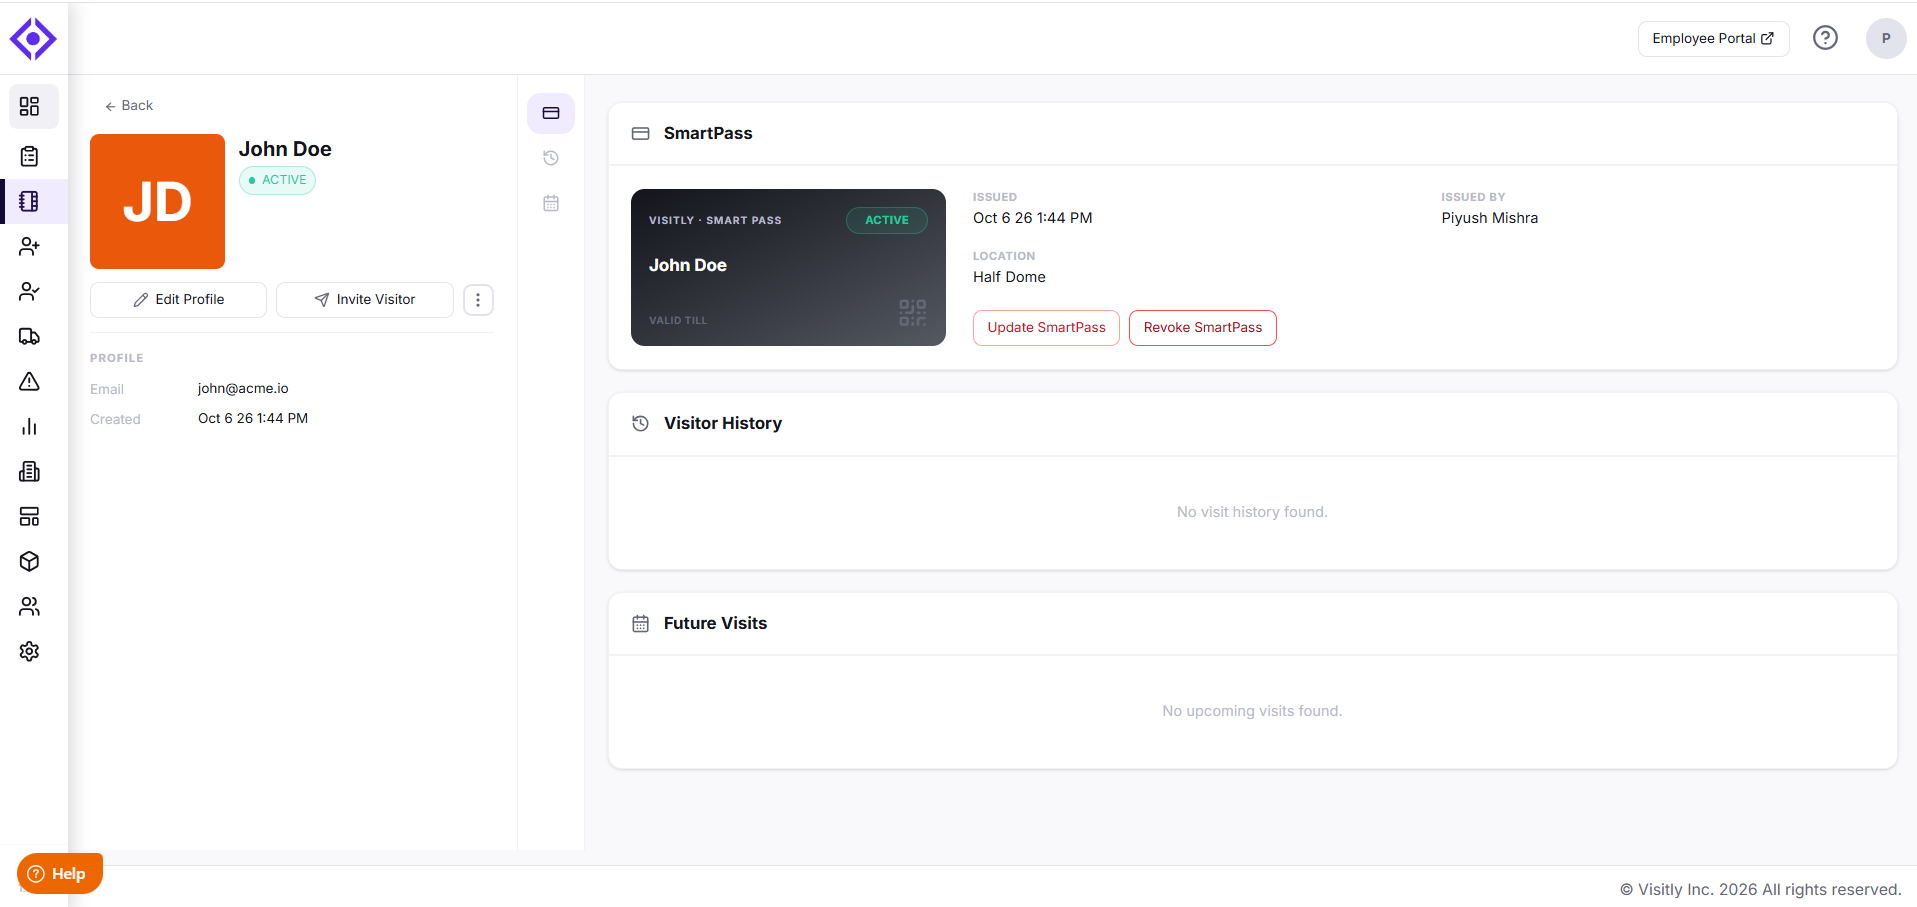
⚠️ Revoking is permanent. The pass stops working immediately and shows "Revoked" in the visitor's wallet. To give them access again, issue a new pass.
Revoke a pass when a contractor's engagement ends, a visitor should no longer have access, or a pass was issued by mistake.
Troubleshooting
I can't see SmartPass in the menu.
SmartPass isn't on your plan, or your admin role can't access it. Contact your account manager or a Global Admin.
I see "SmartPass is not available on your current plan."
Contact your Visitly account manager to add SmartPass.
A location doesn't appear when I issue a pass.
Turn on SmartPass enabled for that location in Locations → [location] → SmartPass.
I see "Failed to issue SmartPass."
You may have reached your plan's active-pass limit. Revoke unused passes or contact your account manager.
Visitors aren't getting passes automatically.
Check that Allow Contactless Check-in Using GeoFence is on for that location, that the visitor has an email address, and that you're under your pass limit.
The invitation or check-in email has no wallet buttons.
Add the Wallet buttons merge field to your email templates (see Step 3).
Visitors see "You are outside the check-in area."
Check that the pin is on the right building, and increase the Radius. 200–400 m suits most sites.
A visitor lost their phone or got a new one.
Ask them to open their original SmartPass email on the new phone. If needed, revoke the old pass and issue a new one.
Need help? Contact the Visitly support team at support@visitly.io
Was this article helpful?
That’s Great!
Thank you for your feedback
Sorry! We couldn't be helpful
Thank you for your feedback
Feedback sent
We appreciate your effort and will try to fix the article