Configure SCIM-based provisioning between Okta and Visitly to automate host directory synchronization and user group management across your organization.
Admin role required: Global Admin

Feature availability varies by plan. Check What's in each plan on our pricing page to see if it's included in yours, or talk to our sales team about upgrading.
Overview
The Visitly–Okta integration uses the SCIM (System for Cross-domain Identity Management) protocol to keep your host directory and user groups synchronized. Changes made in Okta — whether creating a user, updating a profile, deactivating an account, or managing group membership — are automatically reflected in Visitly without manual intervention.
How It Works
Host Directory Sync - Automate the lifecycle of individual host accounts (create, update, deactivate, reactivate).
User Group Sync - Push Okta groups to Visitly as User Groups and keep membership changes (add, remove, rename, delete) synchronized in real time.
Import from Visitly - Pull existing users and user groups from Visitly into Okta to match and link accounts.
Prerequisites
Complete all prerequisites before starting setup. Missing any of these will prevent the integration from working.
- Global Administrator access to the Visitly Dashboard.
- Administrator access to the Okta Admin Console.
- The Visitly SCIM application added to your Okta tenant (available in the Okta Integration Network).
SCIM Features
Visitly's SCIM integration with Okta supports the following features:
- Create users — When a new user is created in Okta and assigned to the Visitly application, a corresponding host account is automatically created in Visitly. User creation does not require a password to be included in the SCIM payload.
- Update user attributes — Profile changes made in Okta (name, email, phone number, department) sync to the user's Visitly host profile in real time.
- Deactivate users — Deactivating a user or removing their access to the Visitly application in Okta deactivates the corresponding host account in Visitly. The account is not deleted — visit history and audit records are preserved.
- Reactivate users — Reactivating a previously deactivated user in Okta restores their host account in Visitly with all historical data intact.
- Import users — Existing Visitly host accounts can be imported into Okta to match and link with Okta user profiles.
- Import groups — Existing Visitly User Groups can be imported into Okta alongside user import.
- Group push — Okta groups can be pushed to Visitly as User Groups, with create, update, delete, and membership changes (add, remove, rename) kept in sync.
- Silent provisioning — New host accounts can be created in Visitly without sending welcome or notification emails, useful for bulk onboarding.
Configuration Steps
Step A: Generate the API Key in Visitly
Log in to the Visitly Dashboard (app.visitly.io) as a Global Administrator.
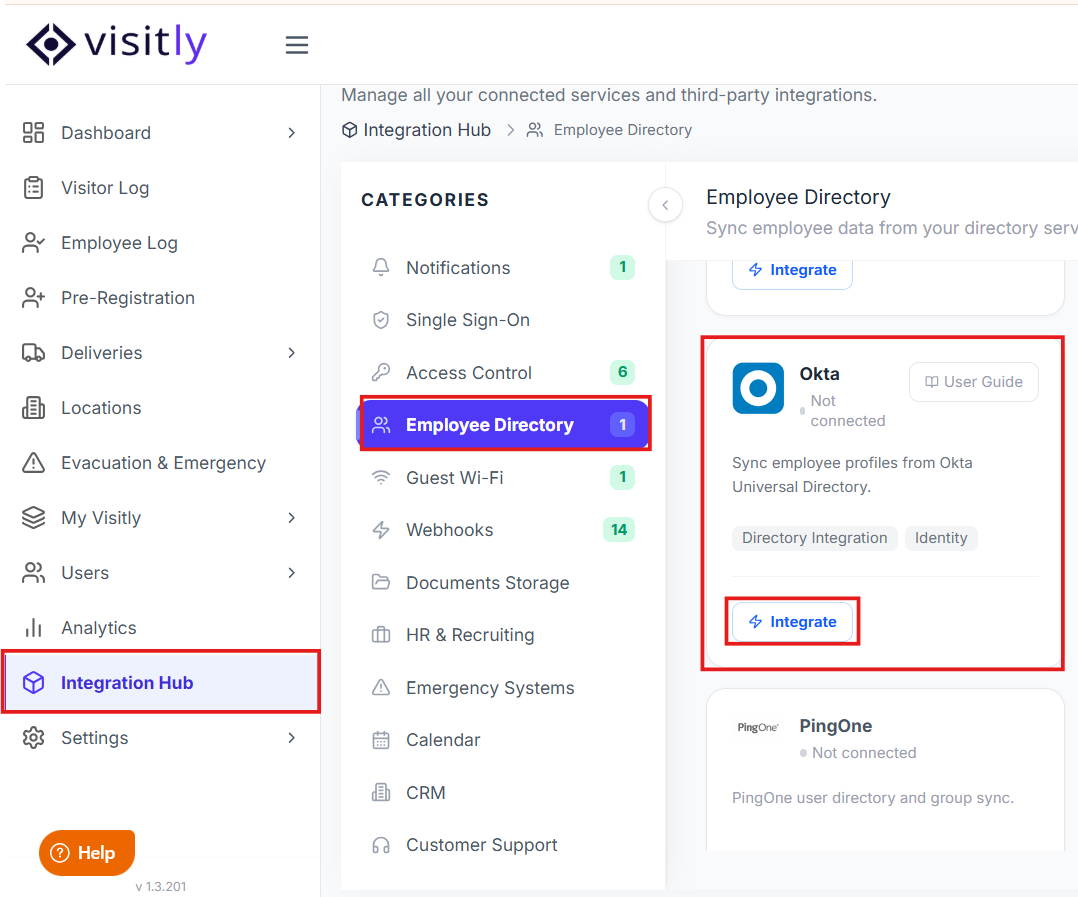
Navigate to Integrations Hub → Employee Directory → Okta.
Click Integrate next to Okta.
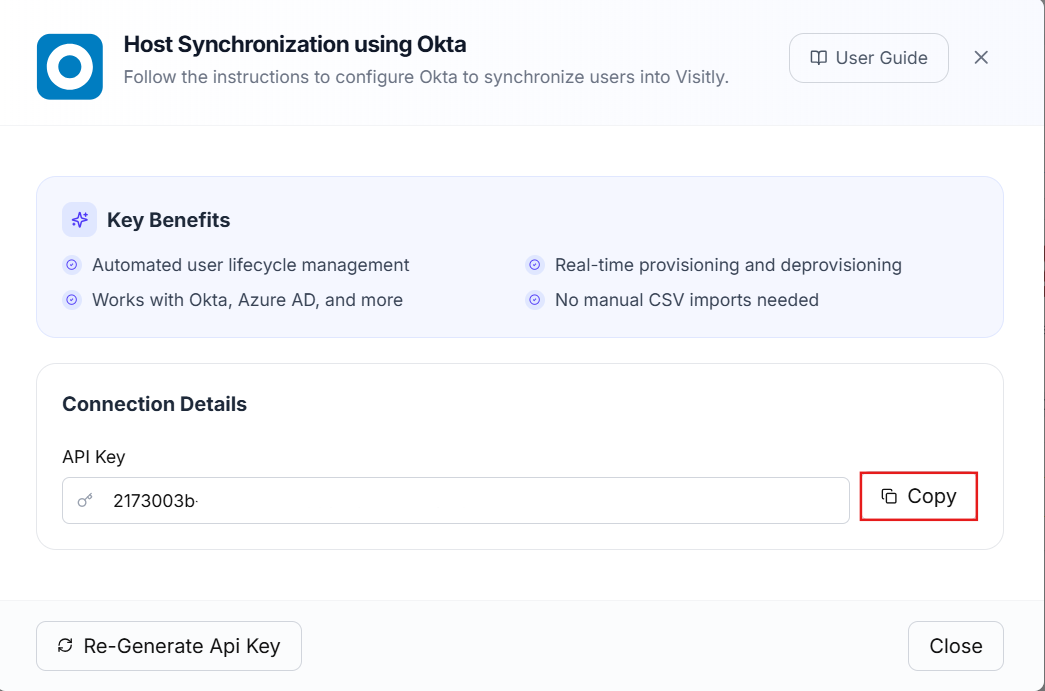
Copy the generated API Key — you will need it in the next step.
Step B: Configure Provisioning in Okta
In the Okta Admin Console, open the Visitly SCIM application.
Go to the Provisioning tab and click Integration.
Under API Integration, paste the API Key generated in Step A.
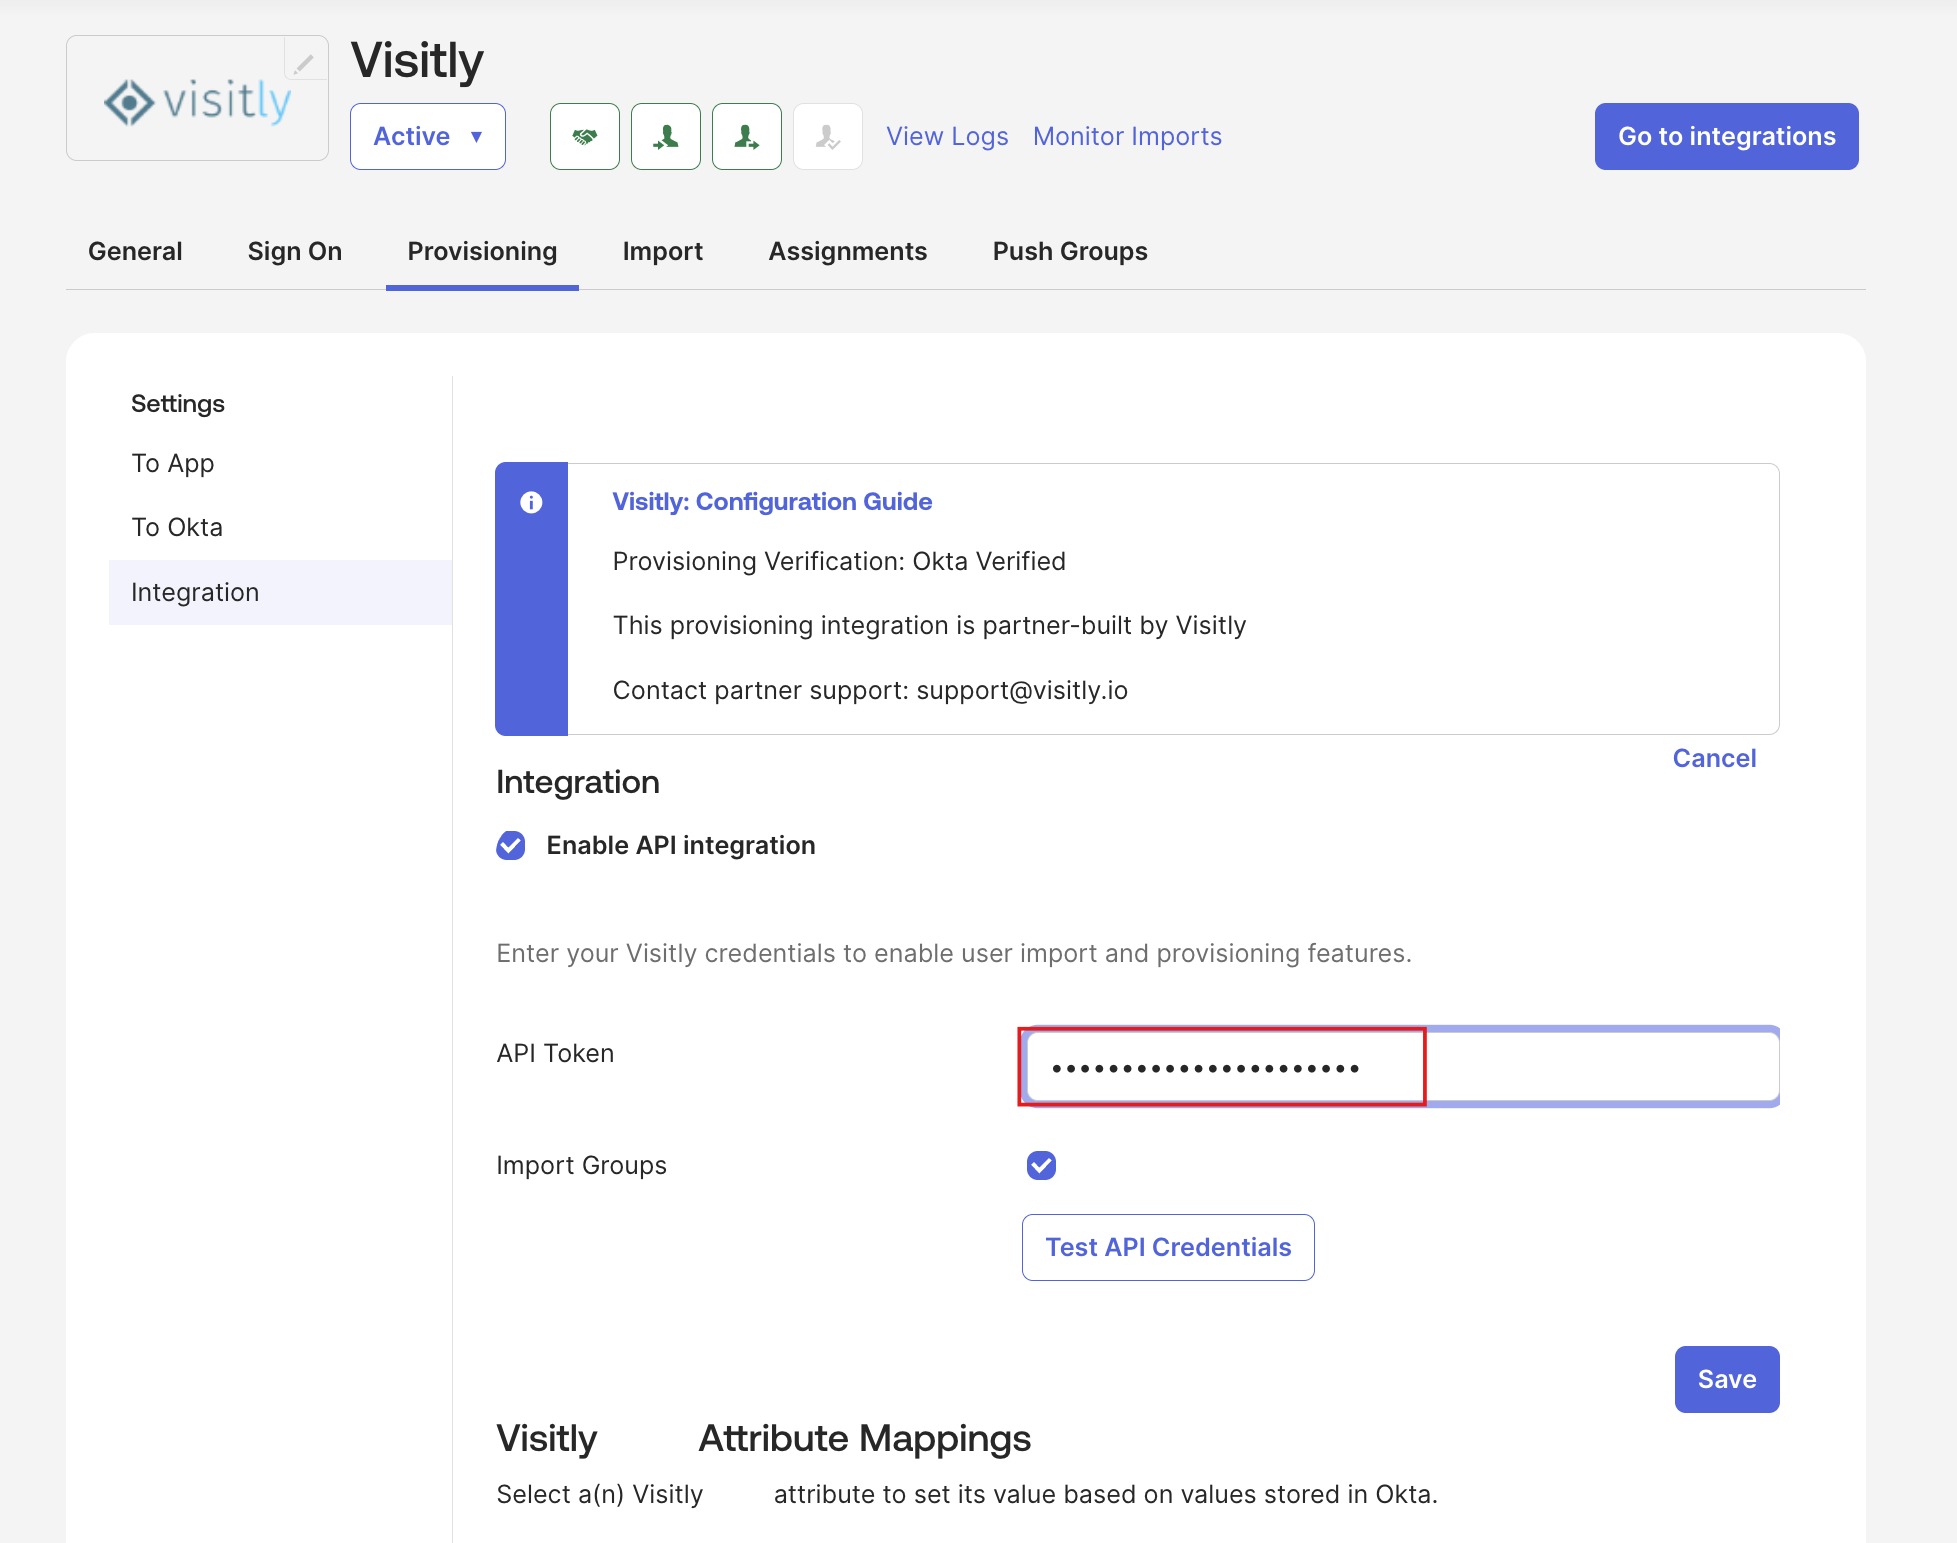
Click Test API Credentials to verify the connection, then click Save.
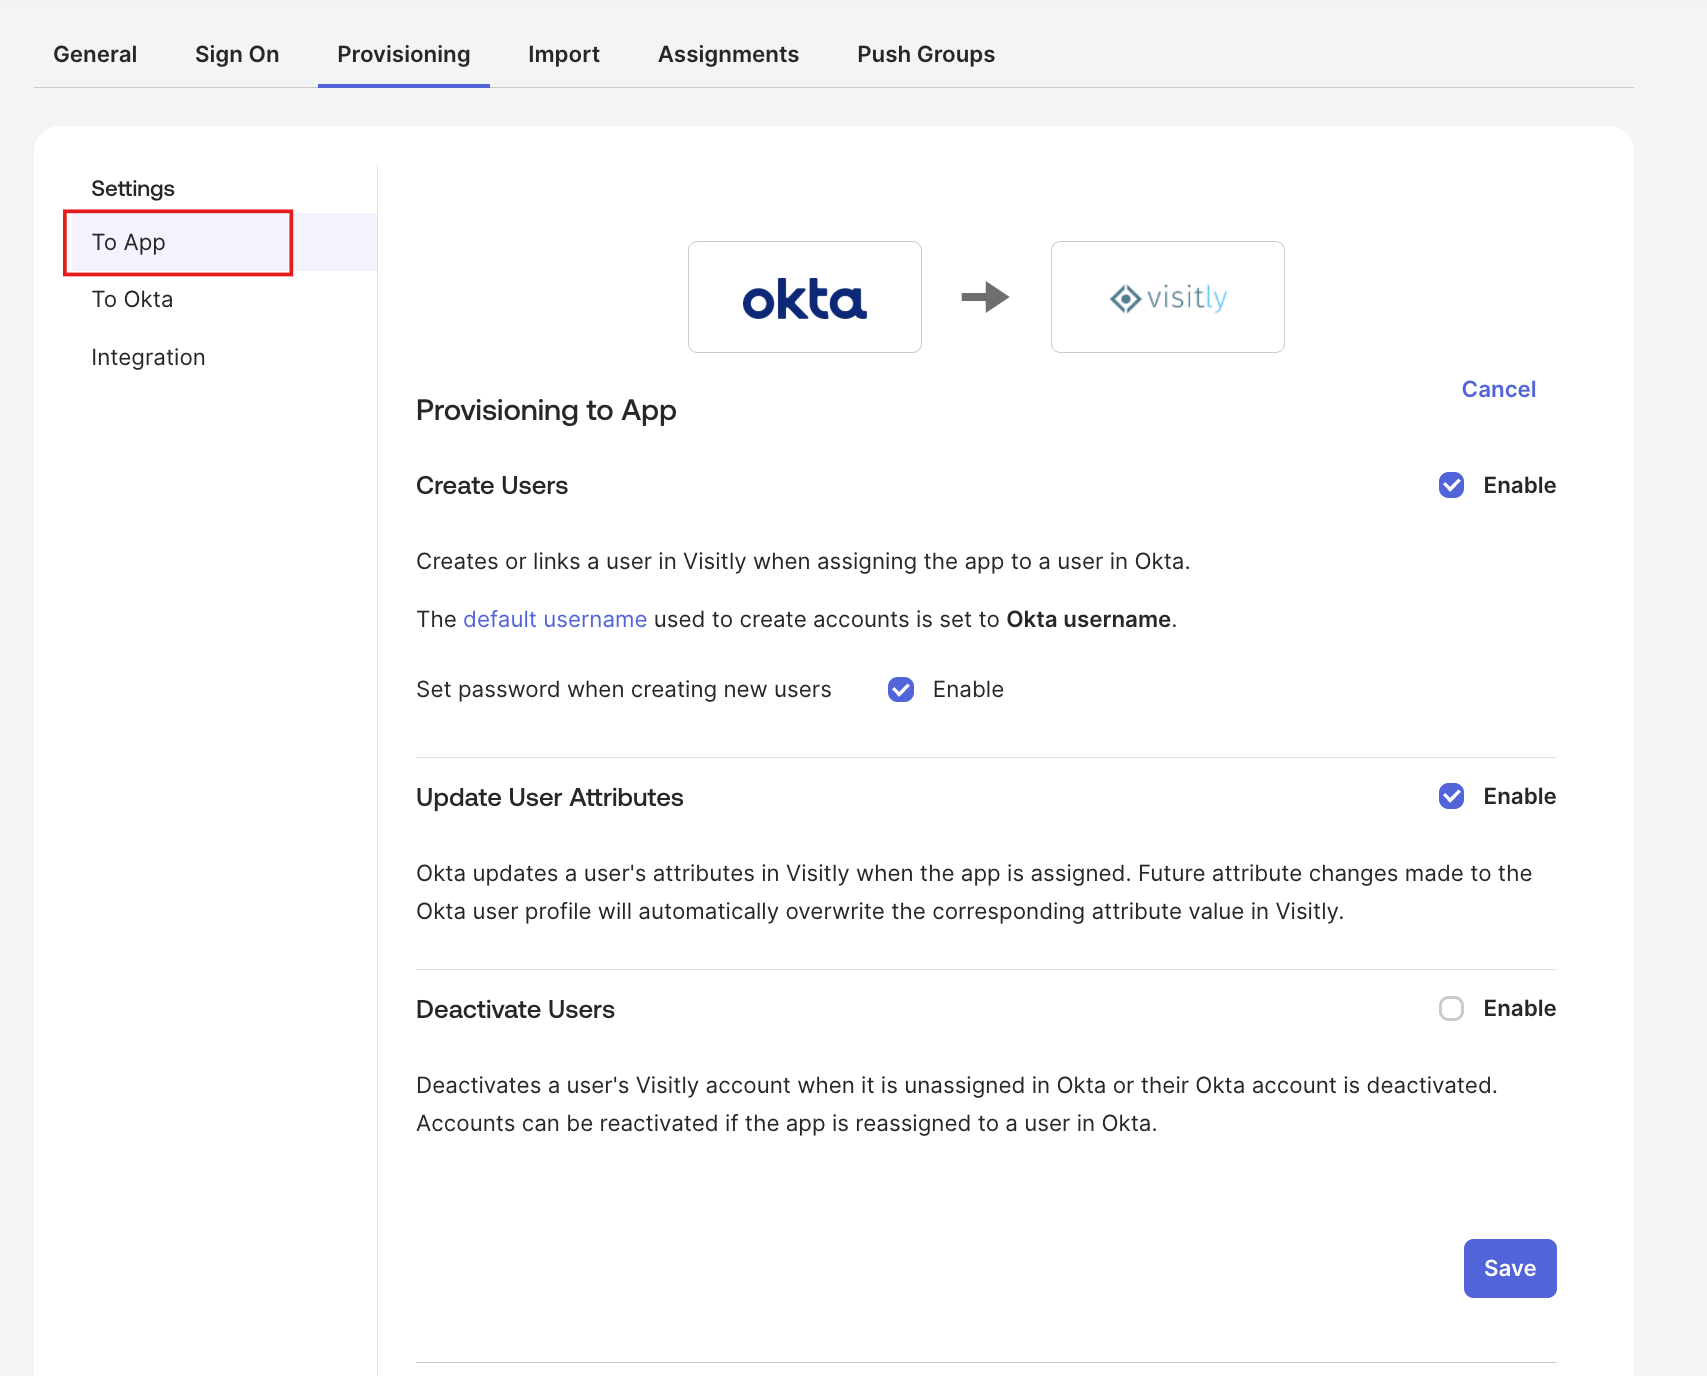
Under Provisioning → To App, select the provisioning features you want to enable.
Assign people to the Visitly application as needed to complete the initial setup.
Host Directory Sync Features
When you enable provisioning, the following features become available. Each one controls a specific part of the host account lifecycle between Okta and Visitly.
Okta → Visitly (Push)
These features push changes from Okta into Visitly automatically.
Push New Users
When you create a new user in Okta and assign them to the Visitly application, a corresponding host account is automatically created in Visitly. No manual entry is needed on the Visitly side. Follow the given steps to push new users to Visitly application:
1. In Okta, go to the Visitly application, navigate to assignments.
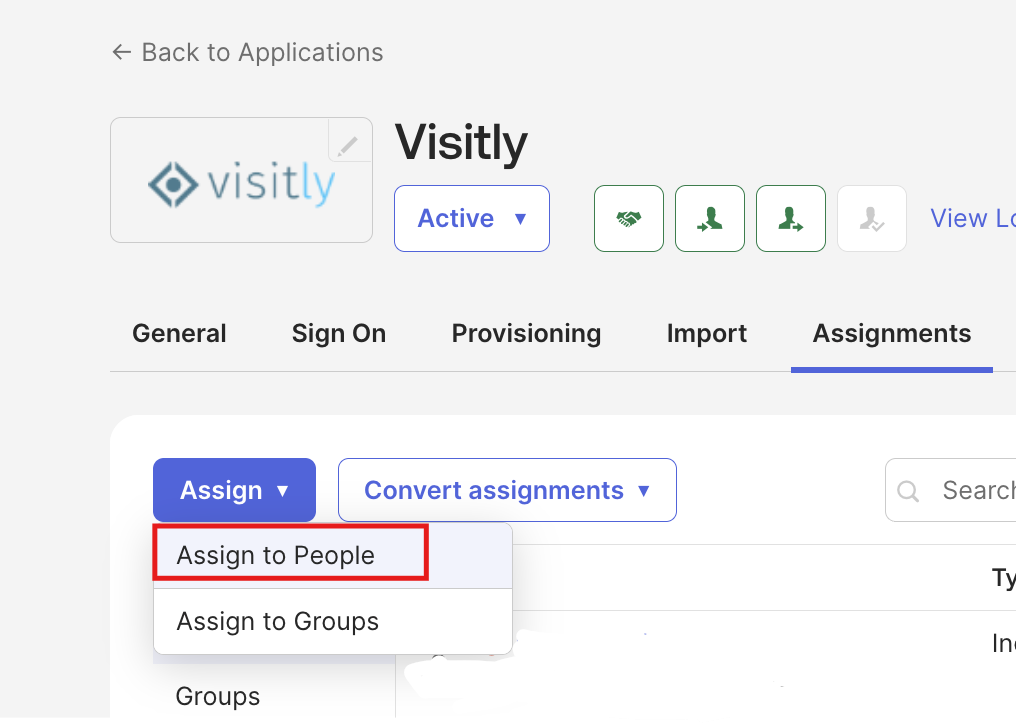
2. Click on Assign, select Assign to People.
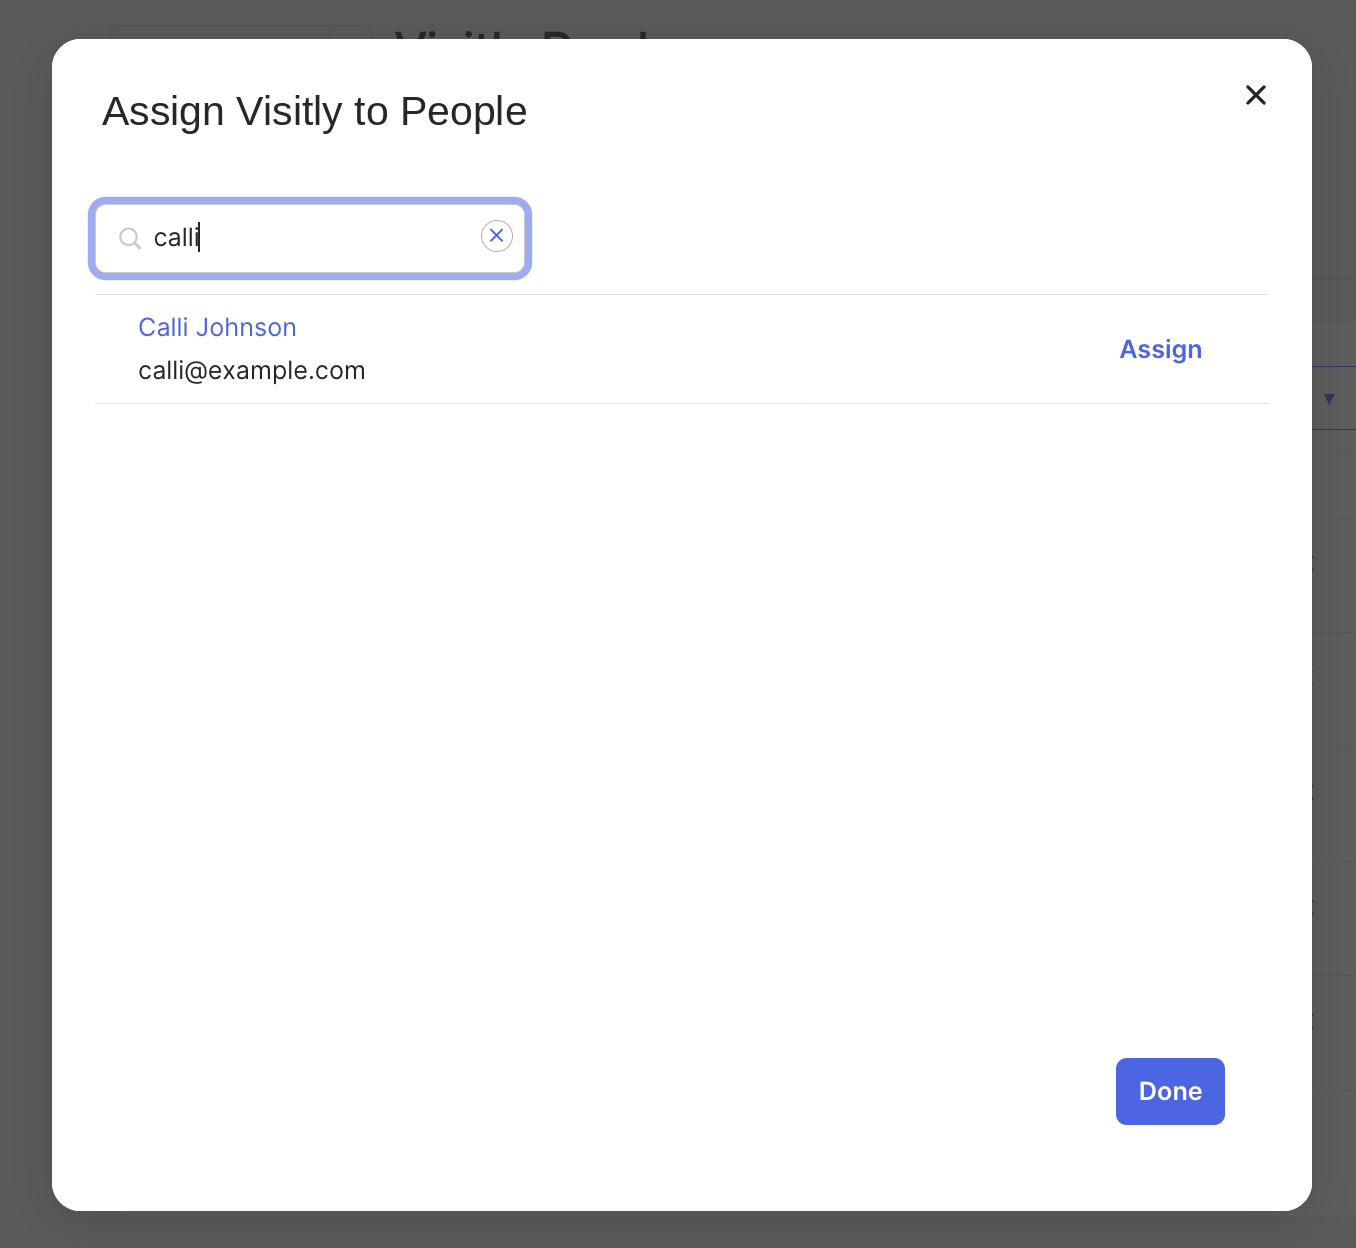
3. Click on assign next to the user profile to select the user and then click on done.
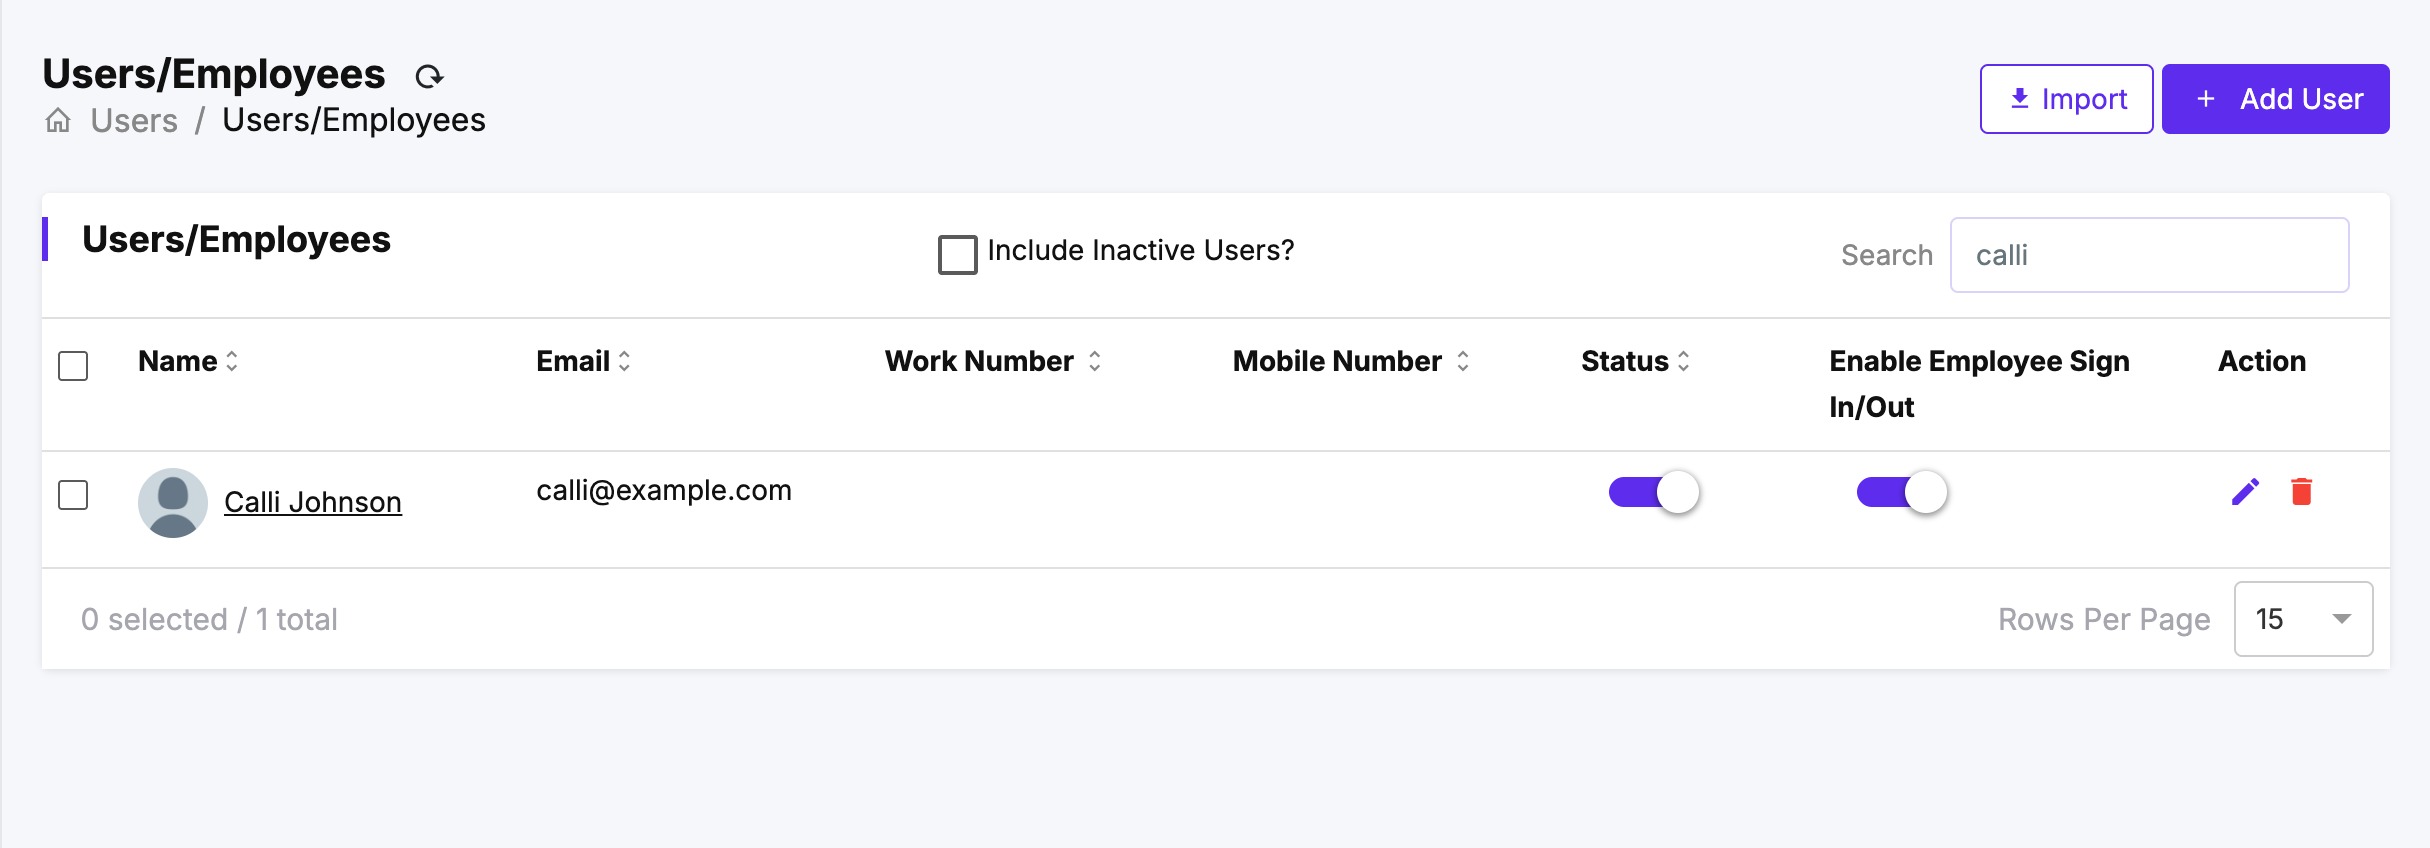
4. Verify in Visitly: Navigate to Users → User/Employee in the Visitly Dashboard and confirm the user appears with correct details.
User Group Sync
In addition to individual host provisioning, you can push Okta groups to Visitly as User Groups. Once a group is linked, all membership and group-level changes sync to Visitly in real time.
Setting Up Group Sync
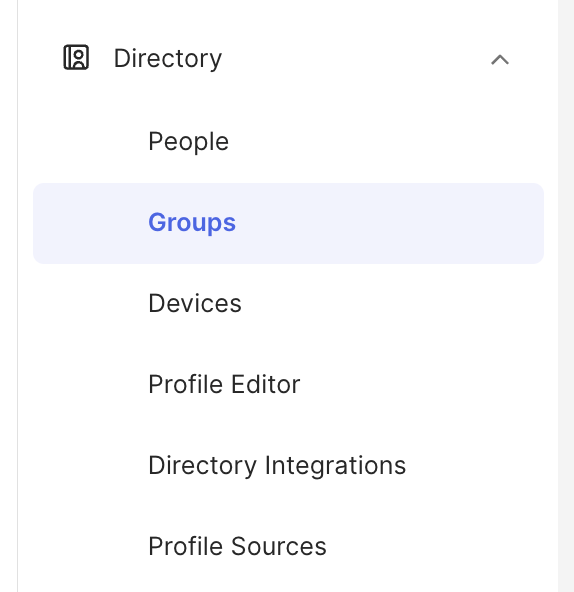
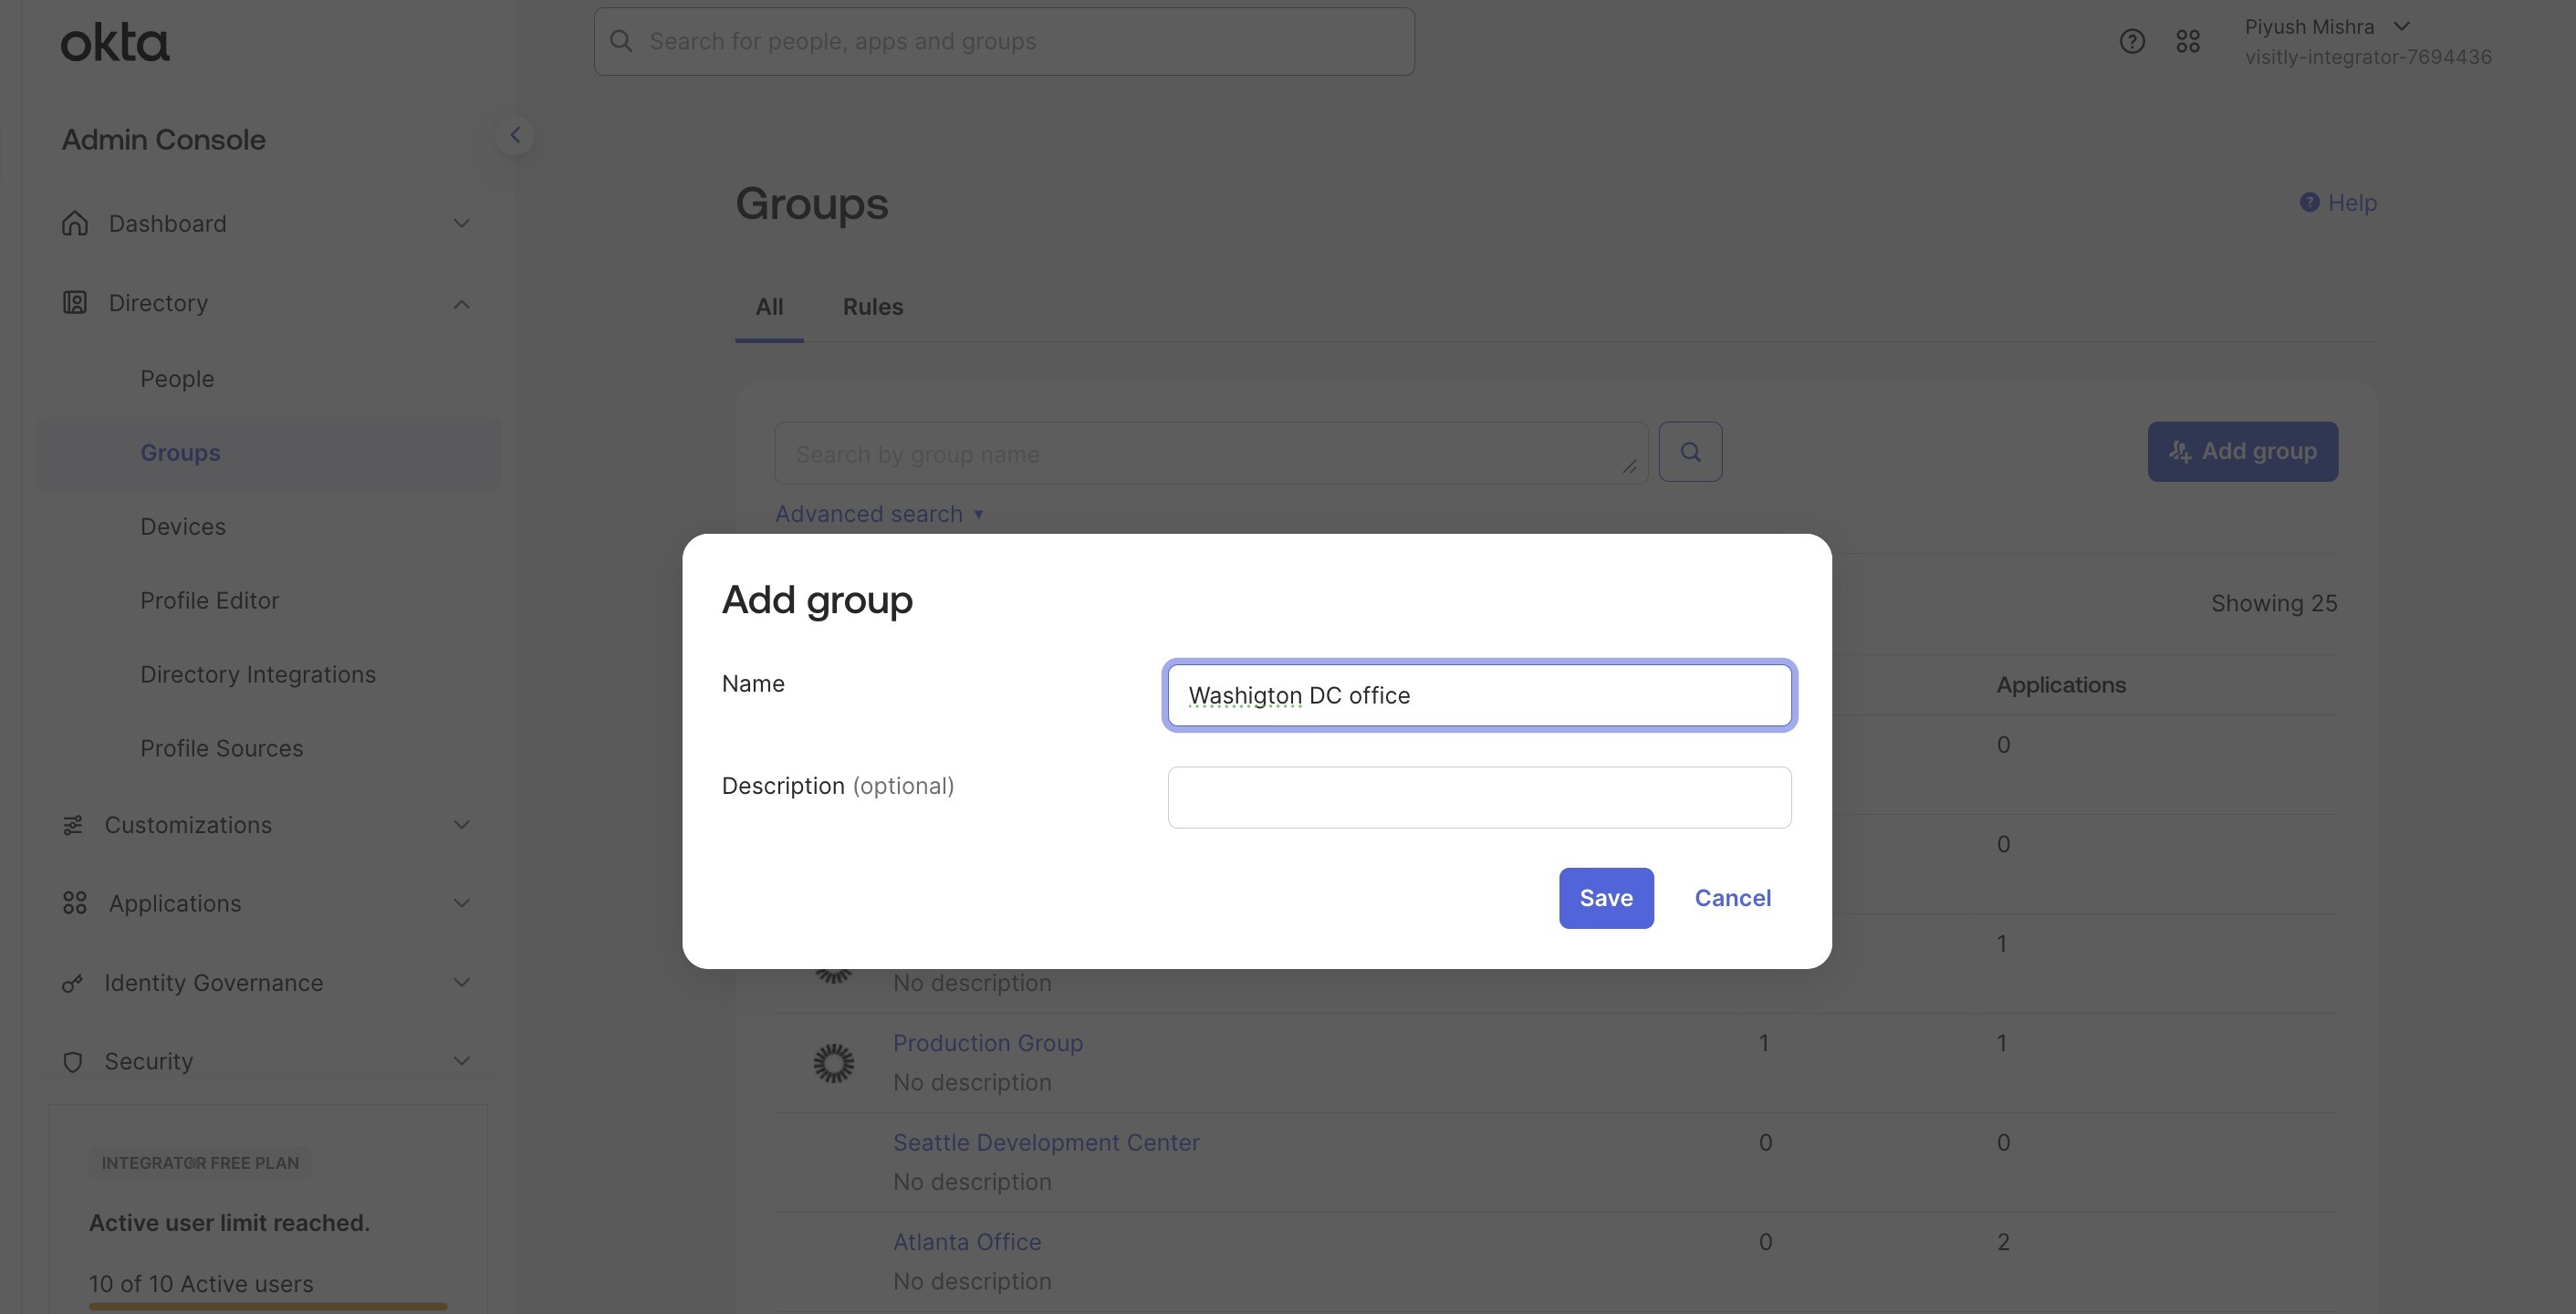
In the Okta Admin Console, navigate to Directory → Groups and click Add Group.
Enter a group name (for example, "Washington DC Office") and save.
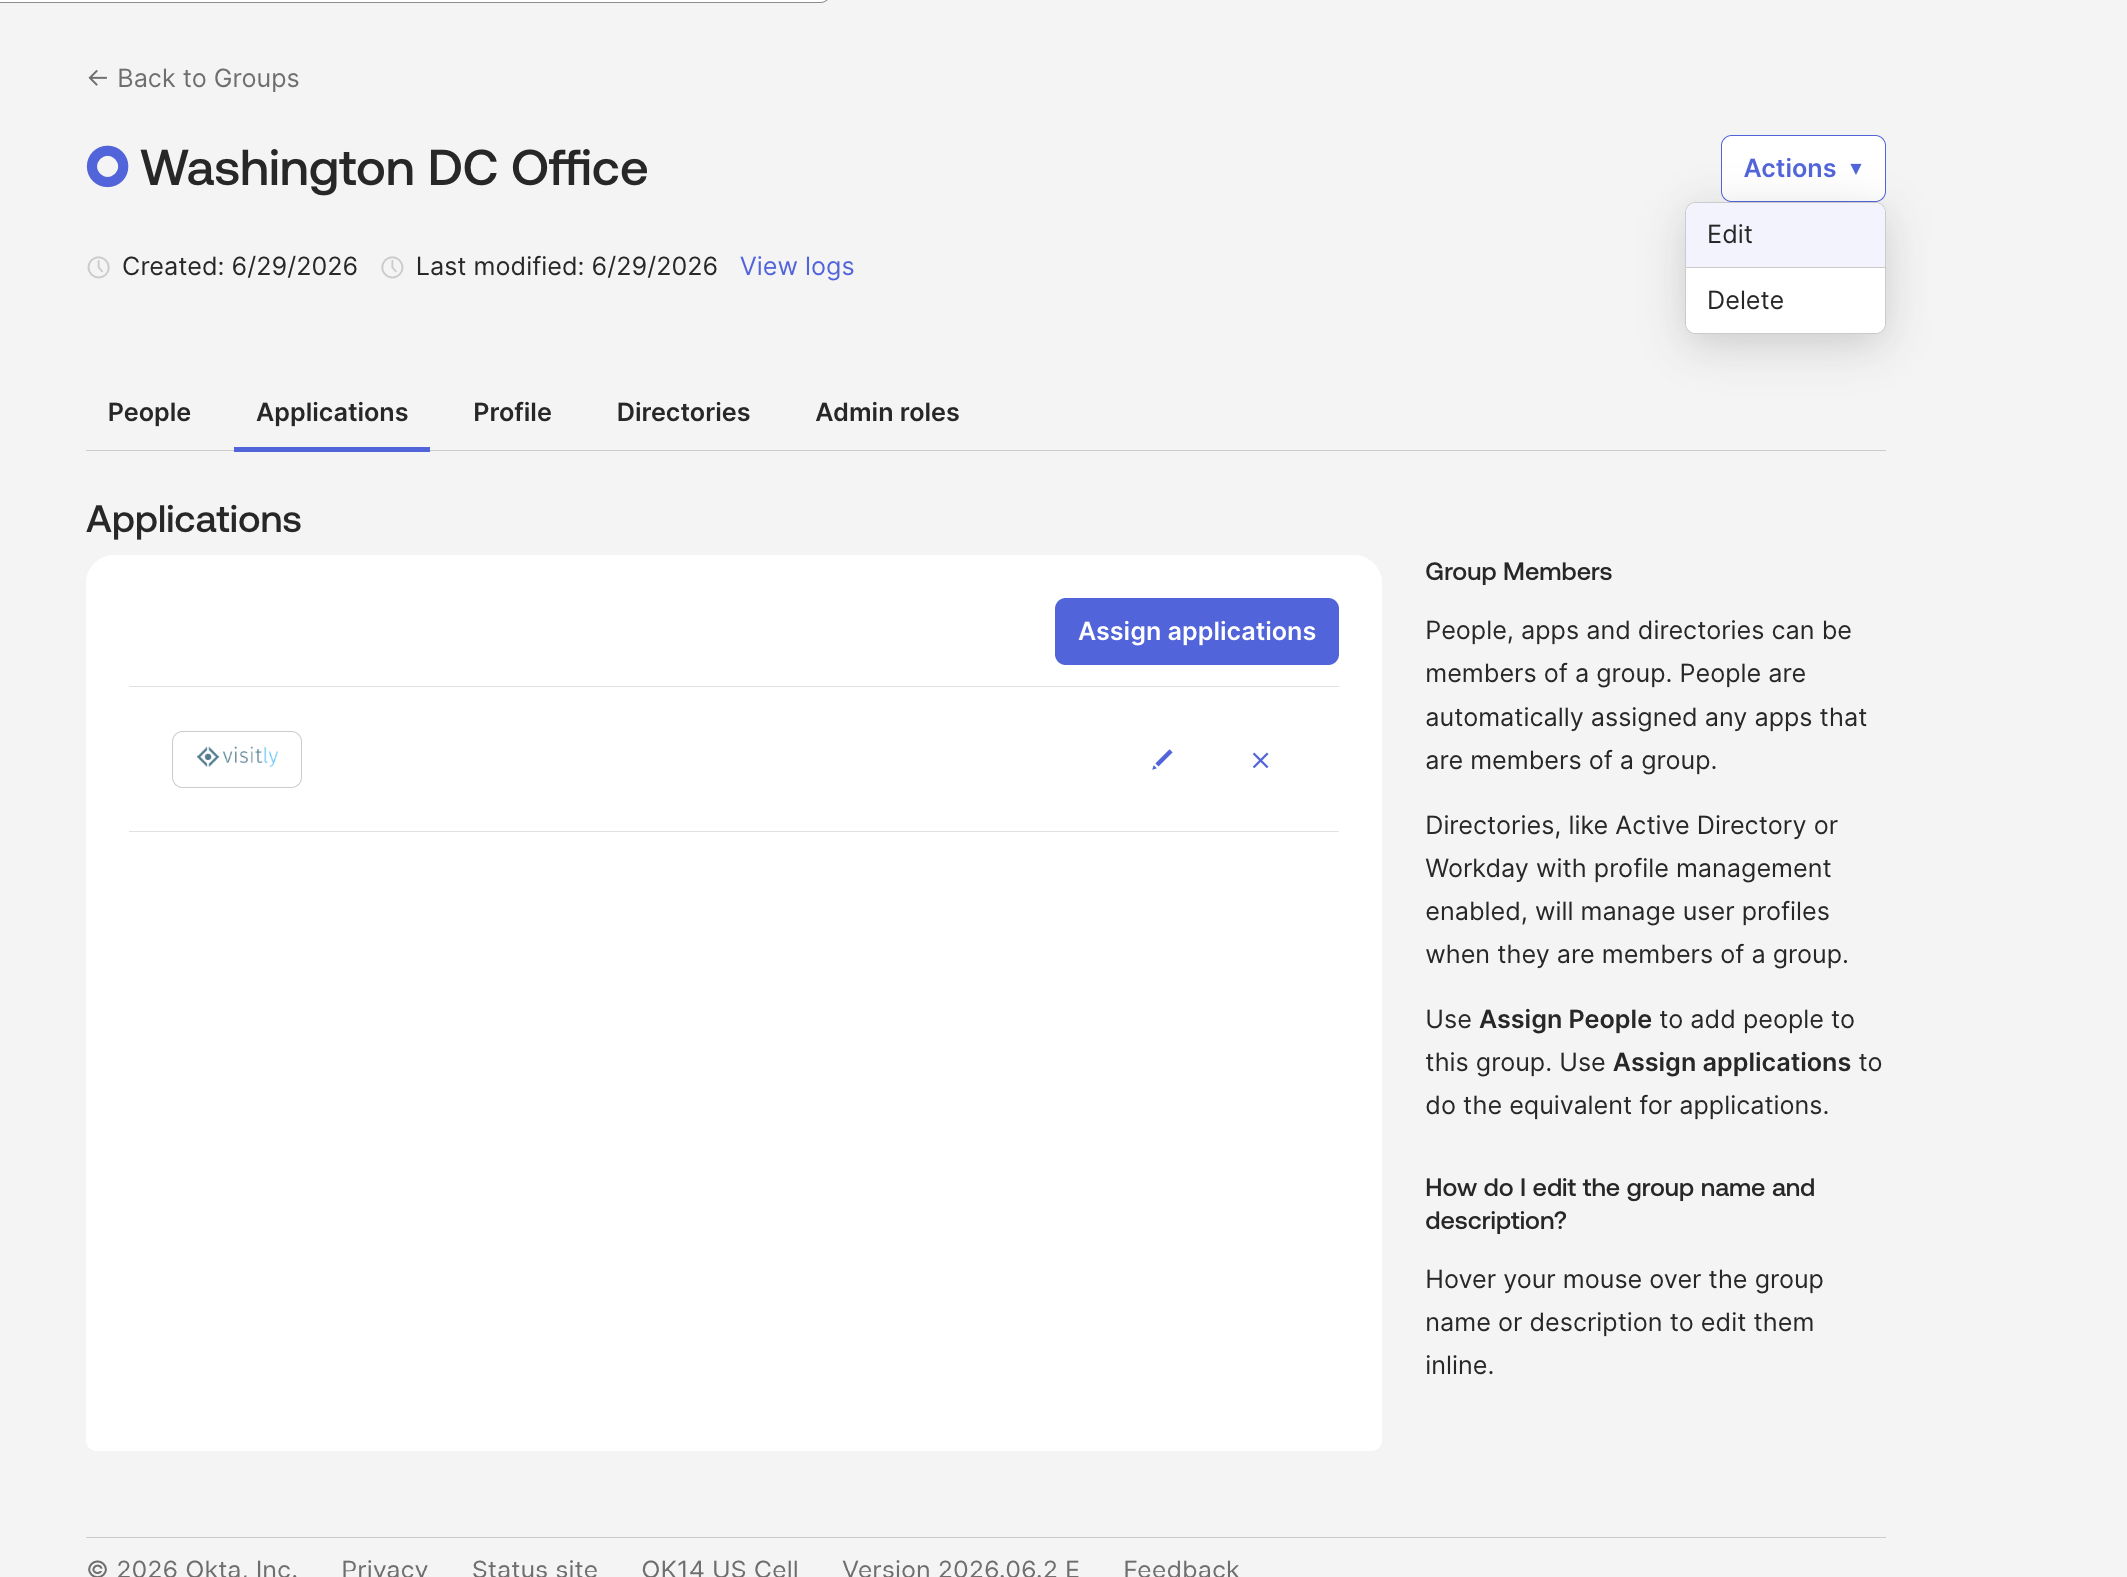
Open the newly created group and go to the Applications tab.
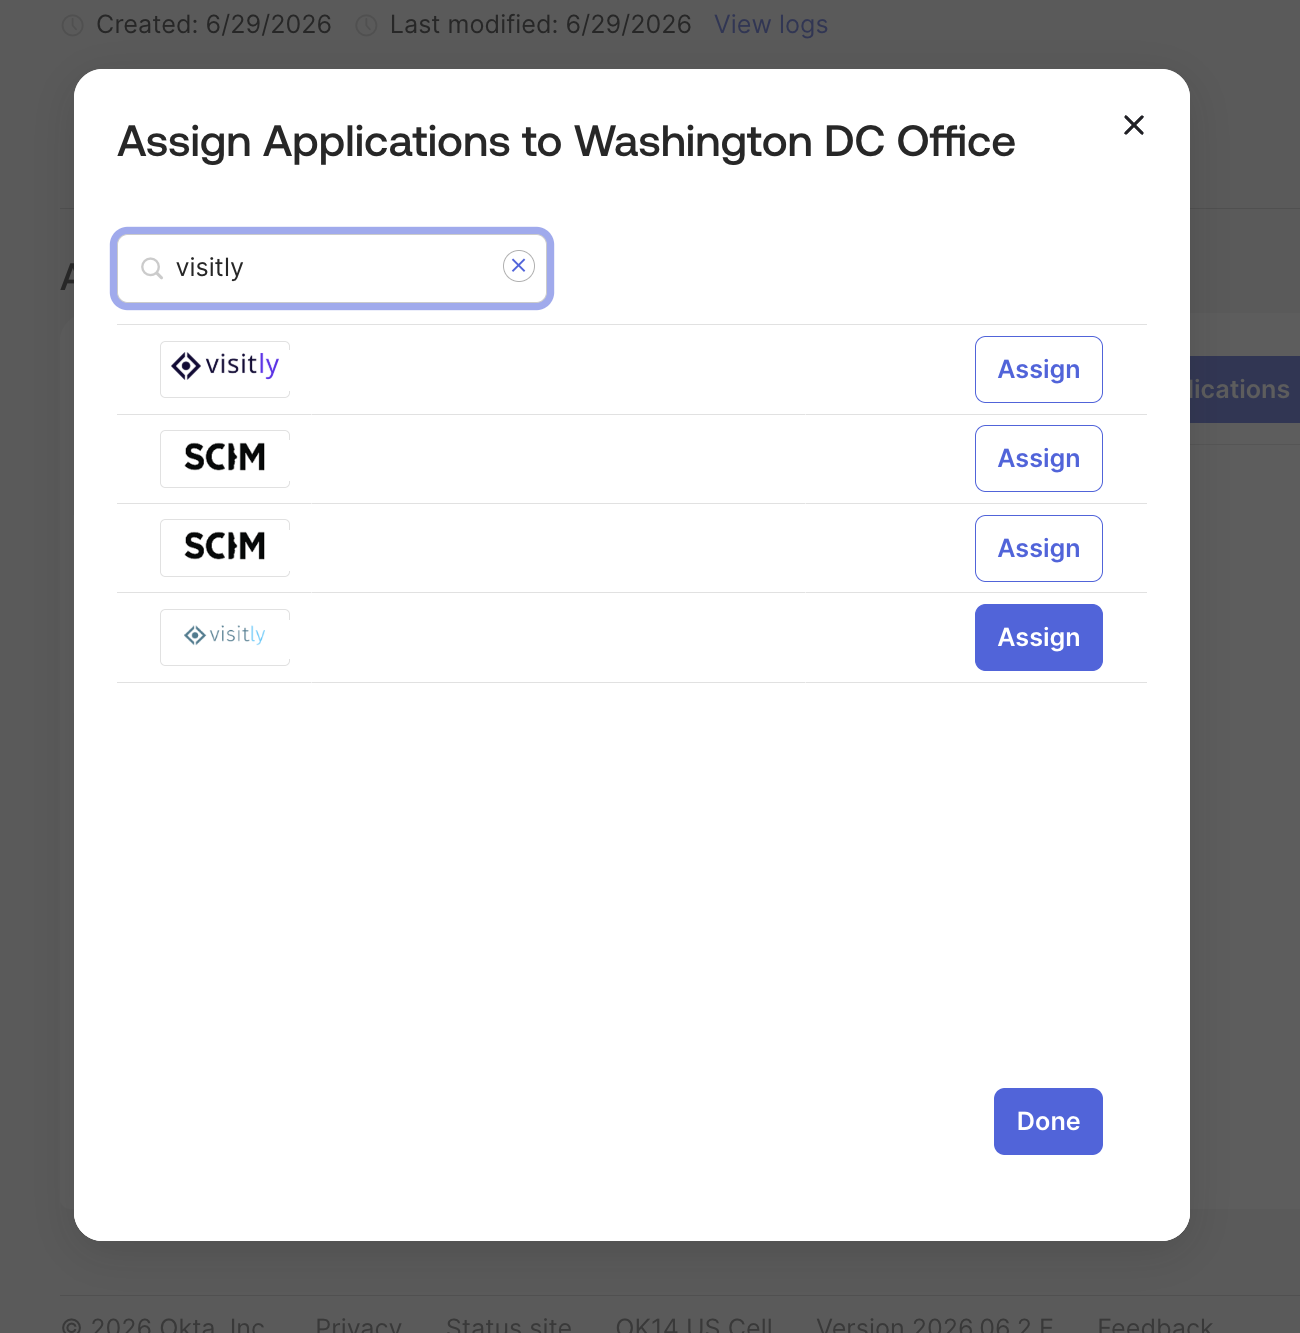
Assign the Visitly SCIM application to the group by clicking Assign applications and selecting your Visitly app.
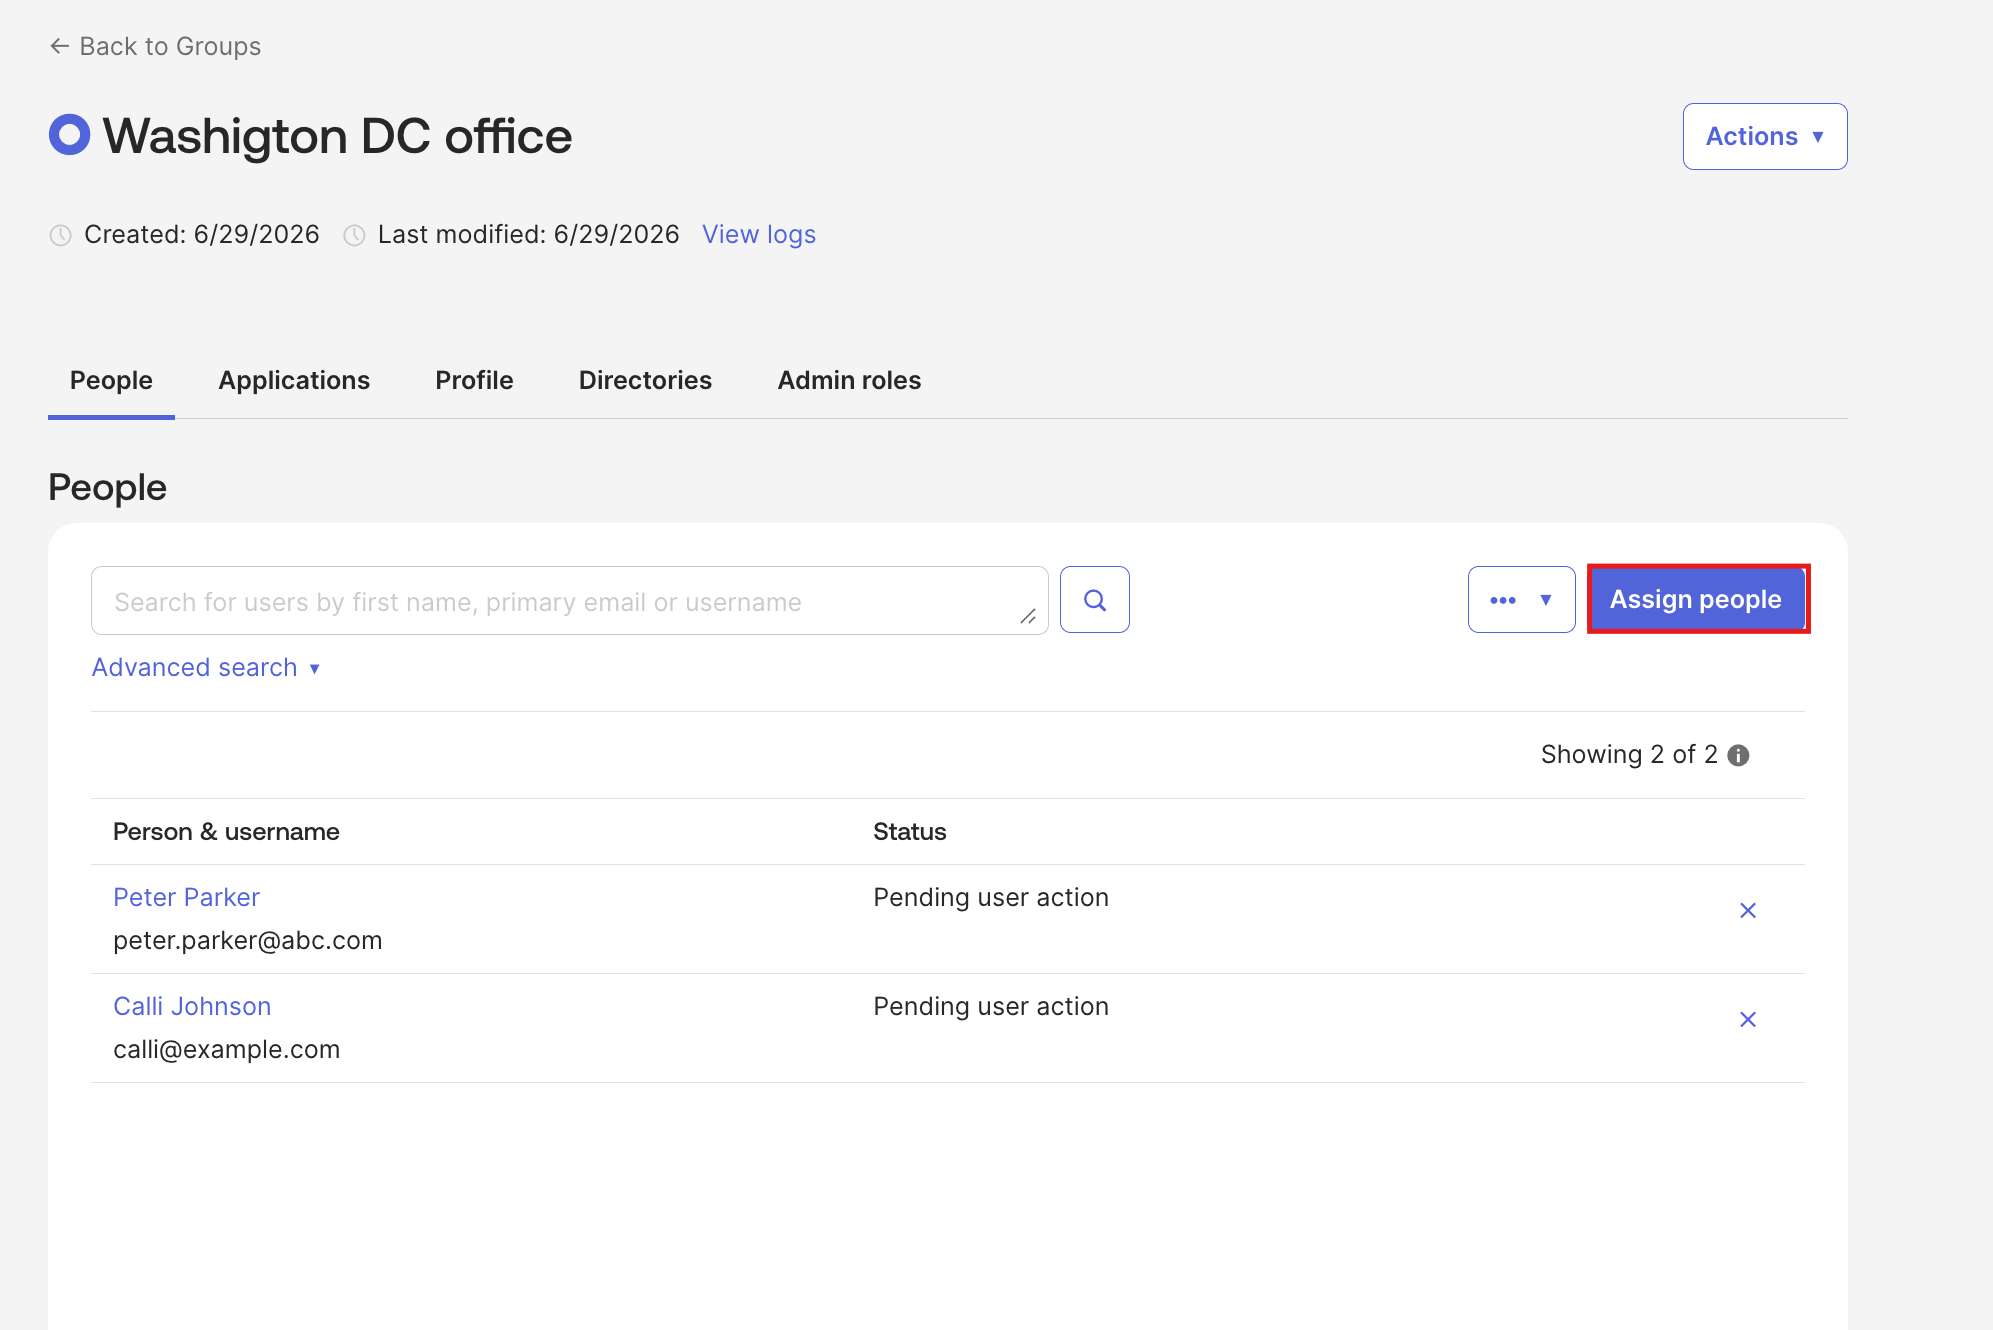
Switch to the People tab and click Assign people to add members to the group.
In the Visitly SCIM application, navigate to the Push Groups tab.
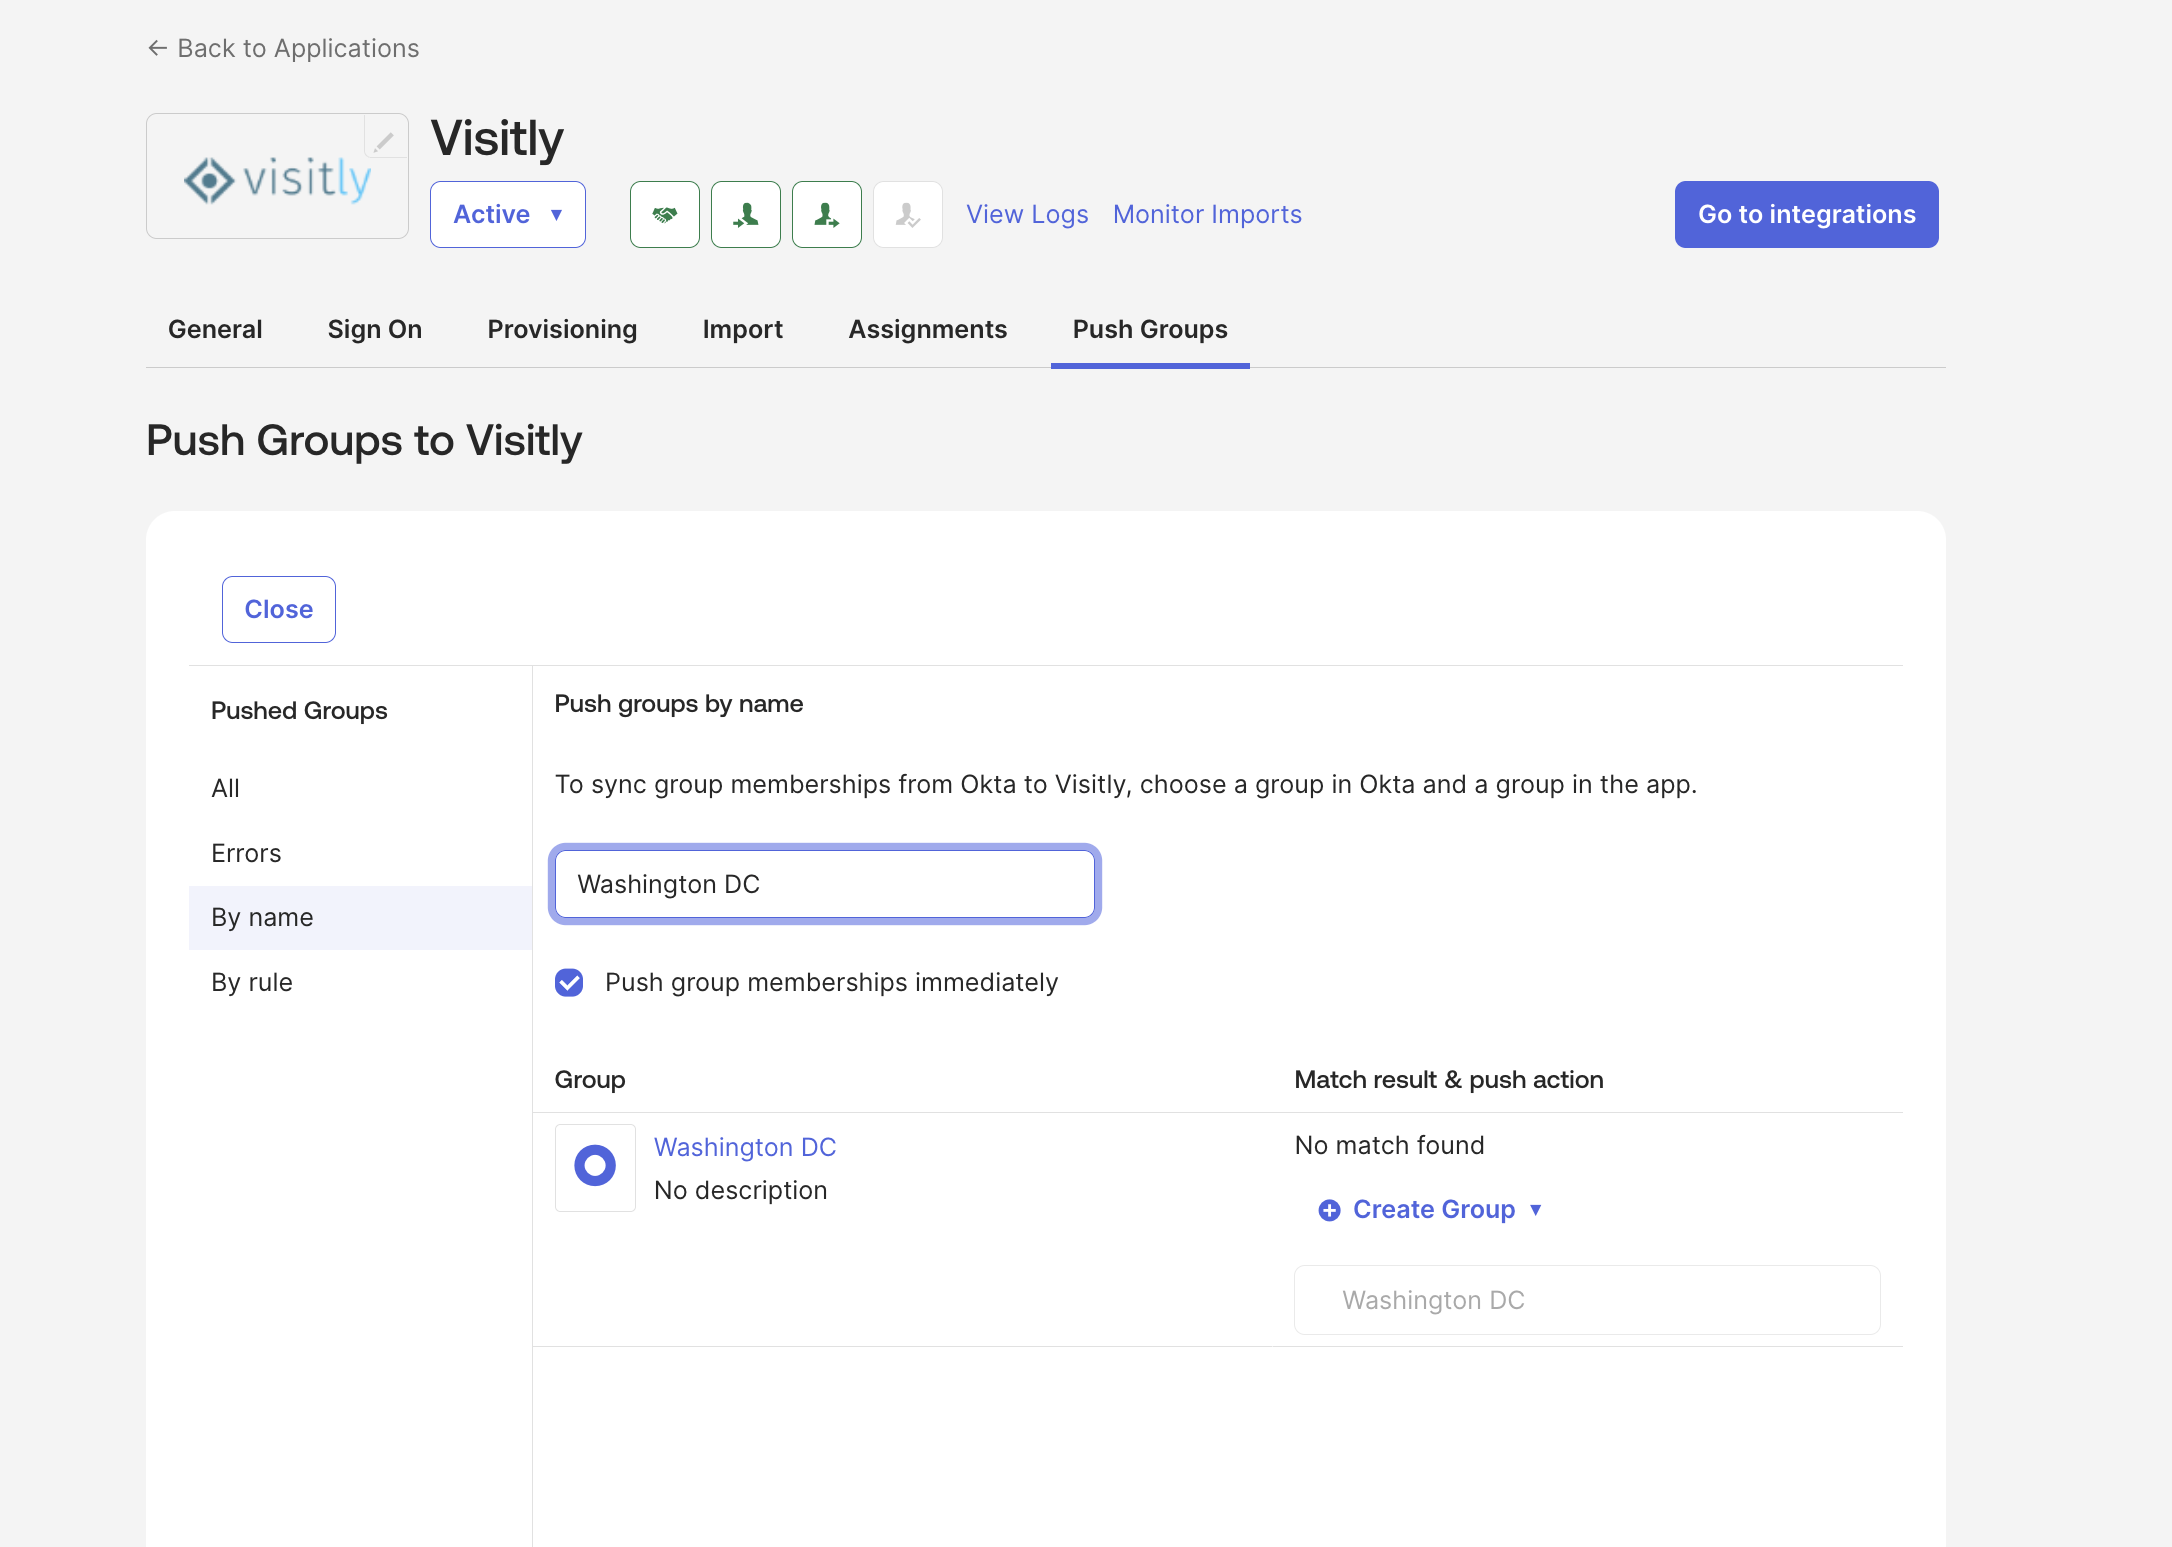
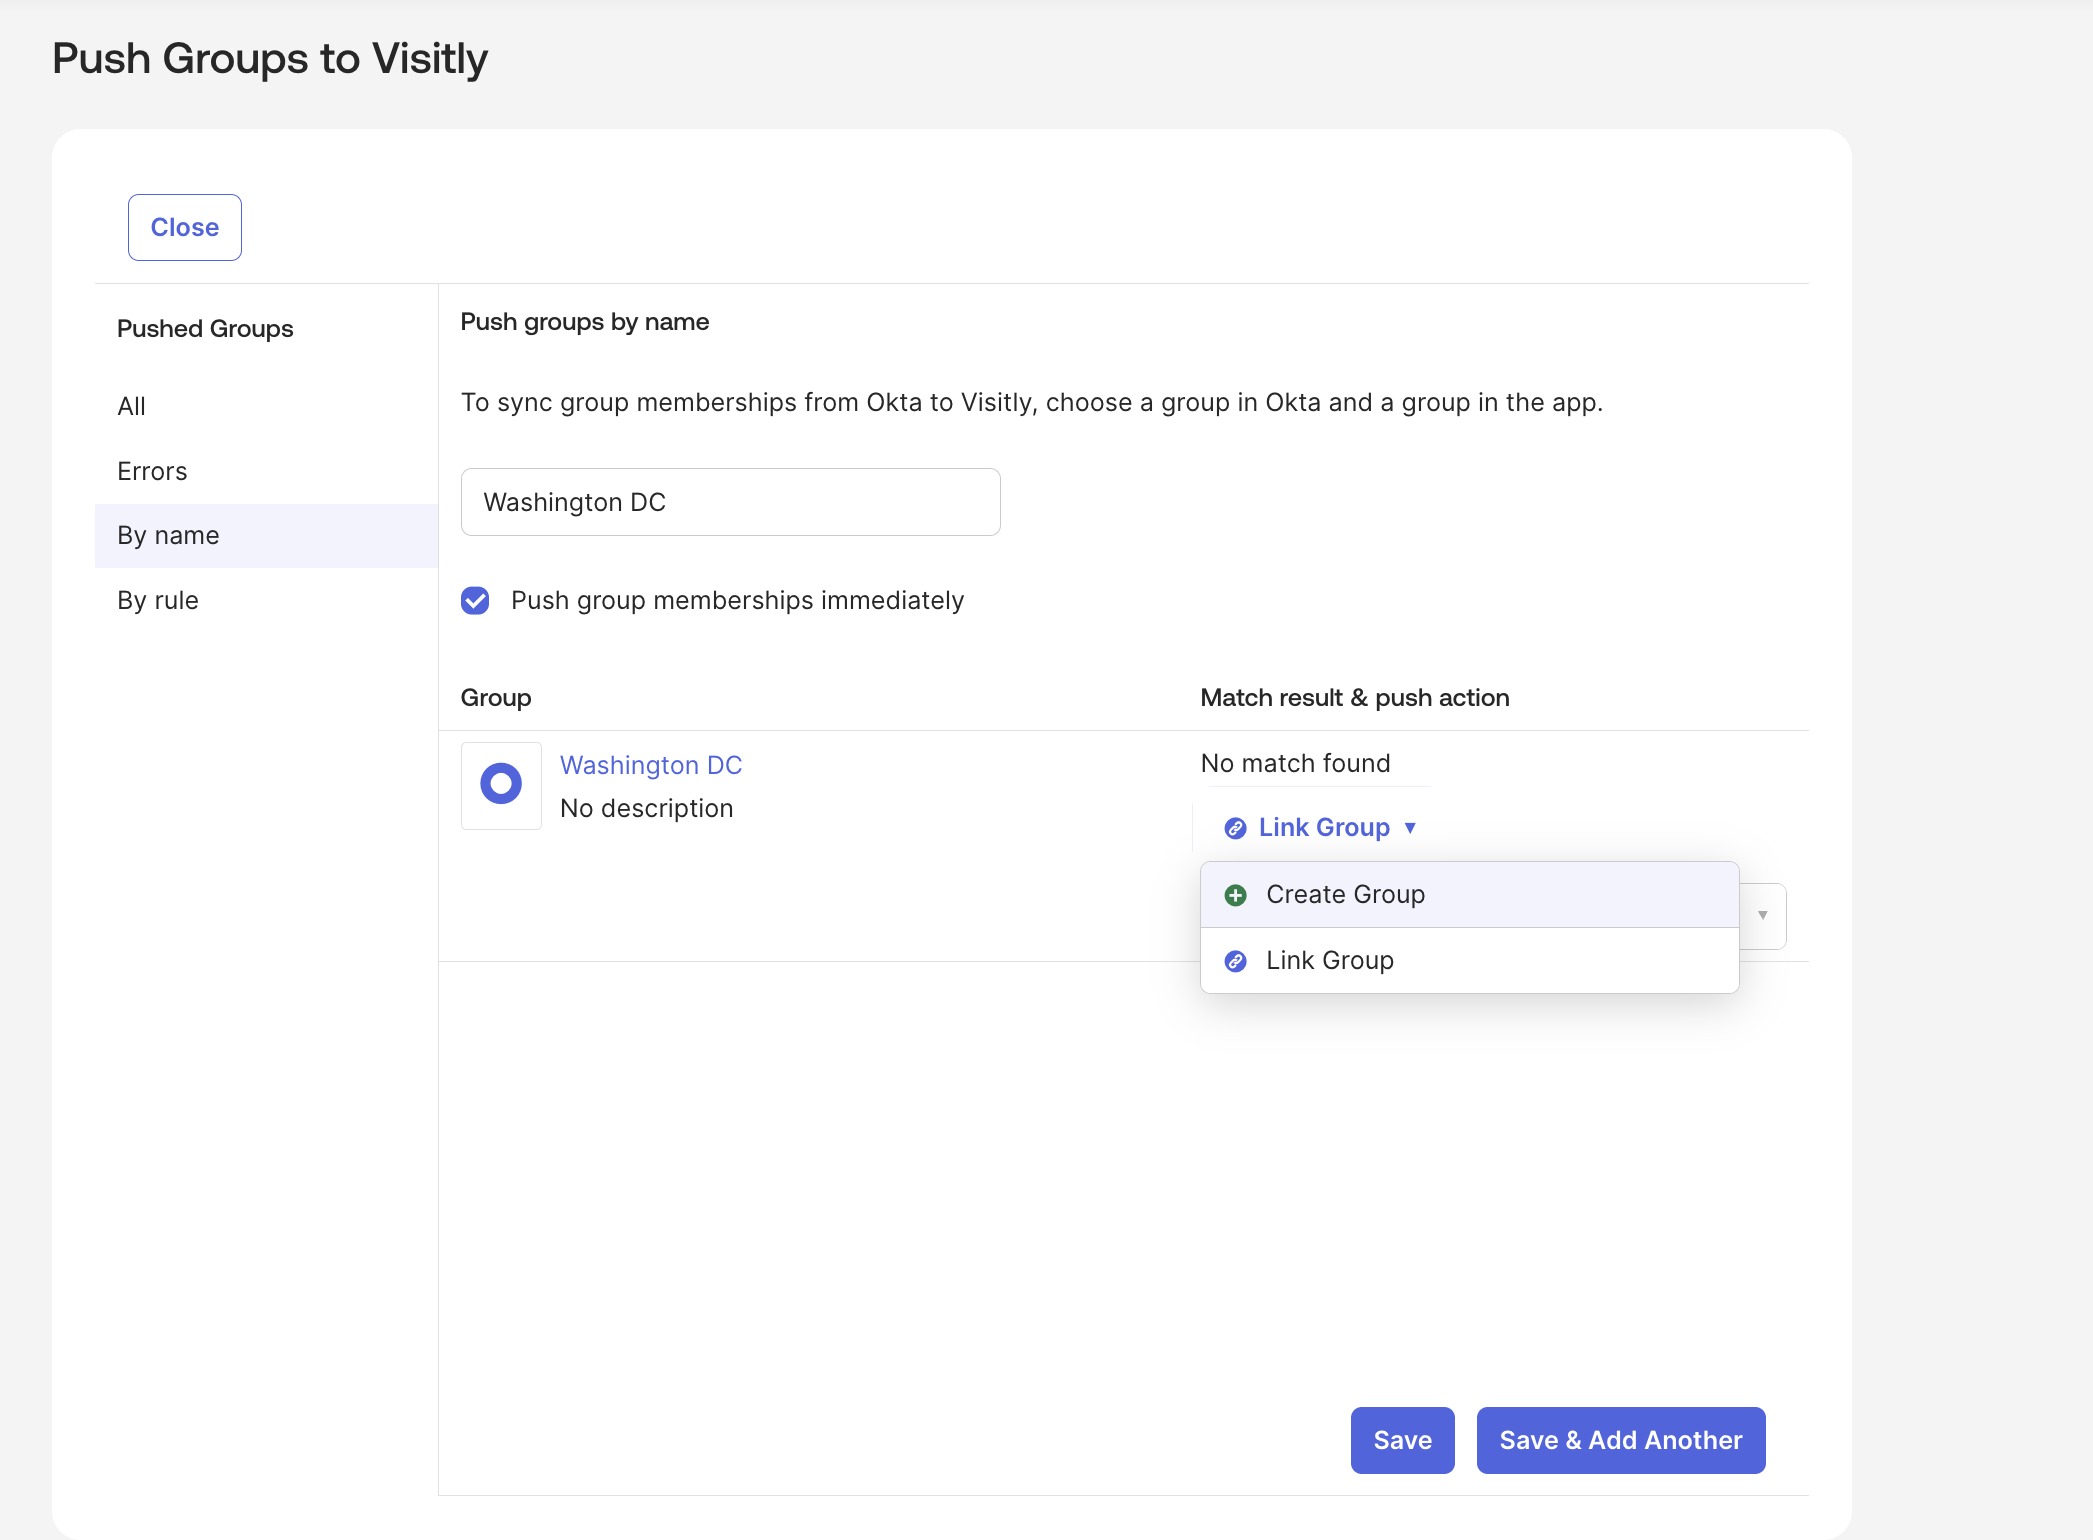
Click Push Groups, search for the group by name, and select it. Choose Create group (or match to an existing Visitly group), enable Push group memberships immediately, and click Save.
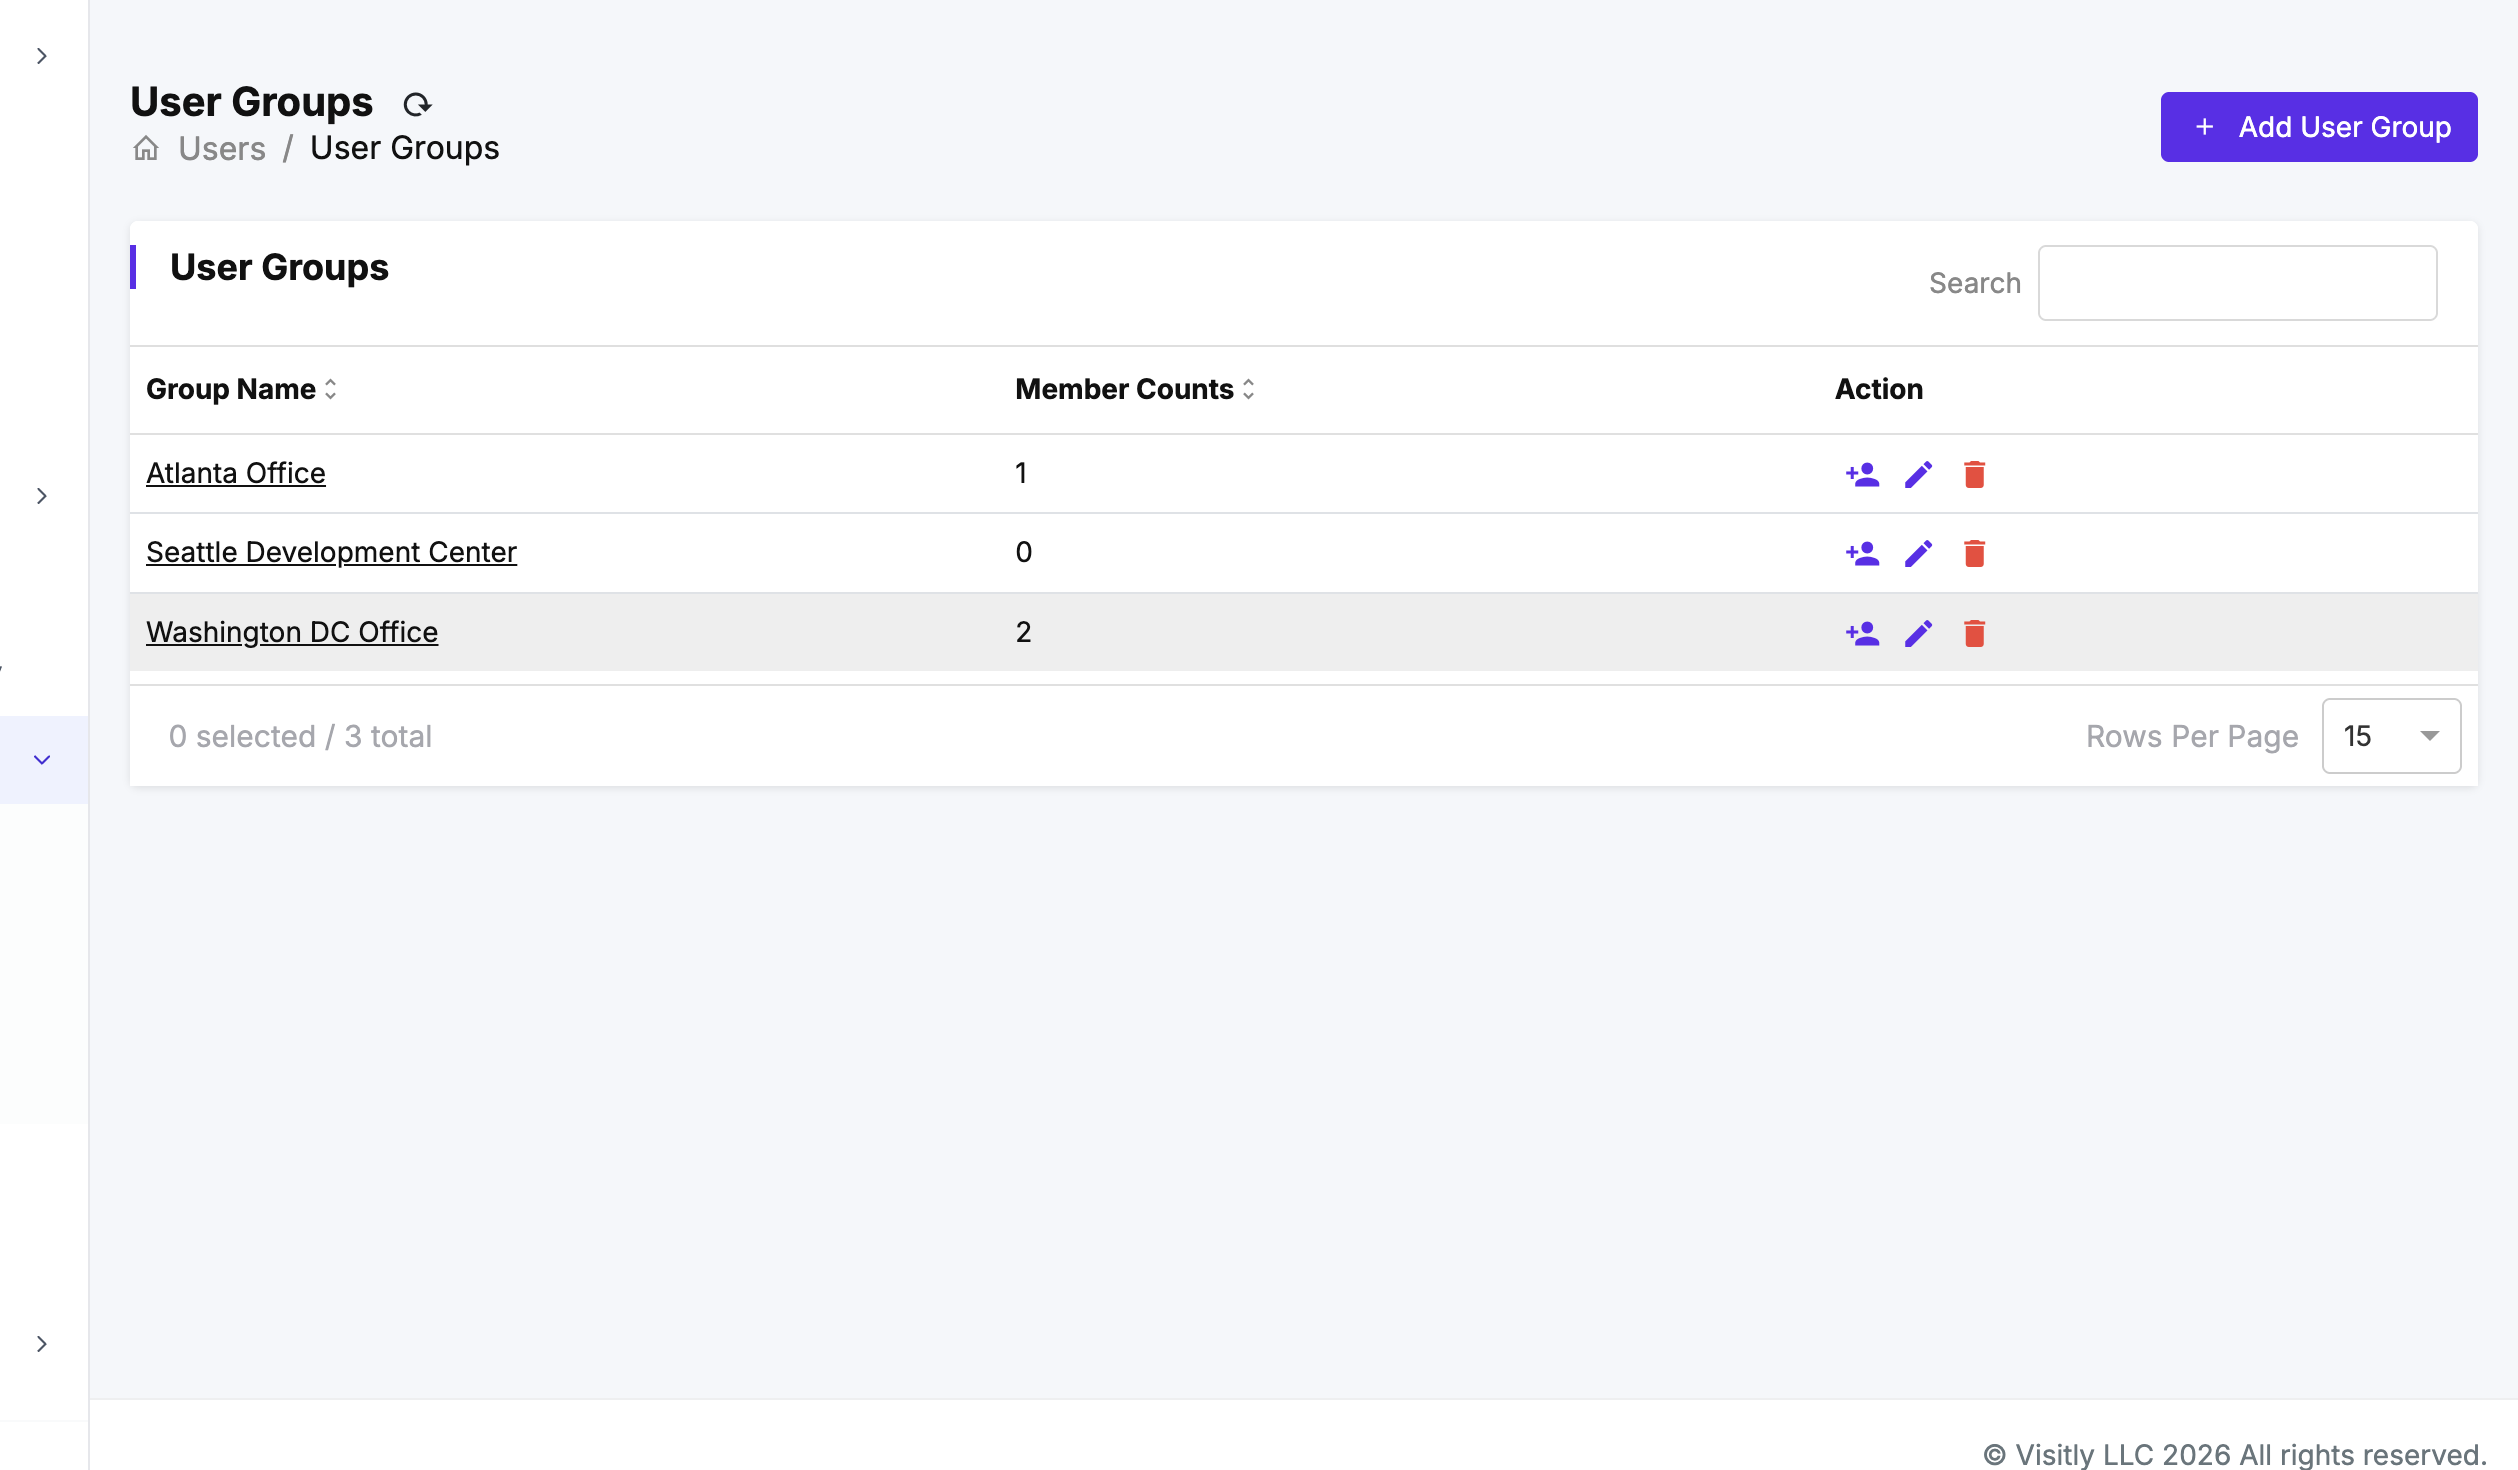
Verify in Visitly: Navigate to Users → User Groups in the Visitly Dashboard and confirm the group appears with the correct members.
What Stays in Sync After Setup
Once a group is pushed to Visitly, the following changes in Okta are automatically reflected in Visitly:
Adding a Member
When you add a user to the Okta group, they are automatically added to the corresponding Visitly User Group. The user must already have a host account in Visitly (either provisioned via SCIM or created manually).
Removing a Member
When you remove a user from the Okta group, they are automatically removed from the Visitly User Group. Their individual host account in Visitly is not affected — only the group membership is removed.
Renaming the Group
When you rename the group in Okta, the corresponding User Group name in Visitly is updated to match.
Deleting the Group
When you delete or unlink the group from the Visitly application in Okta, the corresponding User Group is removed from Visitly. Individual host accounts that were members of the group are not affected.
Import Users & Groups from Visitly to Okta
If you already have users and user groups set up in Visitly before connecting Okta, you can import them into Okta in one step. This is especially useful when you are rolling out Okta for the first time and need to link existing Visitly host accounts with Okta user profiles.
In the Okta Admin Console, open the Visitly SCIM application.
Go to the Import tab.
Click Import Now. Okta will pull all existing users and user groups from Visitly.
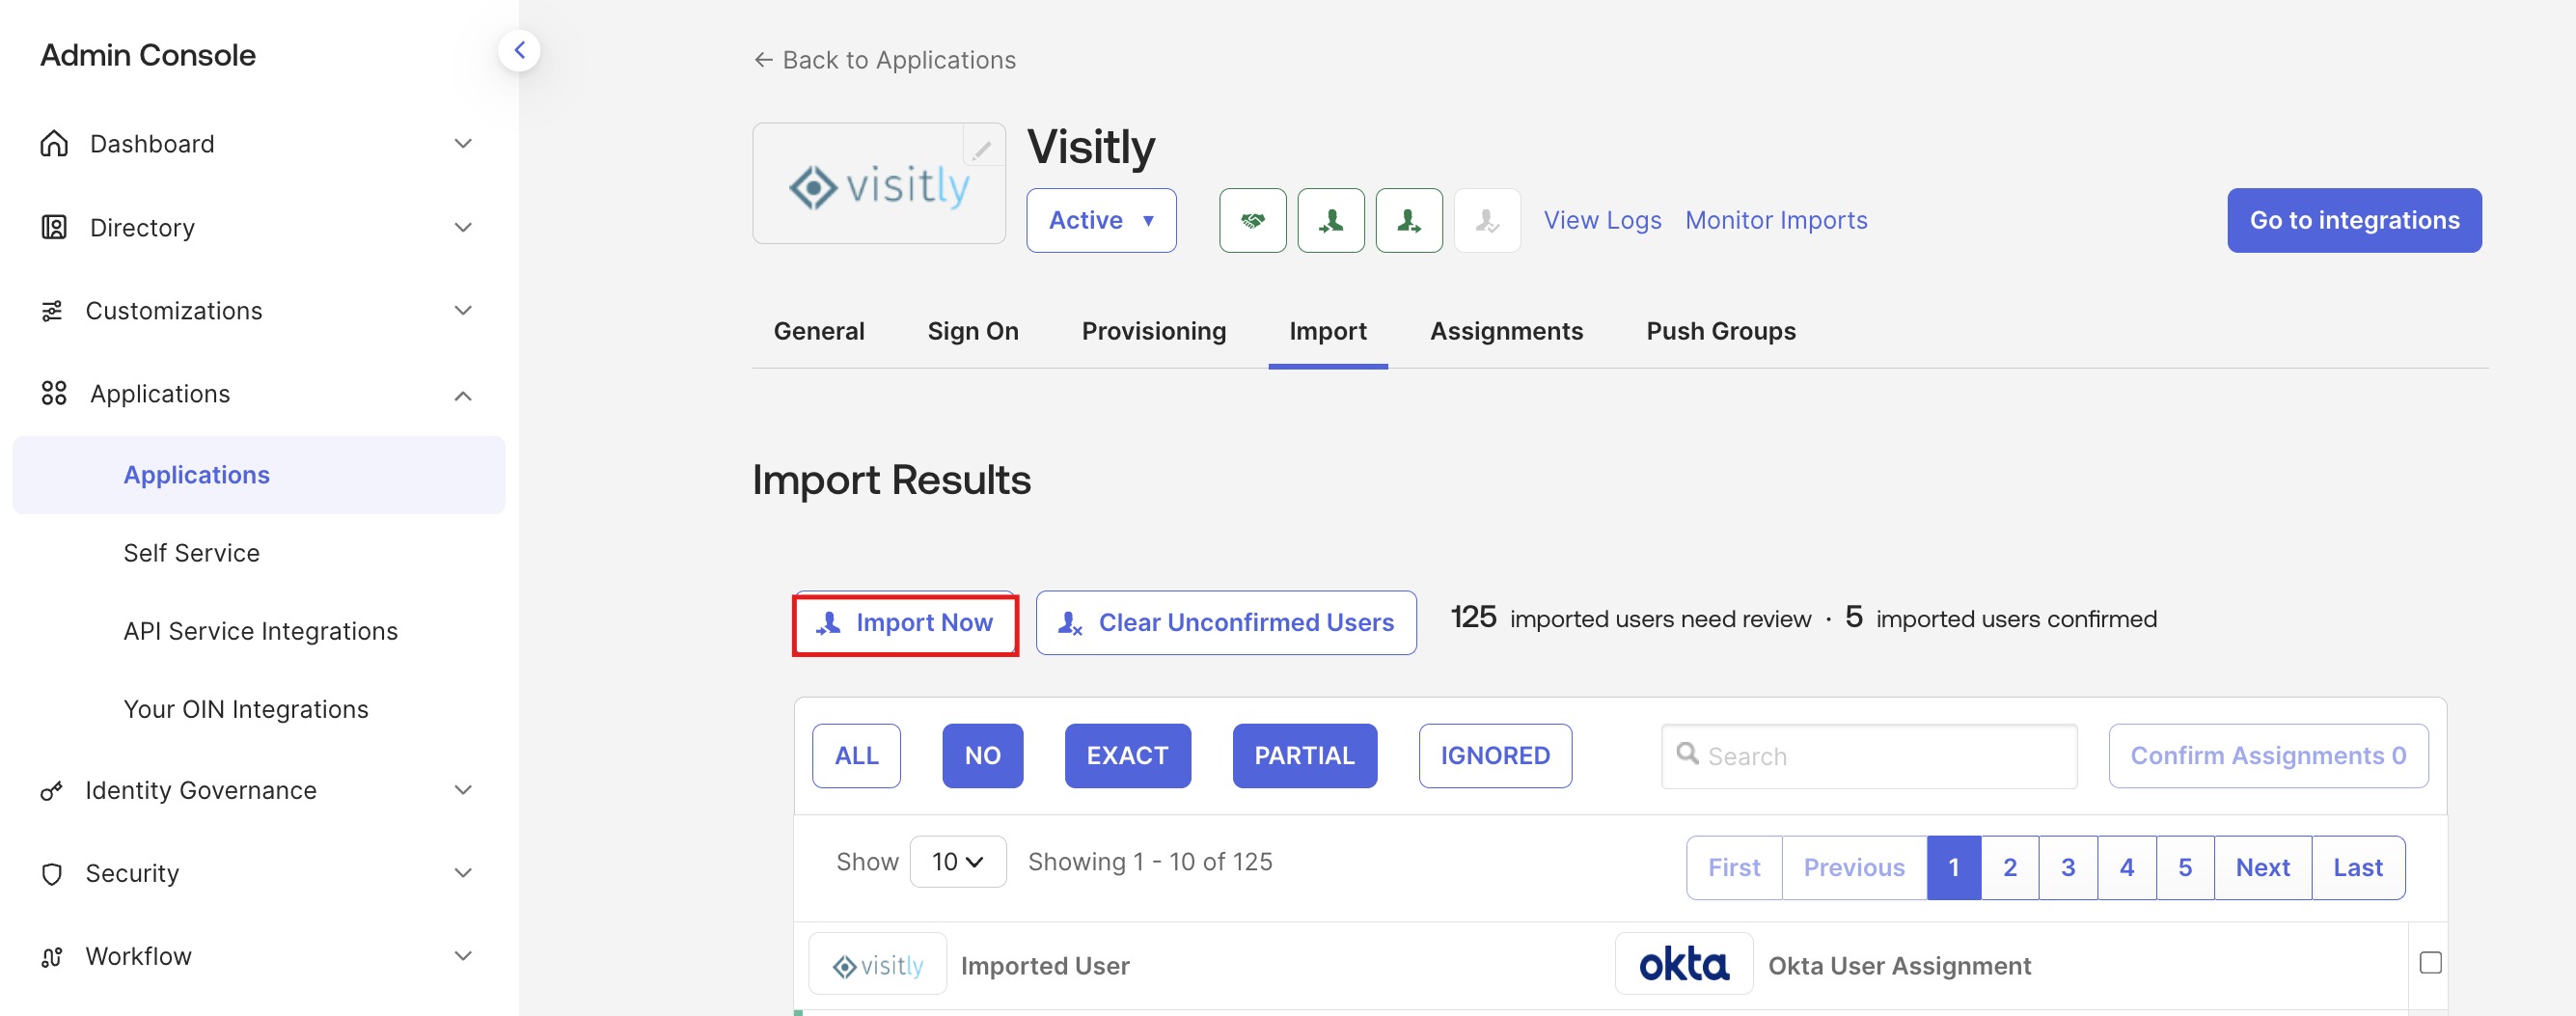
Review the imported records. Okta will show you a list of users and groups it found, along with suggested matches to existing Okta accounts.
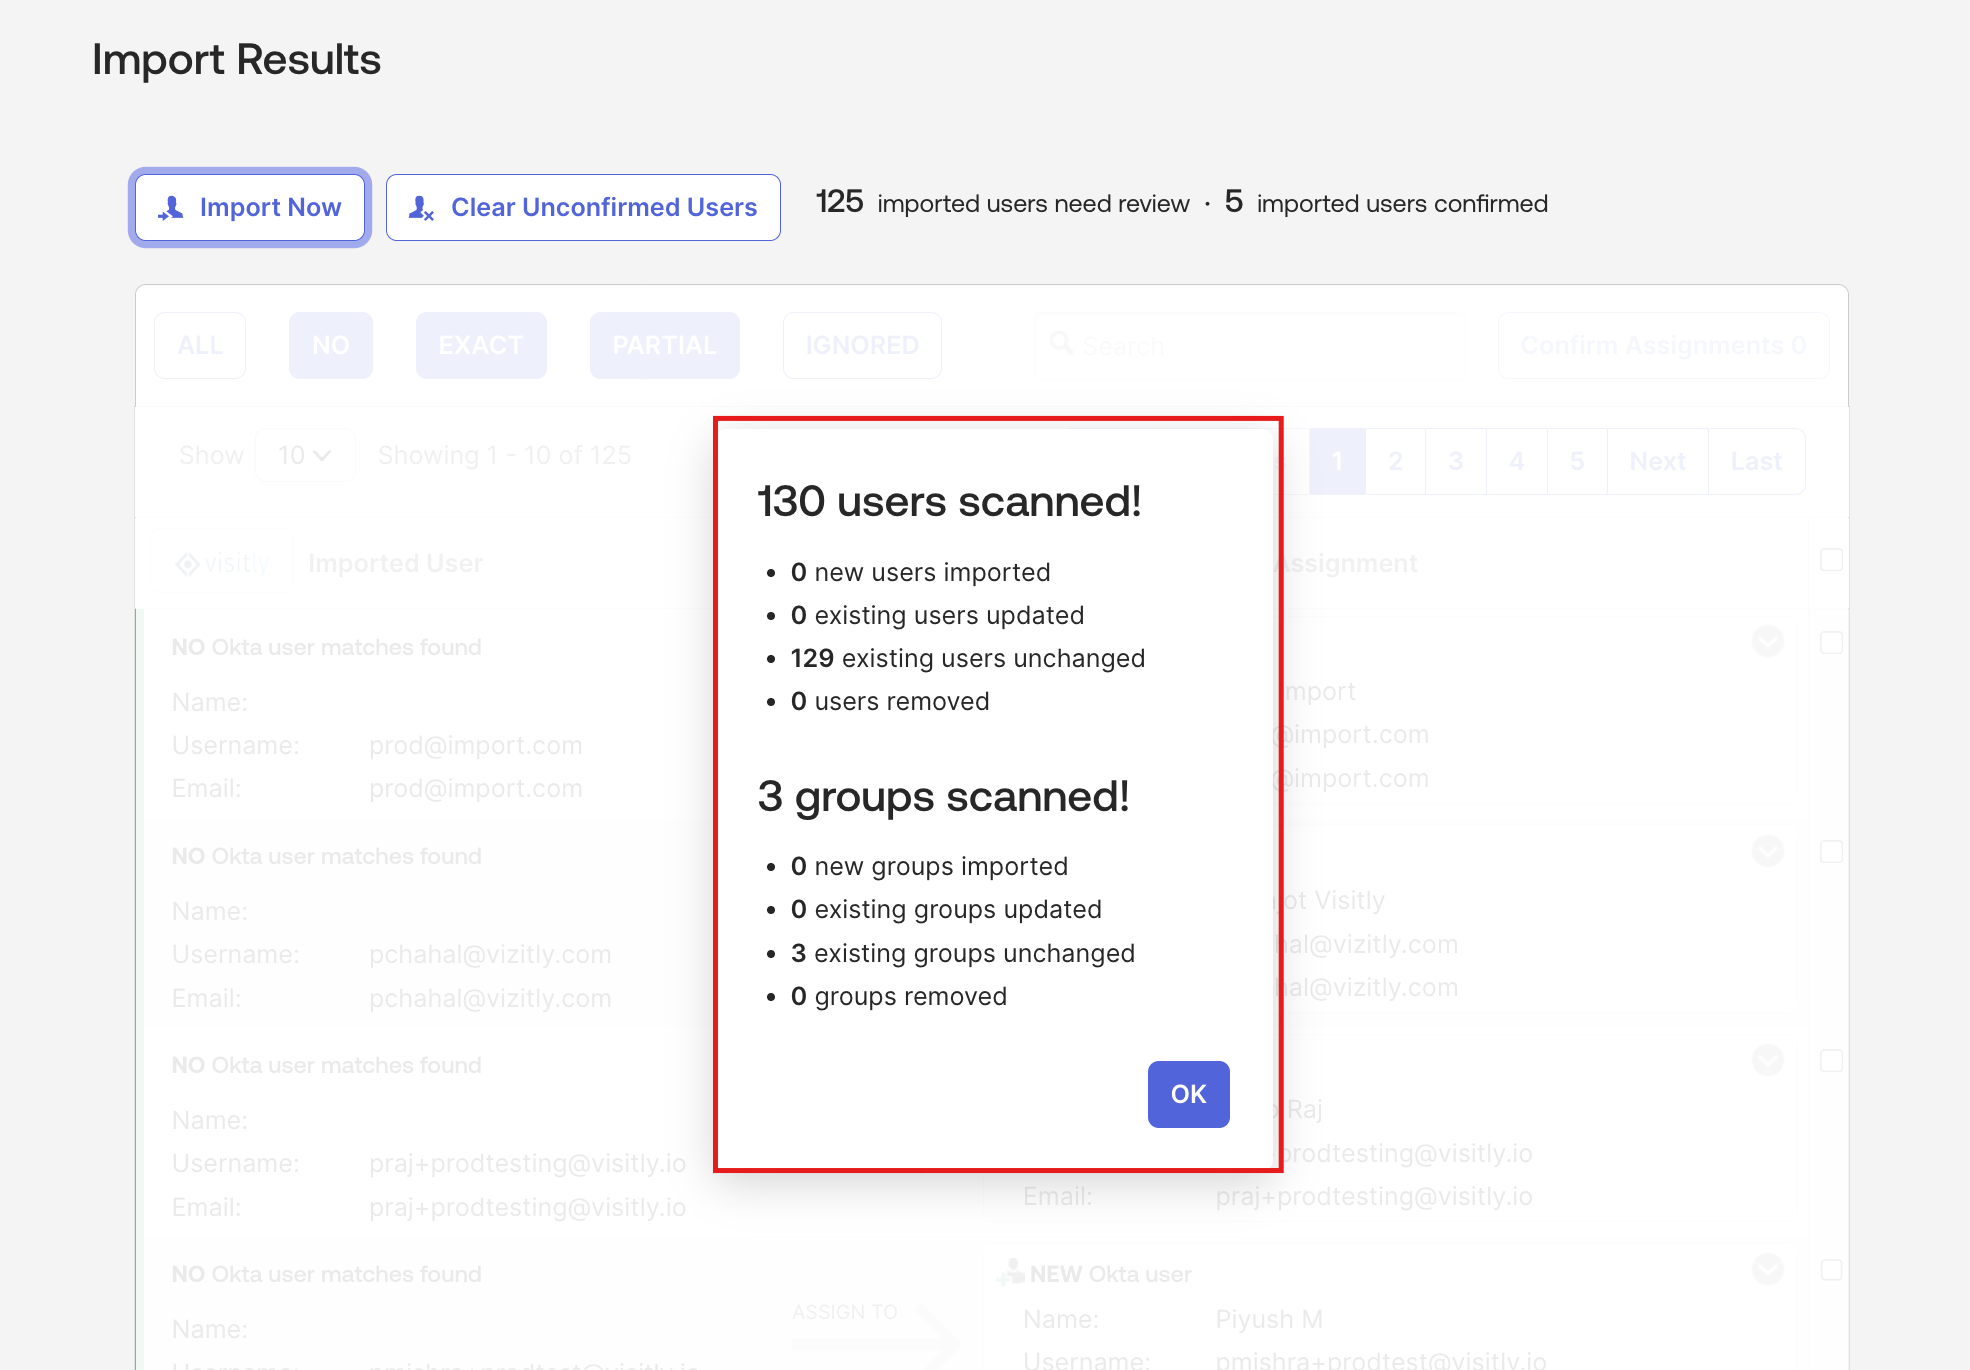
Confirm the matches and save. Matched users are linked to their Okta profiles; unmatched users are created as new AppUser records that you can manually assign or auto-match later.
Troubleshooting
- The API Credentials test fails in Okta.
Confirm you copied the complete API Key from Visitly without leading or trailing spaces. Verify that Okta integration is enabled on your Visitly account by contacting Visitly Support. - Users are not syncing to Visitly.
Ensure the user is assigned to the Visitly SCIM application in Okta. Check that the relevant provisioning features (Push New Users, Push Profile Updates) are enabled under Provisioning → To App. - Group membership changes are not reflected in Visitly.
Confirm the group is listed under the Push Groups tab in the Visitly SCIM app and its status shows Active. Verify that Push group memberships immediately was enabled when the group was first pushed. Check the Okta System Log for any SCIM push errors related to the group. - Deactivated users still appear active in Visitly.
Ensure the Deactivate Users provisioning feature is enabled in Okta. Allow a few minutes for the deactivation event to propagate via SCIM. - Import Now does not show all Visitly users.
Ensure the API Key is valid and the connection test passes. Verify the users exist in Visitly under Users → Employee Directory. Only active host accounts are included in the import.
Need help? Contact the Visitly support team at support@visitly.io
Was this article helpful?
That’s Great!
Thank you for your feedback
Sorry! We couldn't be helpful
Thank you for your feedback
Feedback sent
We appreciate your effort and will try to fix the article