Overview
With SCIM provisioning, Visitly automatically creates, updates, and deactivates users based on your Microsoft Entra ID directory. Once configured, you no longer need to manually add employees to Visitly — their name, title, department, employee ID, and phone numbers stay in sync with Entra automatically.
How It Works
- Users assigned to the Visitly application in Entra are created in Visitly automatically, with no manual entry required.
- Changes made in Entra — such as a title or department update — carry over to Visitly on the next sync.
- If someone leaves your organization or is unassigned in Entra, Visitly deactivates their account automatically.
- Visitly matches accounts between the two platforms by email address, so no separate user mapping is needed.
What Gets Synced
Visitly pulls in a user’s email (used to match the account), first and last name, job title, department, employee ID, and both work and mobile phone numbers. A user’s active or inactive status in Visitly also follows whether they’re enabled and assigned in Entra.
Before You Begin
Complete these prerequisites before starting setup — missing either one will prevent the integration from working.
Microsoft Entra requirements
- The Application Administrator or Cloud Application Administrator role in Microsoft Entra
- Permission to edit the SCIM attribute schema for enterprise applications
Visitly requirements
- Your Visitly SCIM connection details — the Tenant URL and Secret Token
- If you don’t have these, contact your Visitly account manager to request them
Setup Guide
Step 1: Add the Visitly Application in Entra
- Sign in to the Microsoft Entra admin center.
- Go to Entra ID → Enterprise applications → New application.
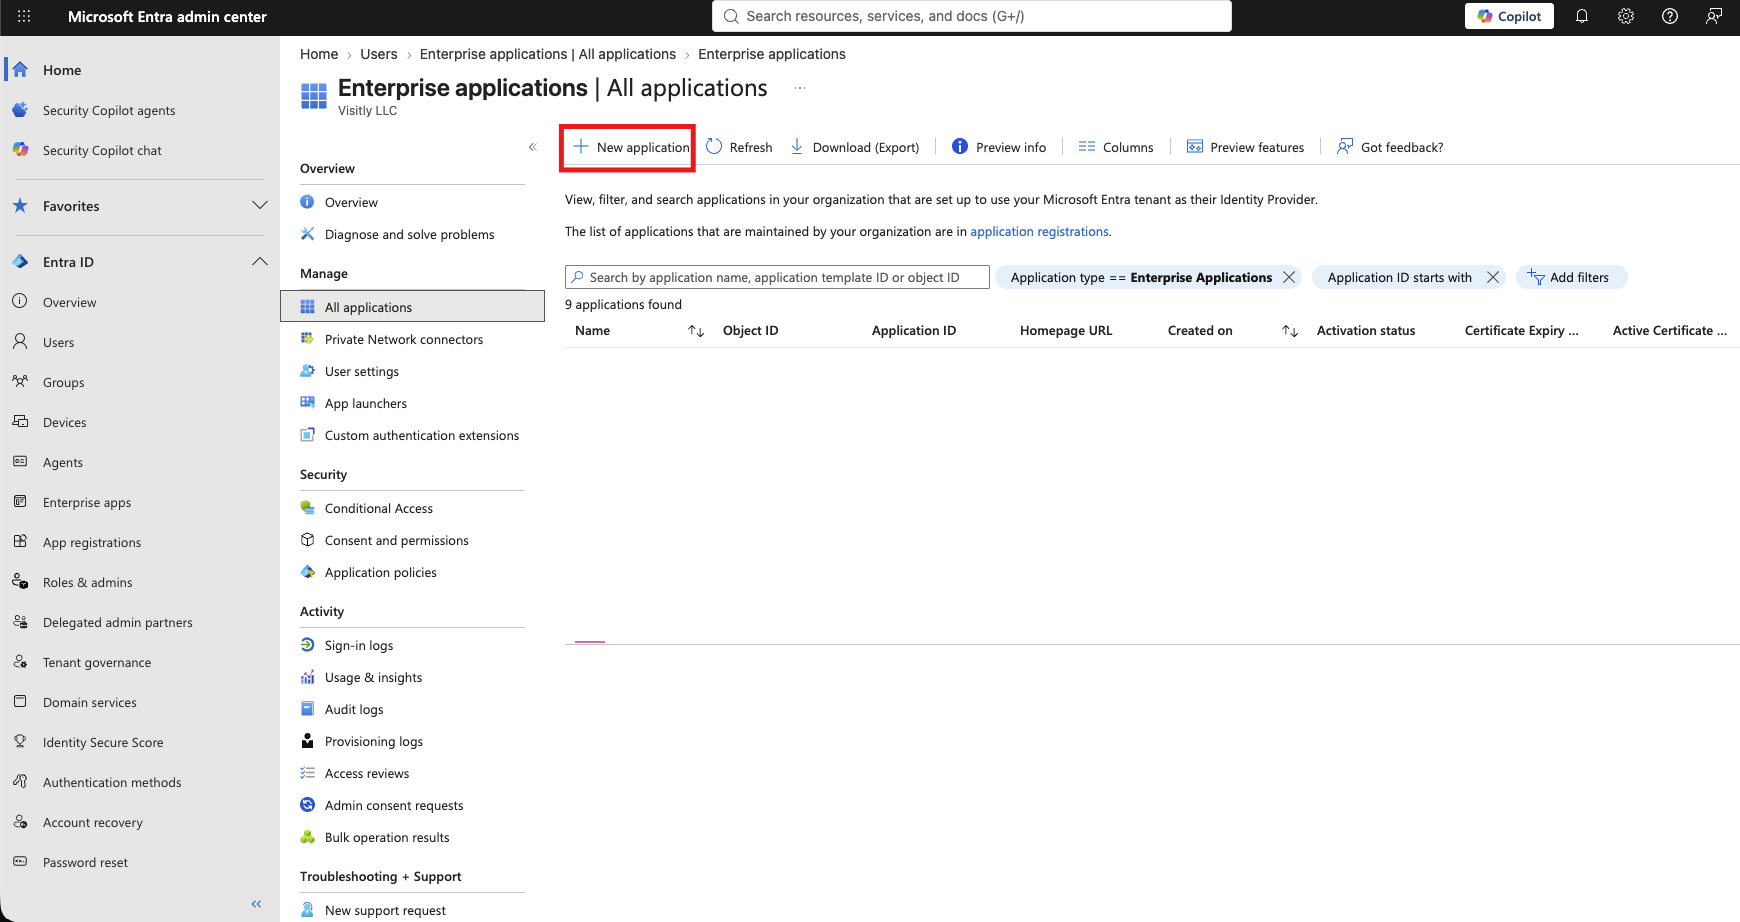
- Enter the name Visitly, select it, then click Create.
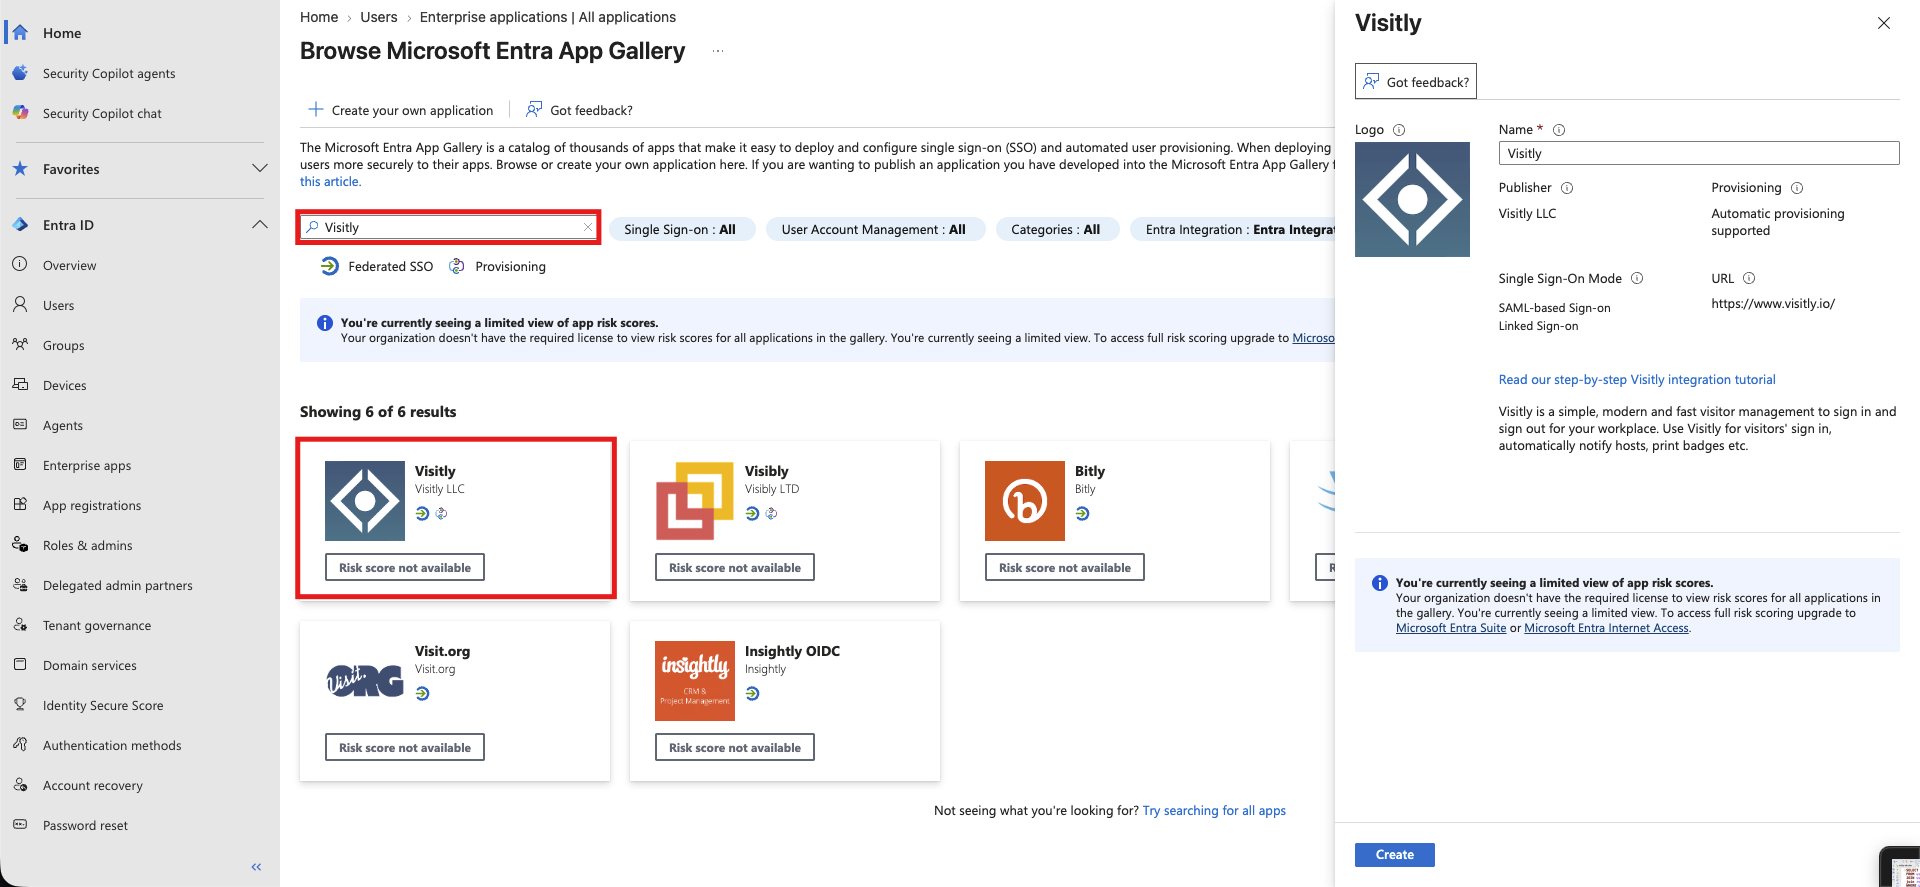
The Visitly application now appears in your list of enterprise applications.
Step 2: Connect Provisioning
- Open the Visitly application and go to Provisioning.
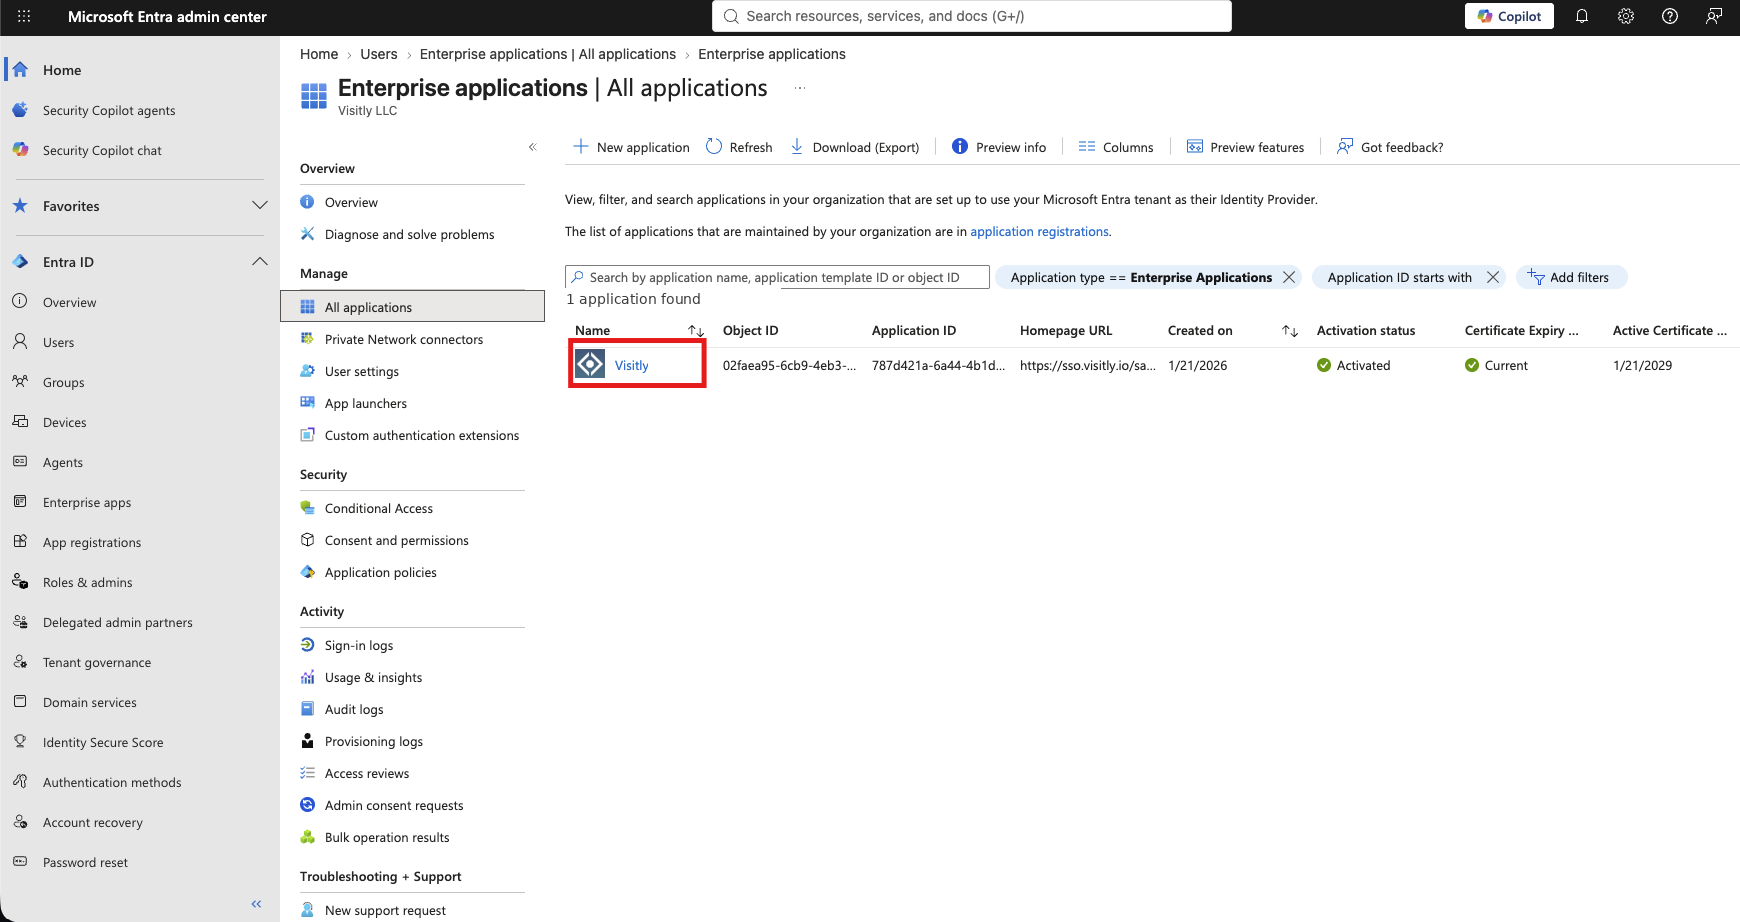
- Set Provisioning Mode to Automatic.
- Under Admin Credentials, enter your Tenant URL and Secret Token.
- Select Test Connection. A success message confirms Entra can reach Visitly.
- Set Provisioning status to On.
- Select Save.
Your Entra tenant is now connected to Visitly for provisioning.
Step 3: Add Visitly Attributes to the Schema
By default, Entra only recognizes a handful of standard attributes. To sync title, department, employee ID, and phone numbers, you need to add these to the attribute schema first.
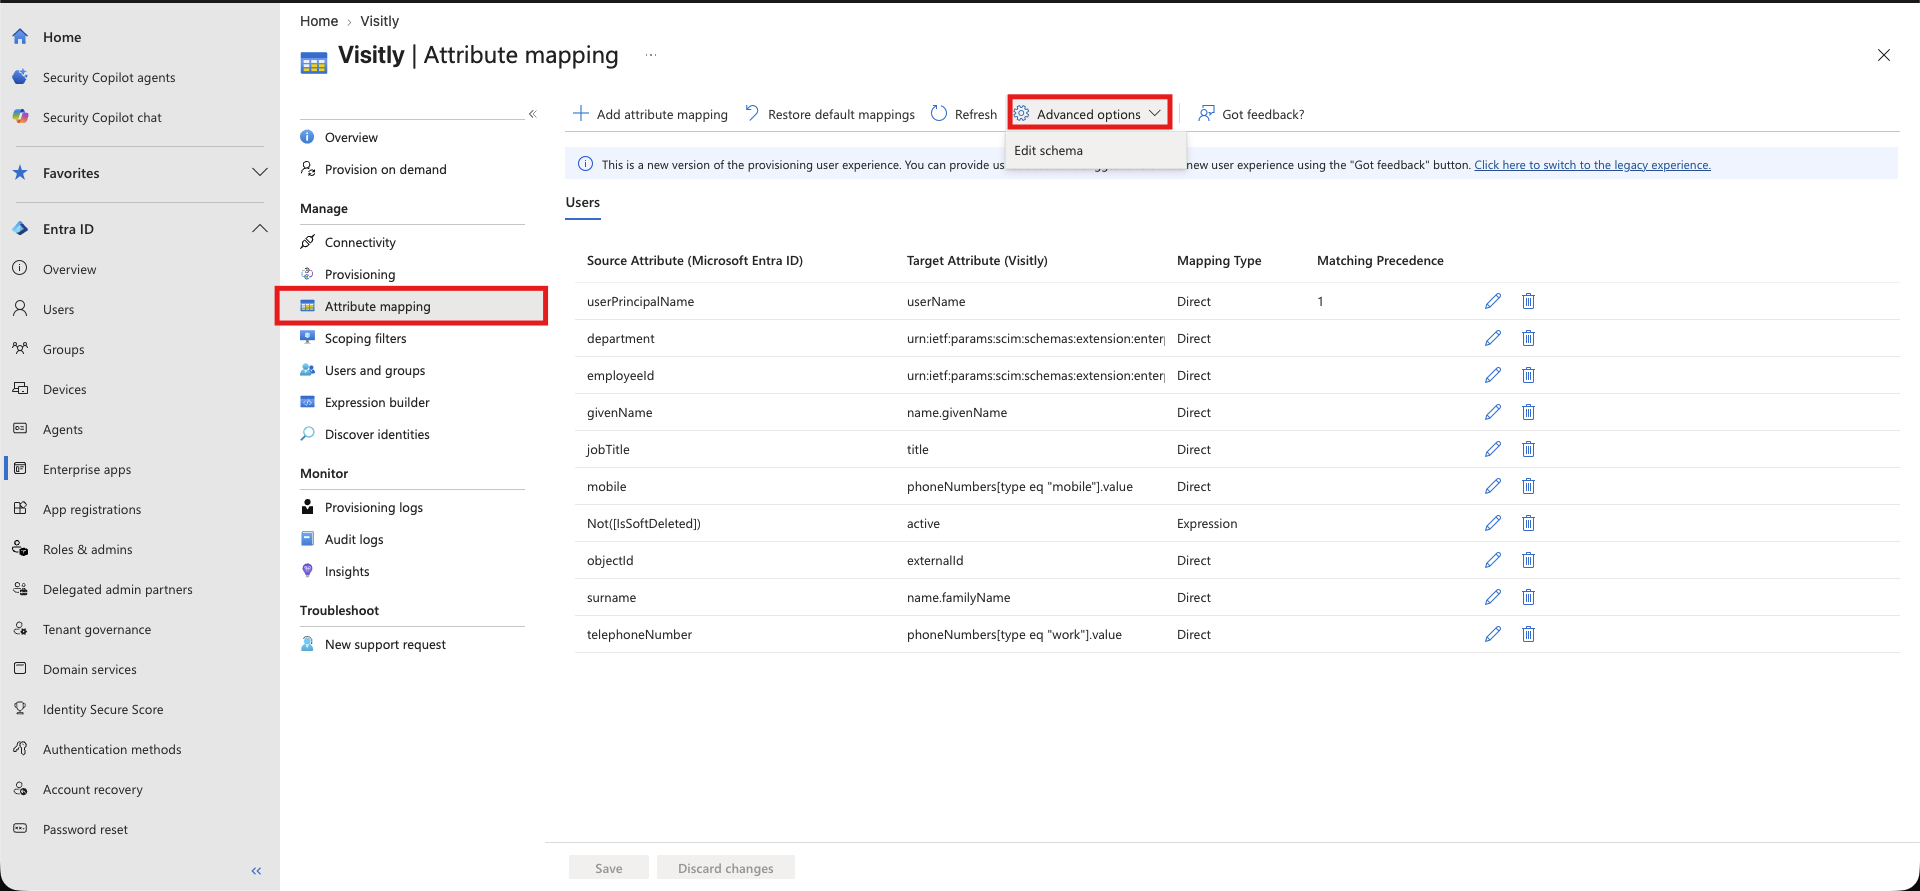
- Go to Attribute Mappings → Advanced options → Edit schema. The schema editor opens.
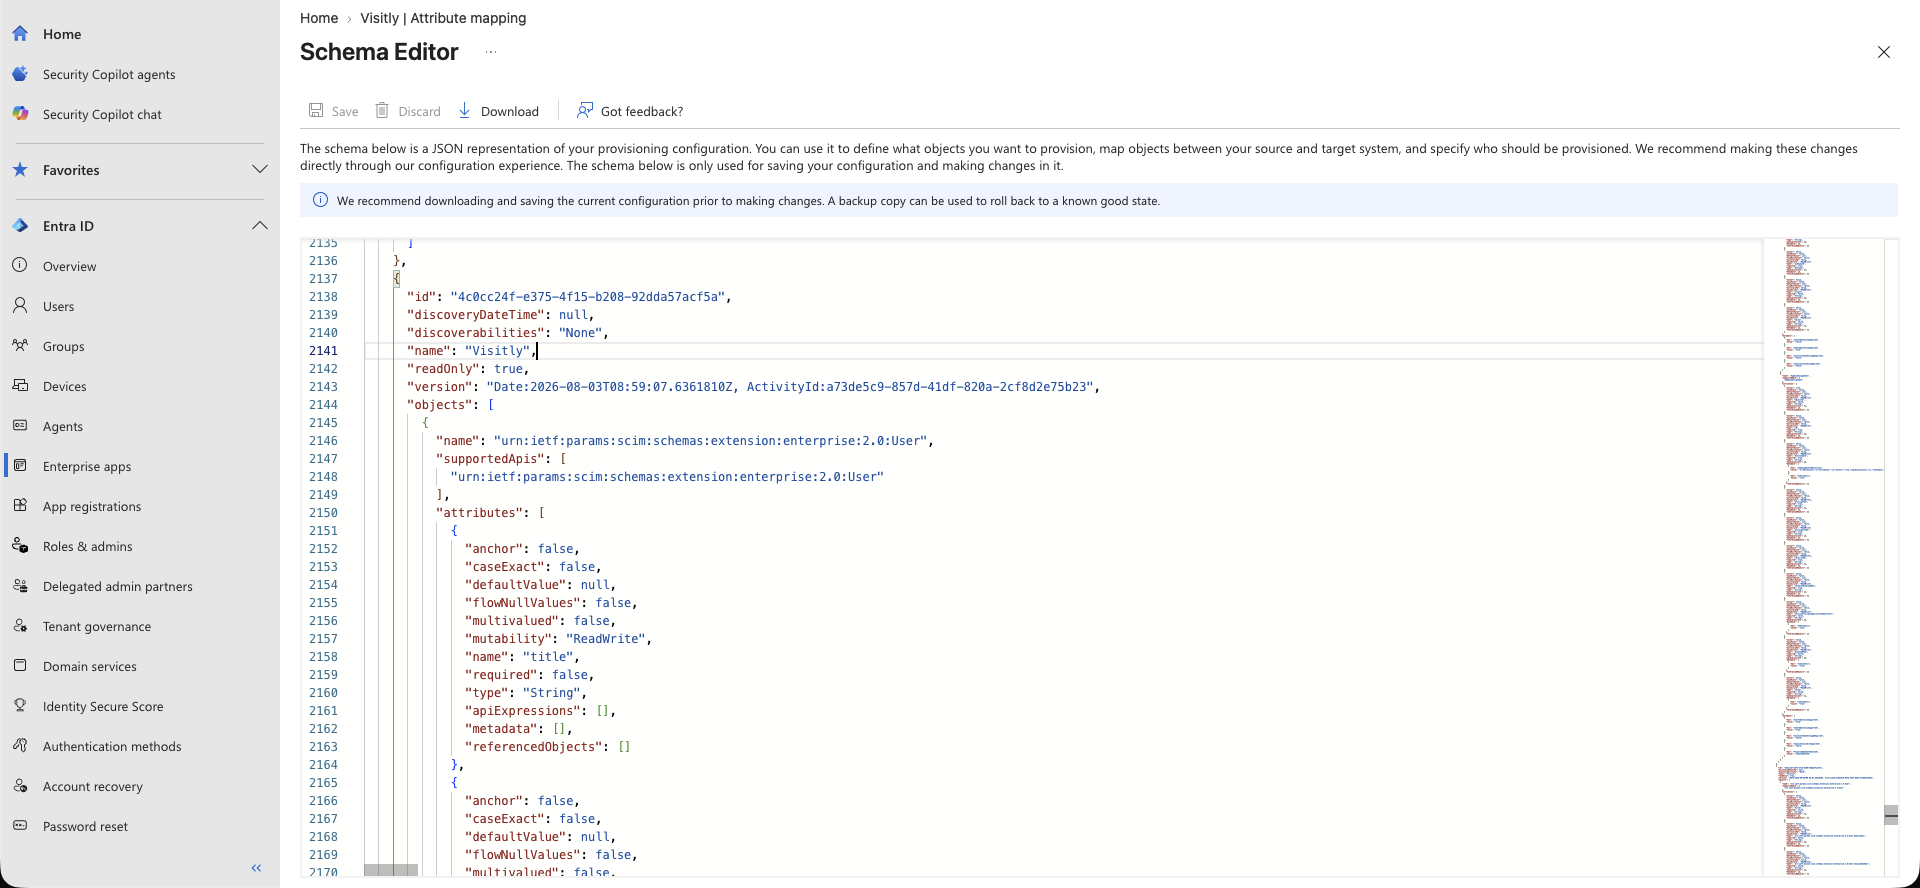
- Add the following attribute objects inside the Visitly target object's attributes list (find “id": 4c0cc24f-e375-4f15-b208-92dda57acf5a", copy and paste this code block inside the attributes array)
{
    "anchor": false,
    "caseExact": false,
    "defaultValue": null,
    "flowNullValues": false,
    "multivalued": false,
    "mutability": "ReadWrite",
    "name": "title",
    "required": false,
    "type": "String",
    "apiExpressions": [],
    "metadata": [],
    "referencedObjects": []
},
{
    "anchor": false,
    "caseExact": false,
    "defaultValue": null,
    "flowNullValues": false,
    "multivalued": false,
    "mutability": "ReadWrite",
    "name": "urn:ietf:params:scim:schemas:extension:enterprise:2.0:User:department",
    "required": false,
    "type": "String",
    "apiExpressions": [],
    "metadata": [],
    "referencedObjects": []
},
{
    "anchor": false,
    "caseExact": false,
    "defaultValue": null,
    "flowNullValues": false,
    "multivalued": false,
    "mutability": "ReadWrite",
    "name": "urn:ietf:params:scim:schemas:extension:enterprise:2.0:User:employeeNumber",
    "required": false,
    "type": "String",
    "apiExpressions": [],
    "metadata": [],
    "referencedObjects": []
},
{
    "anchor": false,
    "caseExact": false,
    "defaultValue": null,
    "flowNullValues": false,
    "multivalued": false,
    "mutability": "ReadWrite",
    "name": "phoneNumbers[type eq \"work\"].value",
    "required": false,
    "type": "String",
    "apiExpressions": [],
    "metadata": [],
    "referencedObjects": []
},
{
    "anchor": false,
    "caseExact": false,
    "defaultValue": null,
    "flowNullValues": false,
    "multivalued": false,
    "mutability": "ReadWrite",
    "name": "phoneNumbers[type eq \"mobile\"].value",
    "required": false,
    "type": "String",
    "apiExpressions": [],
    "metadata": [],
    "referencedObjects": []
},
When editing the JSON, the attribute name here and the targetAttributeName used in the mapping step below must match exactly — this is especially important for the two enterprise attributes (Department and Employee ID).
Step 4: Map the Attributes
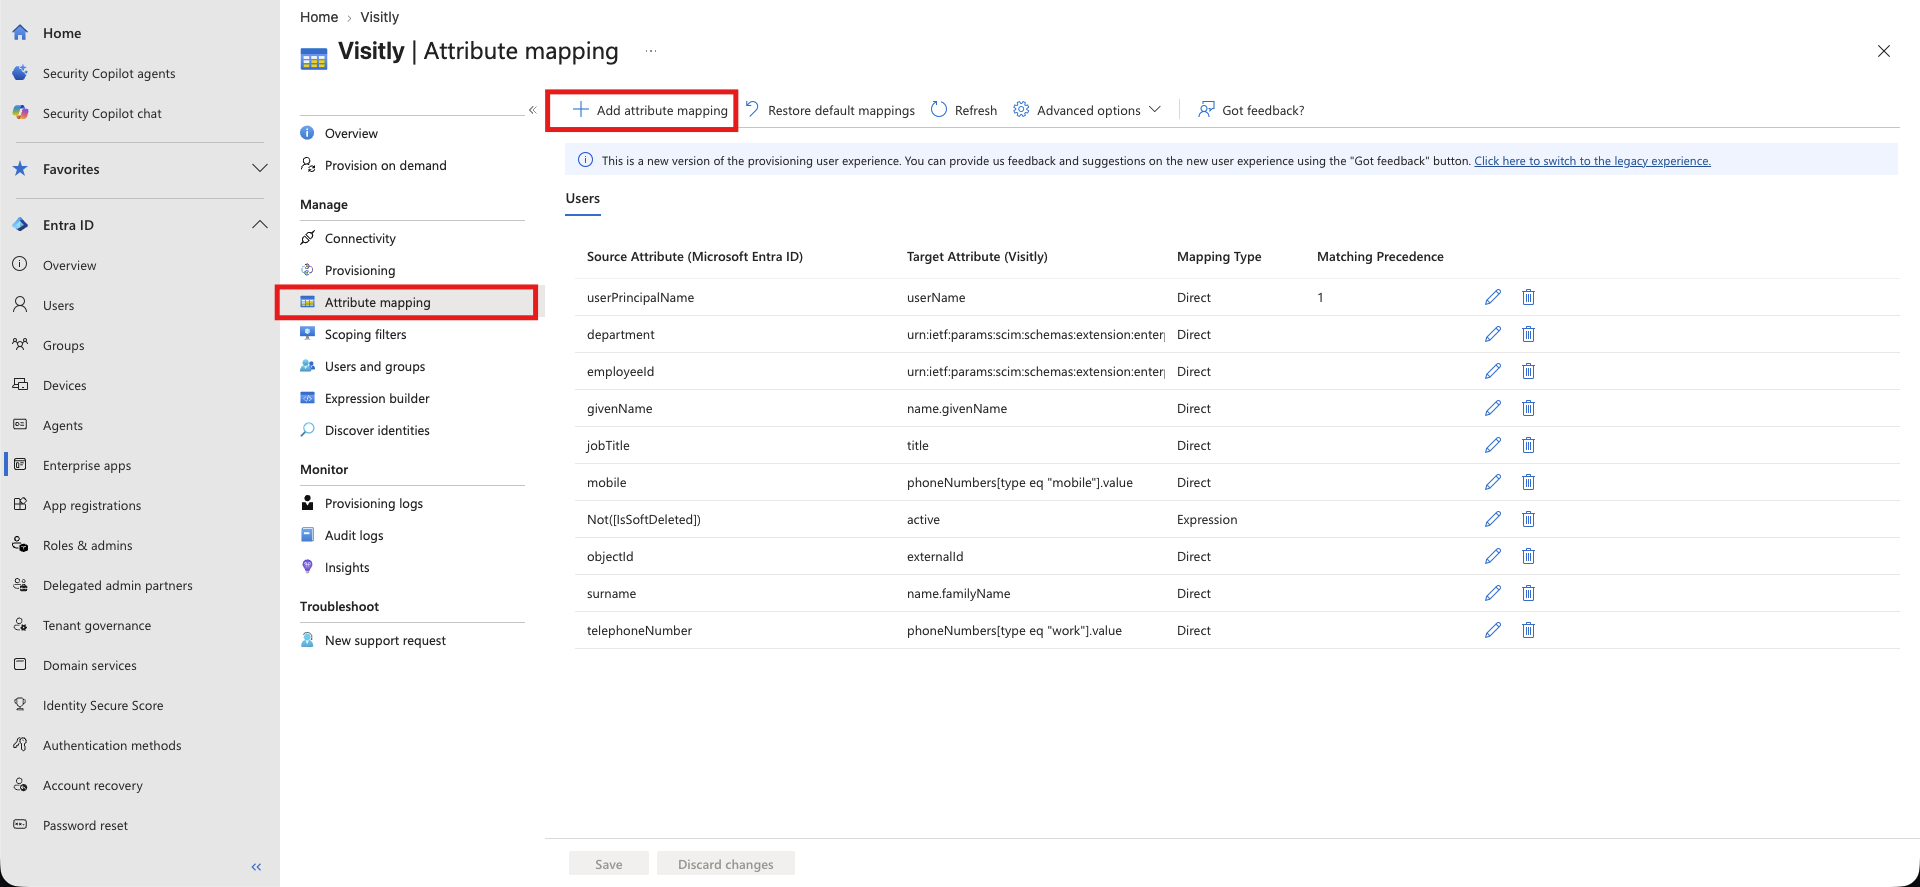
For each attribute, click Add Attribute Mapping and configure the following:
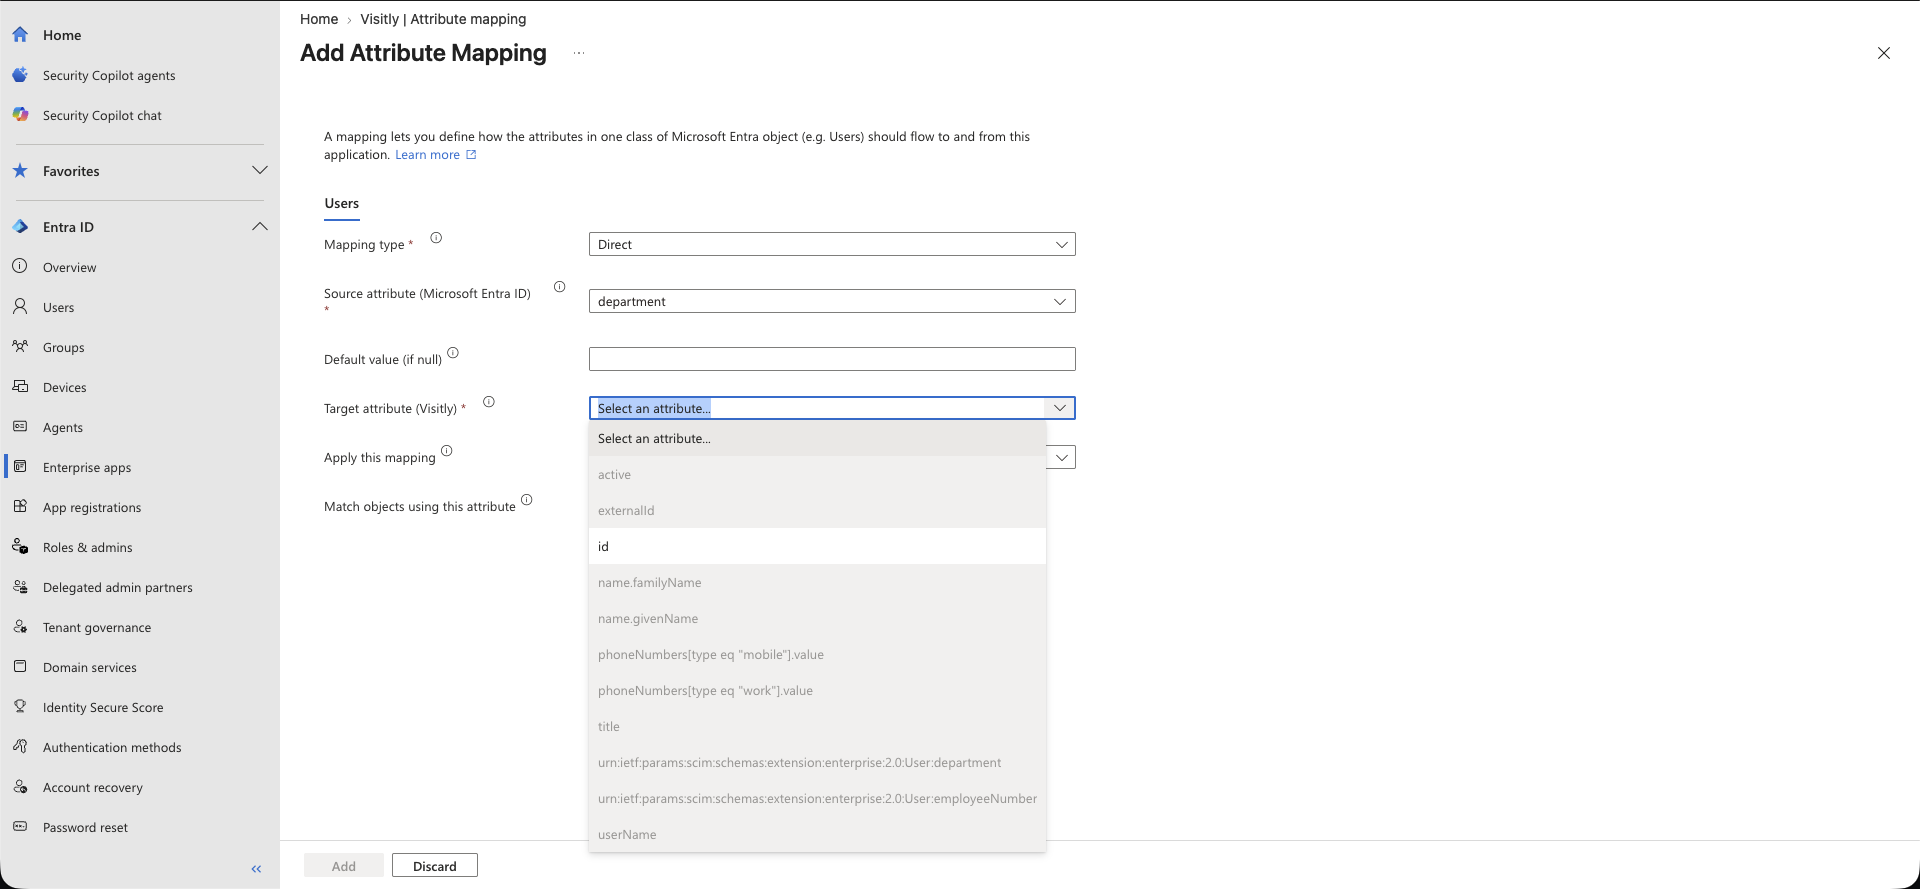
- Set Mapping type to Direct.
- Under Source attribute (Microsoft Entra ID), select the Entra attribute you want to sync.
- Under Target attribute (Visitly), select the matching Visitly attribute. For department and employee ID, select the full
urn:ietf:params:scim:schemas:extension:enterprise:2.0:User:...option from the list, not the short name. - Click Add to save the mapping, then repeat for each attribute below.
Map the following, matching Entra’s source attribute to Visitly’s target attribute:
userPrincipalName→userName(also set this as the attribute used to match objects)givenName→name.givenNamesurname→name.familyNamejobTitle→titledepartment→urn:ietf:params:scim:schemas:extension:enterprise:2.0:User:departmentemployeeId→urn:ietf:params:scim:schemas:extension:enterprise:2.0:User:employeeNumbertelephoneNumber→phoneNumbers[type eq "work"].valuemobile→phoneNumbers[type eq "mobile"].value
Users are matched between Entra and Visitly by email, so keep the
userPrincipalNametouserNamemapping set as the matching attribute.Your attribute mappings are now configured, and Entra knows which fields to send to Visitly.
Step 5: Assign Users to Provision
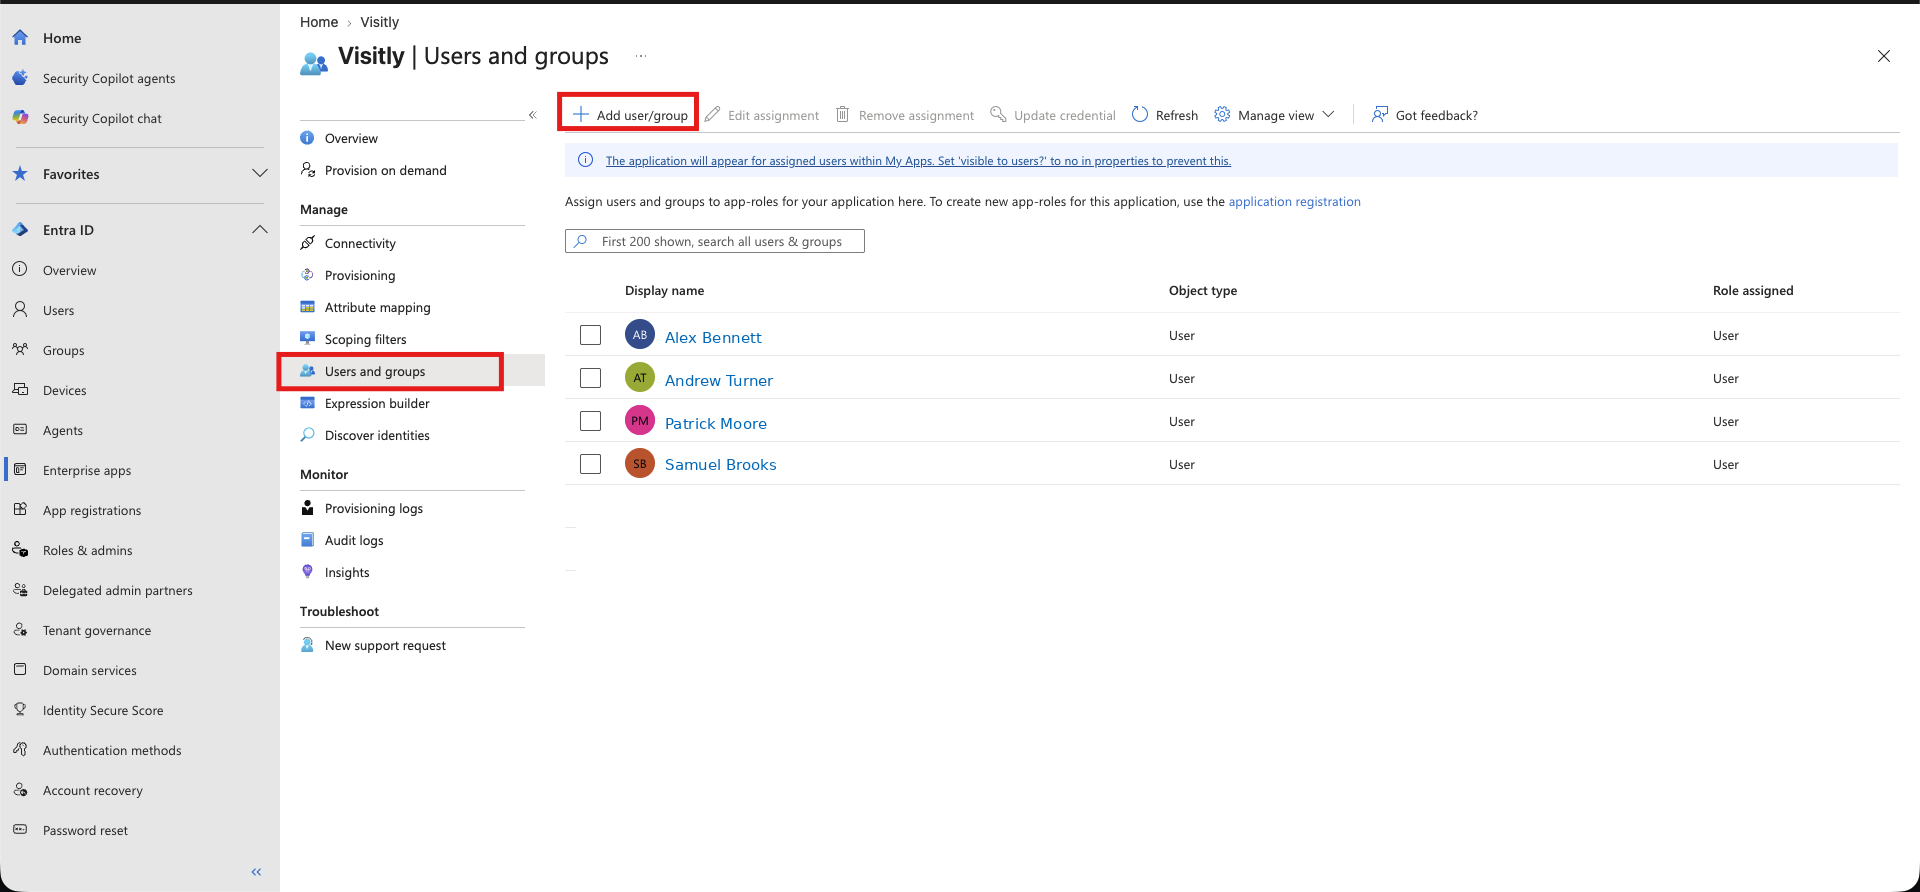
- Go to the Visitly application and select Users and groups → Add user/group.
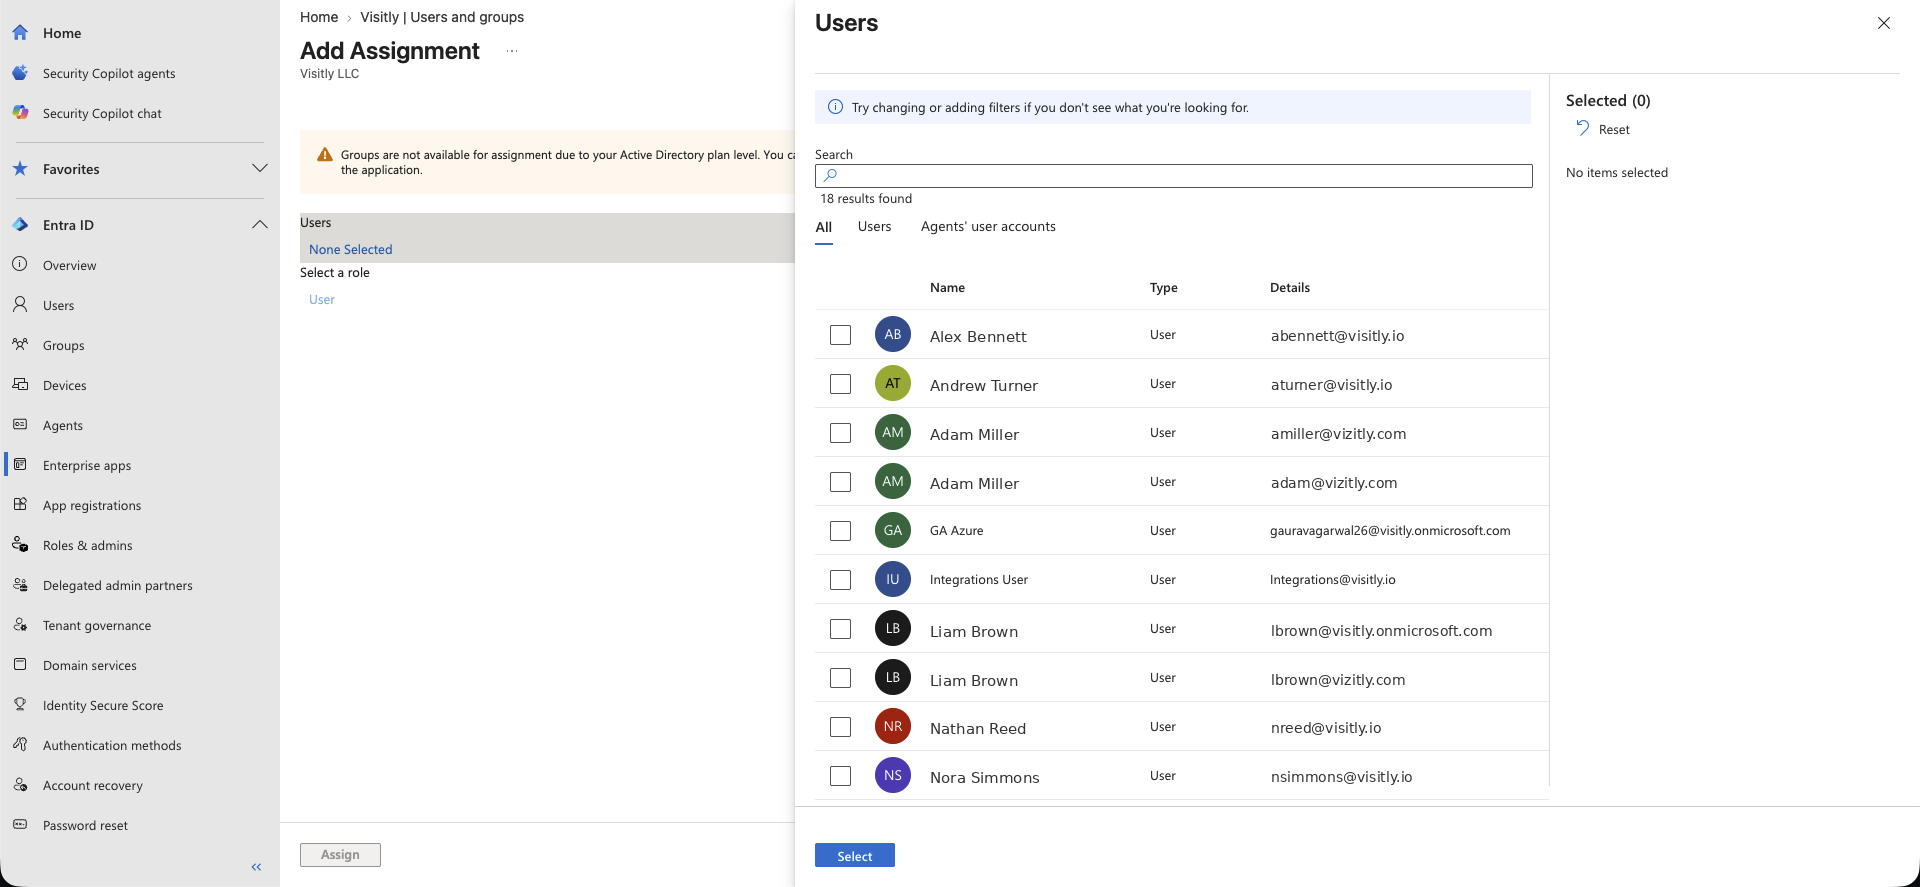
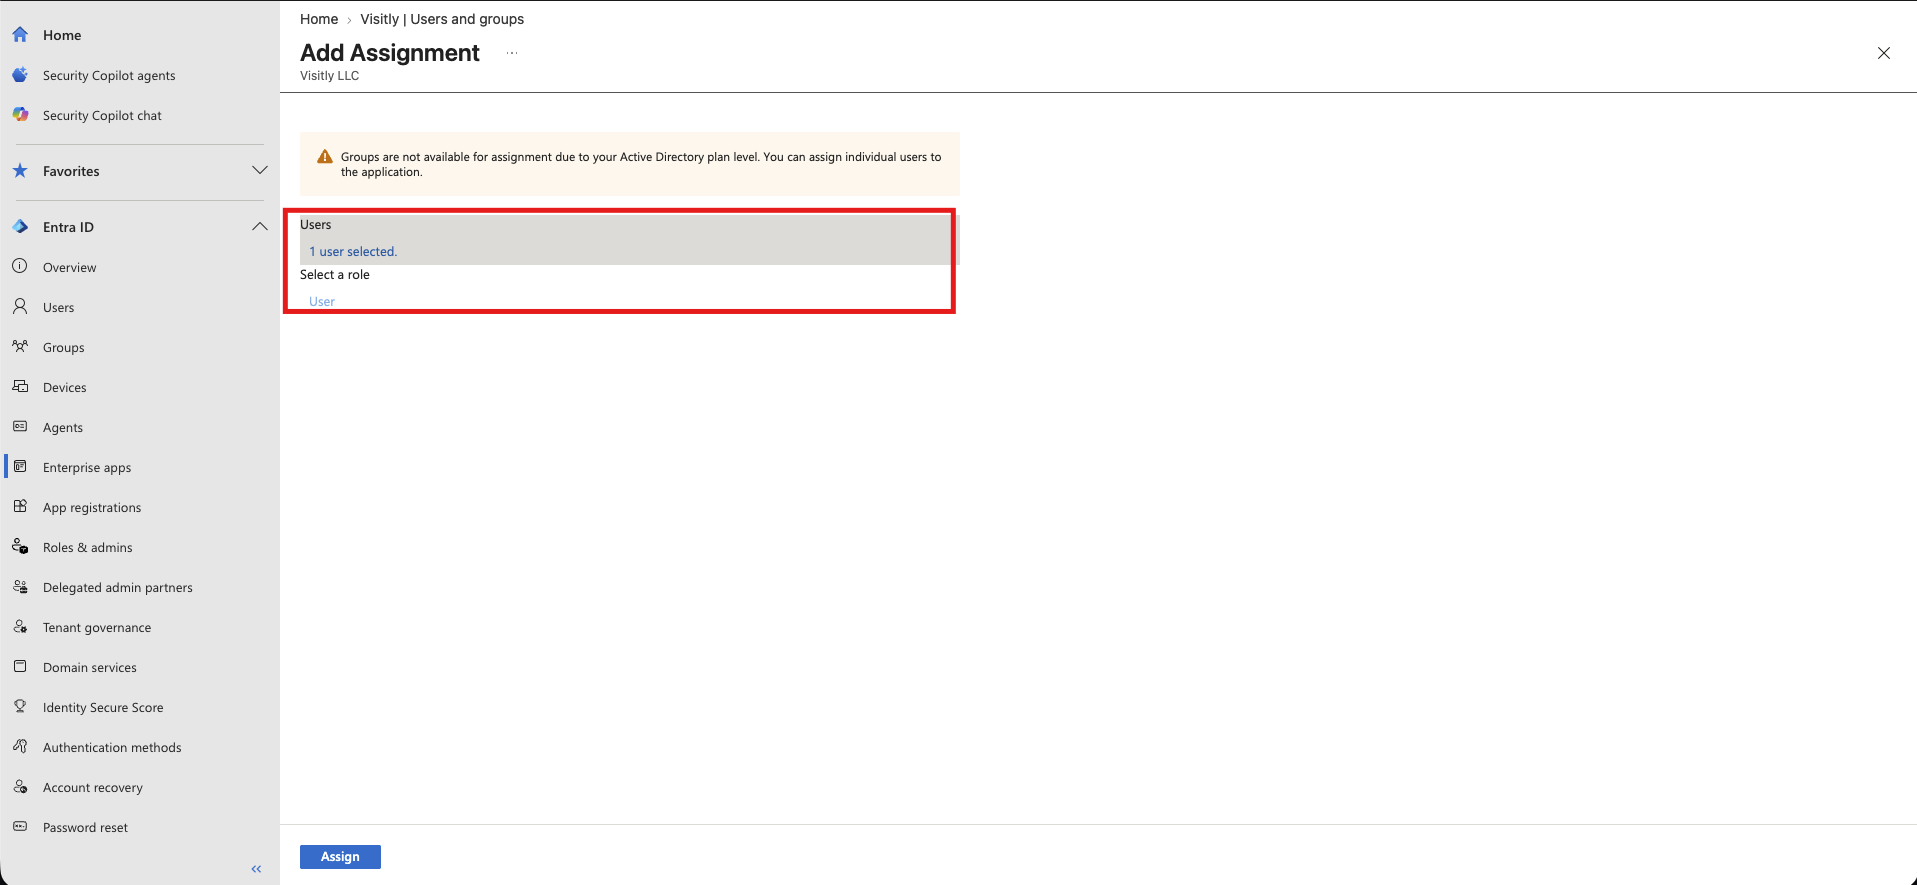
- Assign the users or groups you want provisioned to Visitly.
- Optional: under Provisioning → Settings, set Scope to Sync only assigned users and groups.
- Go to the Visitly application and select Users and groups → Add user/group.
The users and groups you assigned are now queued for provisioning.
Step 6: Start Provisioning
- Go to Provisioning → Overview and select Start provisioning.
- The first cycle can take up to about 40 minutes. After that, Entra syncs changes automatically roughly every 40 minutes.
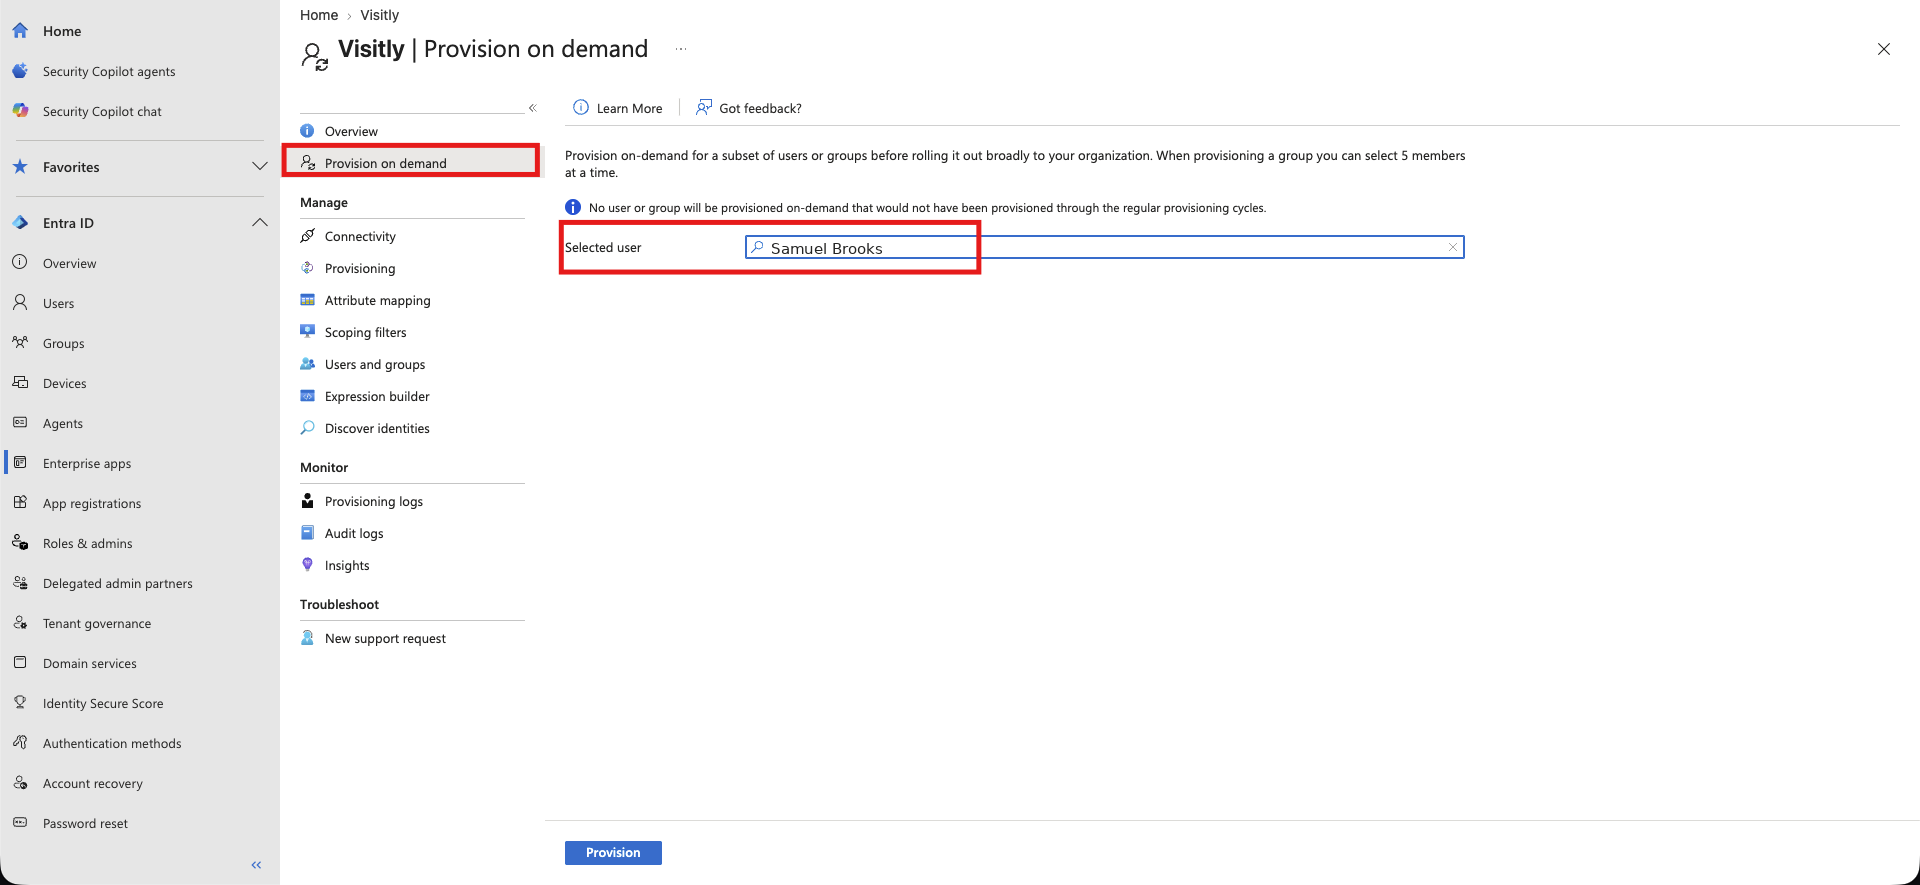
- To test a single user immediately without waiting for the next cycle, use Provision on Demand.
Provisioning is now active, and Entra will keep Visitly’s user list in sync going forward.
Verifying the Sync
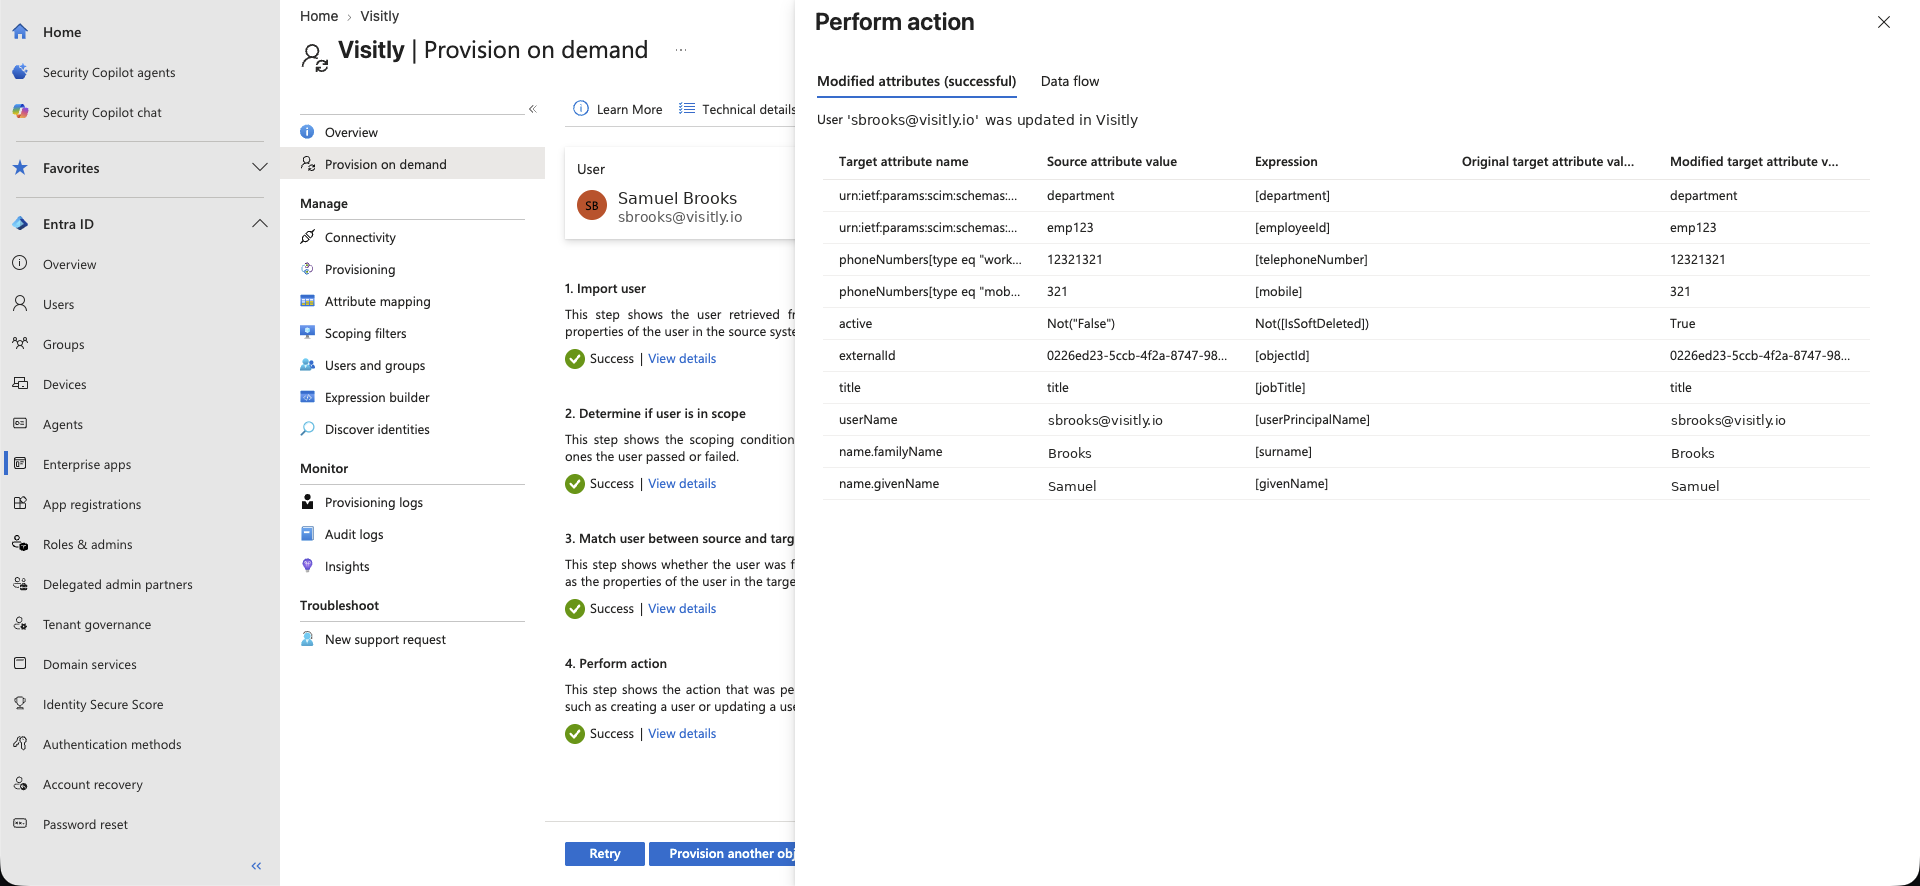
- Go to Provisioning → Provision on demand.
- Search for and select a user, then run the action.
- On the Modified attributes / Data flow tab, review exactly which attributes were sent and their values.
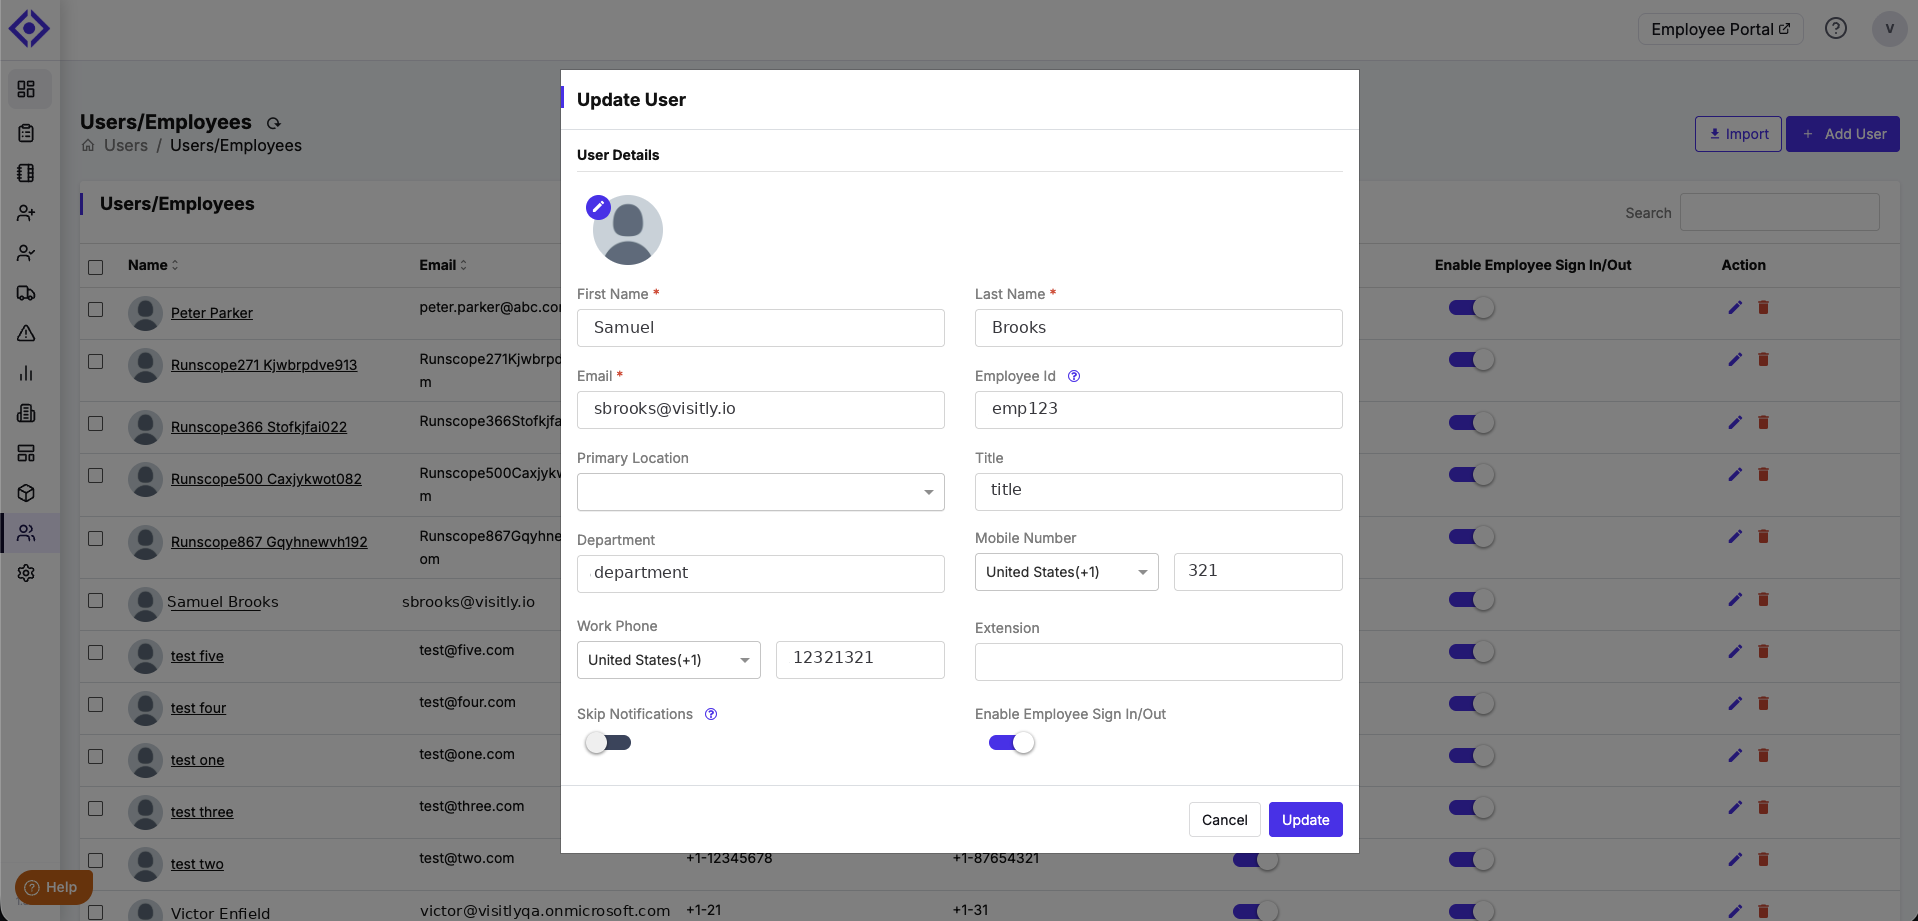
- Open Visitly and confirm the user appears with the correct name, title, department, employee ID, and phone numbers.
Good to Know- Sync is scheduled, not instant. Edits made in Entra are picked up on the next cycle, which can take up to about 40 minutes. Use Provision on Demand to apply a change immediately.
- Empty fields are not sent. If a user has no value for a field in Entra — for example, no employee ID — that field is left unchanged in Visitly rather than being cleared out.
- Deactivation is automatic. If you unassign a user from the Visitly app in Entra, or disable their Entra account, Visitly deactivates them too.
- Exact attribute names matter. When adding an attribute to the schema and when mapping it, the name must match exactly in both places. Otherwise, Entra reports the attribute as not defined.
Troubleshooting
Entra reports that an attribute is not defined.
Check that the attribute name in the schema editor matches the target attribute name used in the mapping step exactly, including capitalization and the full URN for department and employee ID.A user isn’t appearing in Visitly after provisioning starts.
Confirm the user is assigned to the Visitly application in Entra and that their account is enabled. If your scope is set to sync only assigned users and groups, users outside that scope won’t provision.
A field updated in Entra isn’t showing up in Visitly.
Sync is scheduled, not instant. Wait for the next cycle, or use Provision on Demand to push the change immediately. If the field is empty in Entra, Visitly leaves the existing value in place rather than clearing it.
Test Connection fails in Step 2.
Double-check that the Tenant URL and Secret Token were entered exactly as provided by your account manager, with no extra spaces. Request a new Secret Token if the issue continues.
A user was removed from Visitly unexpectedly.
This is expected behavior if the user was unassigned from the Visitly app in Entra or their Entra account was disabled. Reassign the user in Entra and run Provision on Demand to restore their access.Need help? Contact the Visitly support team at support@visitly.io
Was this article helpful?
That’s Great!
Thank you for your feedback
Sorry! We couldn't be helpful
Thank you for your feedback
Feedback sent
We appreciate your effort and will try to fix the article