Admin role required: Global Admin

Feature availability varies by plan. Check What's in each plan on our pricing page to see if it's included in yours, or talk to our sales team about upgrading.
Overview
Visitly's Custom Fields for Microsoft Teams Notifications lets you enrich your Teams alerts with visitor-submitted data collected at check-in. Instead of receiving a generic notification, your team sees the specific information relevant to your operations — from visitor purpose and company name to custom intake fields unique to your workflow. Custom fields are supported for all notification events and delivered directly to your configured Microsoft Teams Channel.
How It Works
- When a visitor completes check-in, Visitly captures all custom field responses entered during the sign-in flow.
- At the moment the notification event triggers (e.g. Visitor Sign-In), Visitly sends a Teams message to your configured channel that includes the selected custom field values alongside the standard notification details.
- You choose up to 6 custom fields per notification configuration, giving you full control over what appears in each Teams message.
- Custom fields are configured per event and per location, so different locations or event types can surface different visitor data.
- This feature works with all supported Microsoft Teams notification events.
Complete all prerequisites before starting setup. Missing any of these will prevent custom fields from appearing in your Teams messages.
Visitly requirements:
Active Visitly account with Global Admin or Location Admin access
Custom Fields for Microsoft Teams enabled on your account (contact support@visitly.io to request access)
At least one location configured with an active Microsoft Teams notification
Custom fields already created for your visitor sign-in flow (see Custom Fields)
Microsoft Teams requirements:
Visitly Microsoft Teams integration connected and authorized
A configured Teams Channel for at least one notification event
Appropriate channel permissions to receive incoming webhook messages
Setup Guide
Step 1: Open Notifications for Your Location
Log in to your Visitly Admin Dashboard.
Select the relevant location from the location menu.
Go to Notifications.
Click Edit on the location.
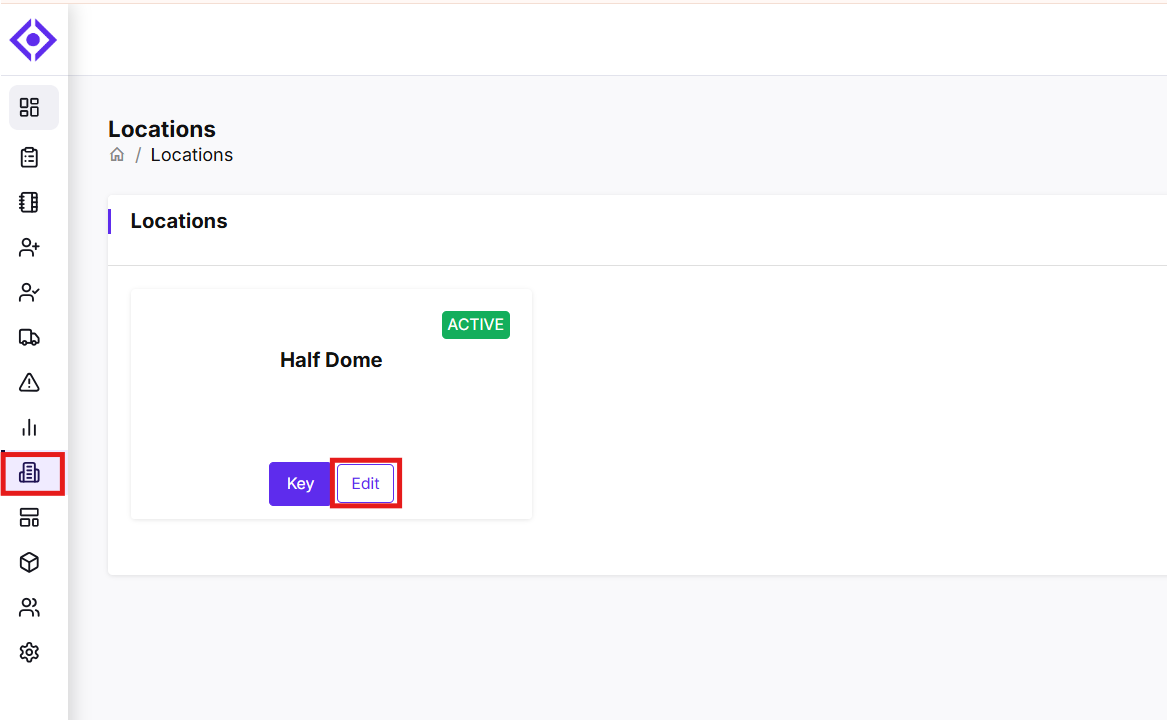
The Notifications configuration screen for that location is now open.
Step 2: Create or Open a Notification
Click Create Notification to set up a new notification, or select an existing one to edit.
Choose the event you want to configure (e.g. Visitor Sign-In).
Step 3: Select Custom Fields
In the notification configuration, locate the Custom Fields column.
Select up to 6 custom fields you want to include in the Teams message.
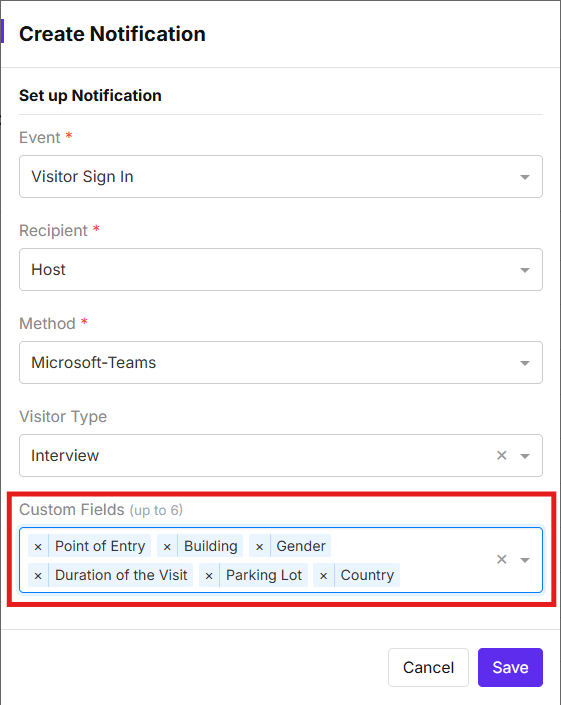
Tip: Choose fields that give your team immediate context without requiring follow-up — such as "Purpose of Visit," "Badge Number," or "Company." Avoid fields that duplicate information already in the standard notification.
Custom fields are now attached to this notification event.
Step 4: Save the Configuration
Review your selected custom fields.
Click Save to apply the configuration.
Your notification is now configured to include custom field values in all Teams messages for this event.
Step 5: Verify the Notification
Trigger the event by having a visitor complete sign-in at the configured location.
Check the Microsoft Teams channel you configured.
Confirm the Teams message displays the custom field labels and the values entered by the visitor during check-in.
Managing multiple locations? Repeat Steps 1–4 for each location where you want custom fields included in Teams notifications.
What the Teams Message Looks Like
When a visitor completes sign-in and the event triggers, Visitly sends a Teams message to your configured channel. The message includes:
Standard notification details (visitor name, time, location, event type)
Each selected custom field label paired with the visitor's submitted value
Example -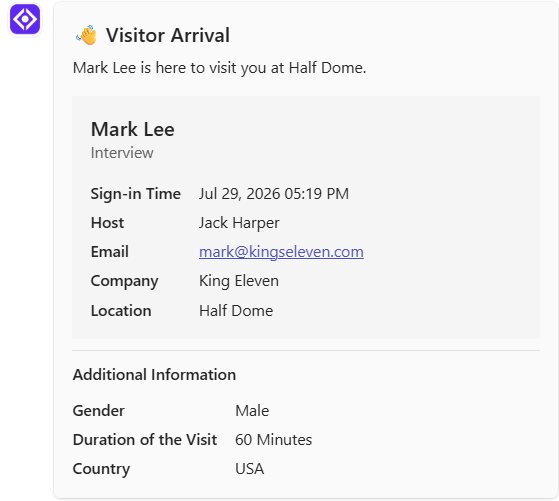
Troubleshooting
- Custom fields are not appearing in the Teams message.
Confirm the Custom Fields for Microsoft Teams feature is enabled on your account — contact support@visitly.io if you are unsure. Also verify that you selected and saved at least one custom field in the notification configuration, and that the visitor completed those fields during sign-in. - The custom field appears blank in the Teams message.
The visitor did not complete that field during check-in. If the field is required for your workflow, configure it as a mandatory field in your sign-in flow so visitors cannot skip it. - I saved the configuration but the Teams message still shows no custom fields. Navigate back to Notifications → Edit for the event and confirm the custom fields are still selected — occasionally a browser session timeout can prevent a save from completing. Re-select the fields and save again.
- The Teams notification is not being delivered at all.
Verify that the Visitly Microsoft Teams integration is still authorized and that the incoming webhook URL for your channel is active. In Teams, webhook connectors can expire or be removed by a Teams admin. Reconnect the webhook and update the URL in your Visitly notification configuration if needed. - Notifications are not reaching my Private Channel.
Private channels in Microsoft Teams require a dedicated incoming webhook — the webhook from a standard channel cannot deliver messages to a private channel. Confirm a webhook is configured directly within the private channel, and that the correct webhook URL is saved in Visitly. - I can only see some of the custom fields I selected.
Visitly supports a maximum of 6 custom fields per notification configuration. If you selected more than 6, only the first 6 will appear. Review your configuration and prioritize the most operationally relevant fields.
Need help? Contact the Visitly support team at support@visitly.io
Was this article helpful?
That’s Great!
Thank you for your feedback
Sorry! We couldn't be helpful
Thank you for your feedback
Feedback sent
We appreciate your effort and will try to fix the article