Connect Visitly to Salesforce to automatically sync visitor check-in and check-out data to your CRM. Create leads, track visits, map custom fields, sync documents, and keep your team informed — all without manual data entry.
Prerequisites
Before connecting, make sure you have the following:
- A Visitly account with admin access (Org Admin or Location Admin)
- A Salesforce account — any edition with API access (Professional, Enterprise, Unlimited, or free Developer Edition)
- Salesforce admin permissions (to create custom objects and authorize OAuth)
- “API Enabled” permission on your Salesforce user profile
Note: Salesforce Essentials does not include API access. If you’re on Essentials, check with your Salesforce admin or consider upgrading to Professional edition or higher. You can verify your edition at Setup → Company Information → Organization Edition.
Step 1: Create the Visitly Visit Object
Visitly syncs visitor data to a custom object called Visitly_Visit__c in your Salesforce org. Your Salesforce admin needs to create this object and its fields before connecting. There are two ways to do this:
Option A: Deploy via Workbench (Recommended)
Download the ready-made metadata package and deploy it through Salesforce Workbench. This creates the custom object and all 20 fields in one step — no manual field creation needed.
- Download the Visitly Salesforce Package (
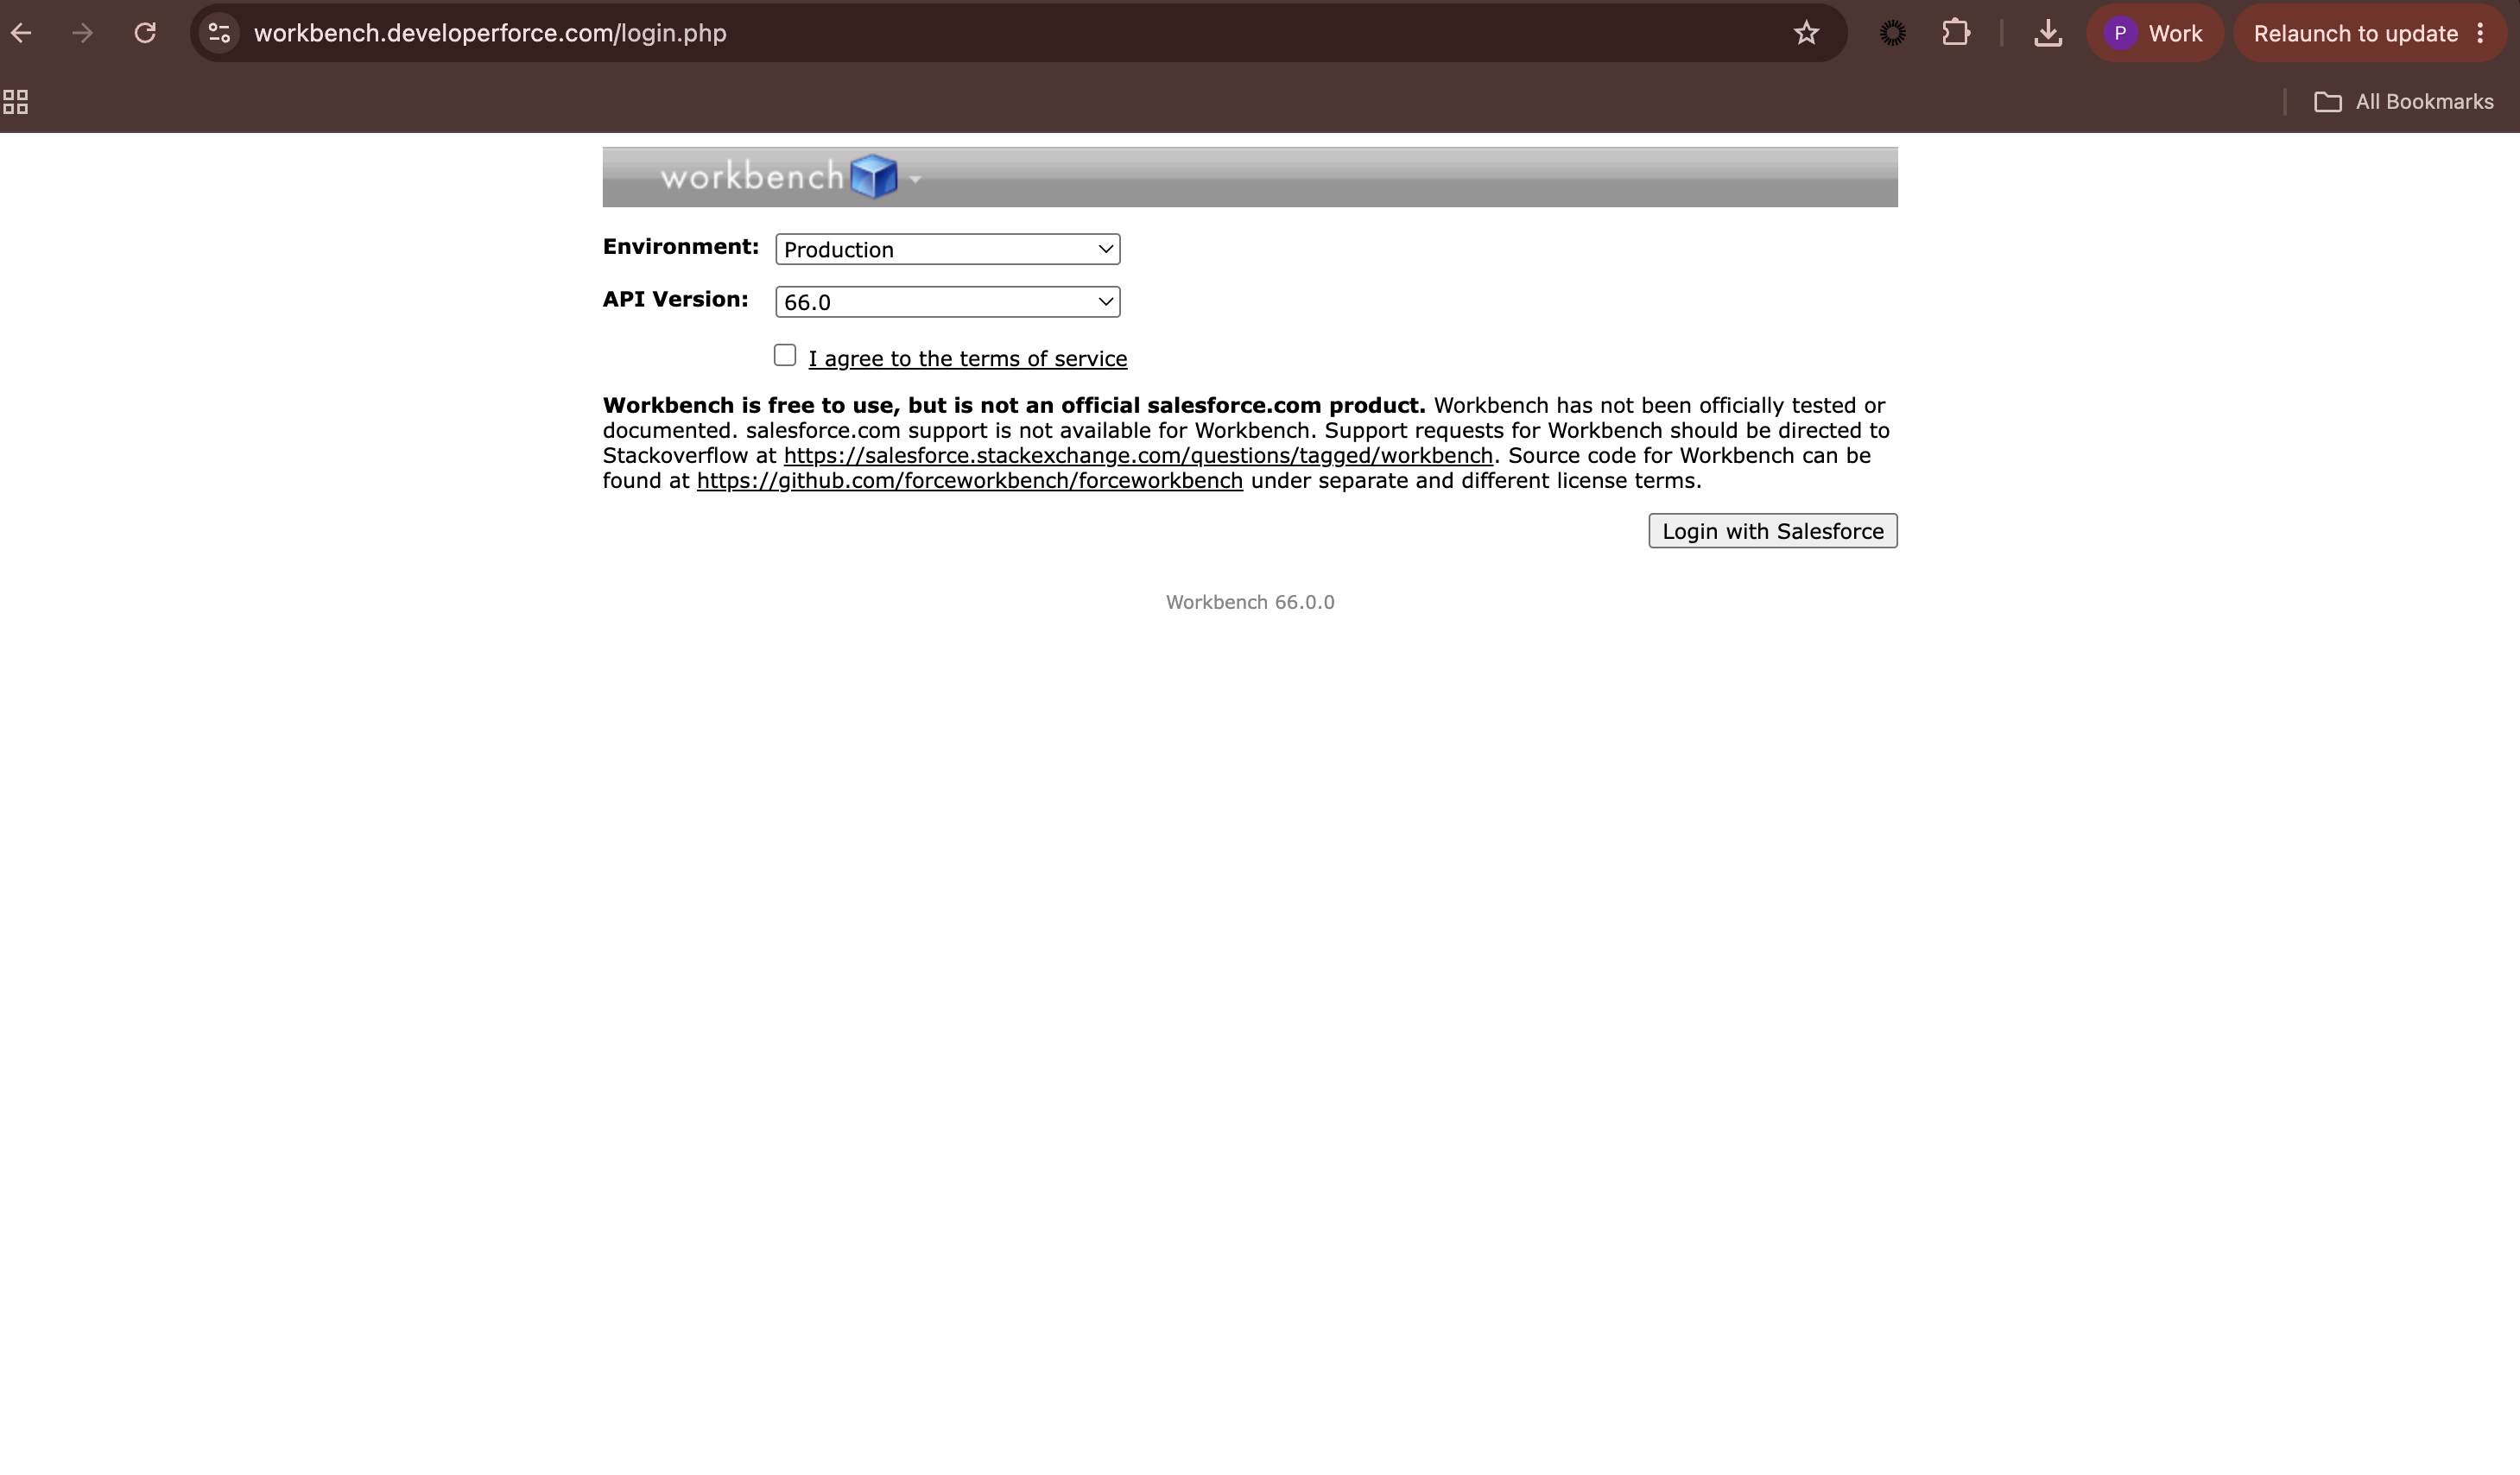
Visitly_Salesforce_Package.zip) from your Visitly account team or the Visitly Help Center downloads page. - Go to workbench.developerforce.com and log in with your Salesforce credentials.
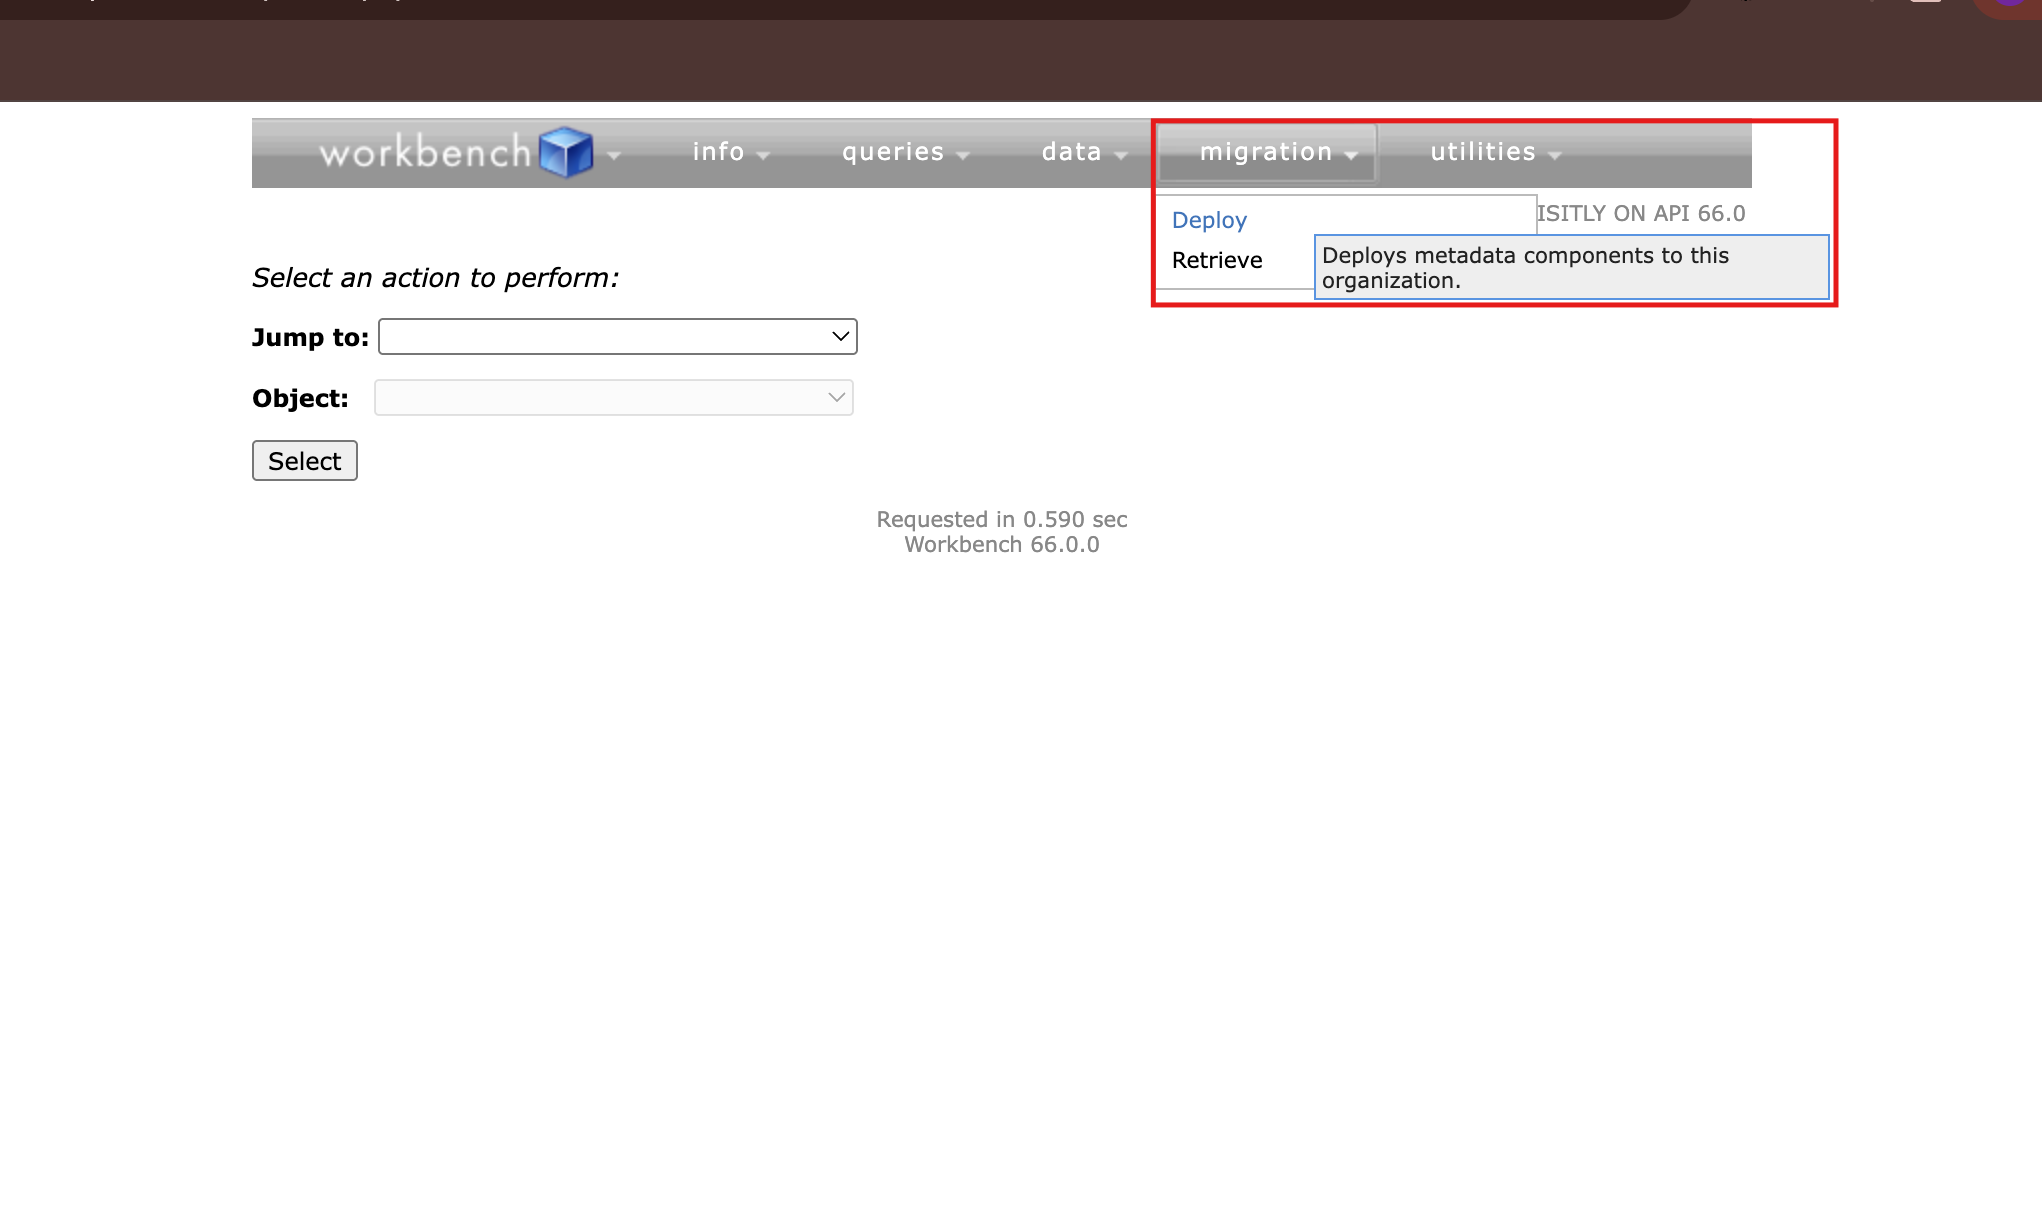
- Navigate to Migration → Deploy.
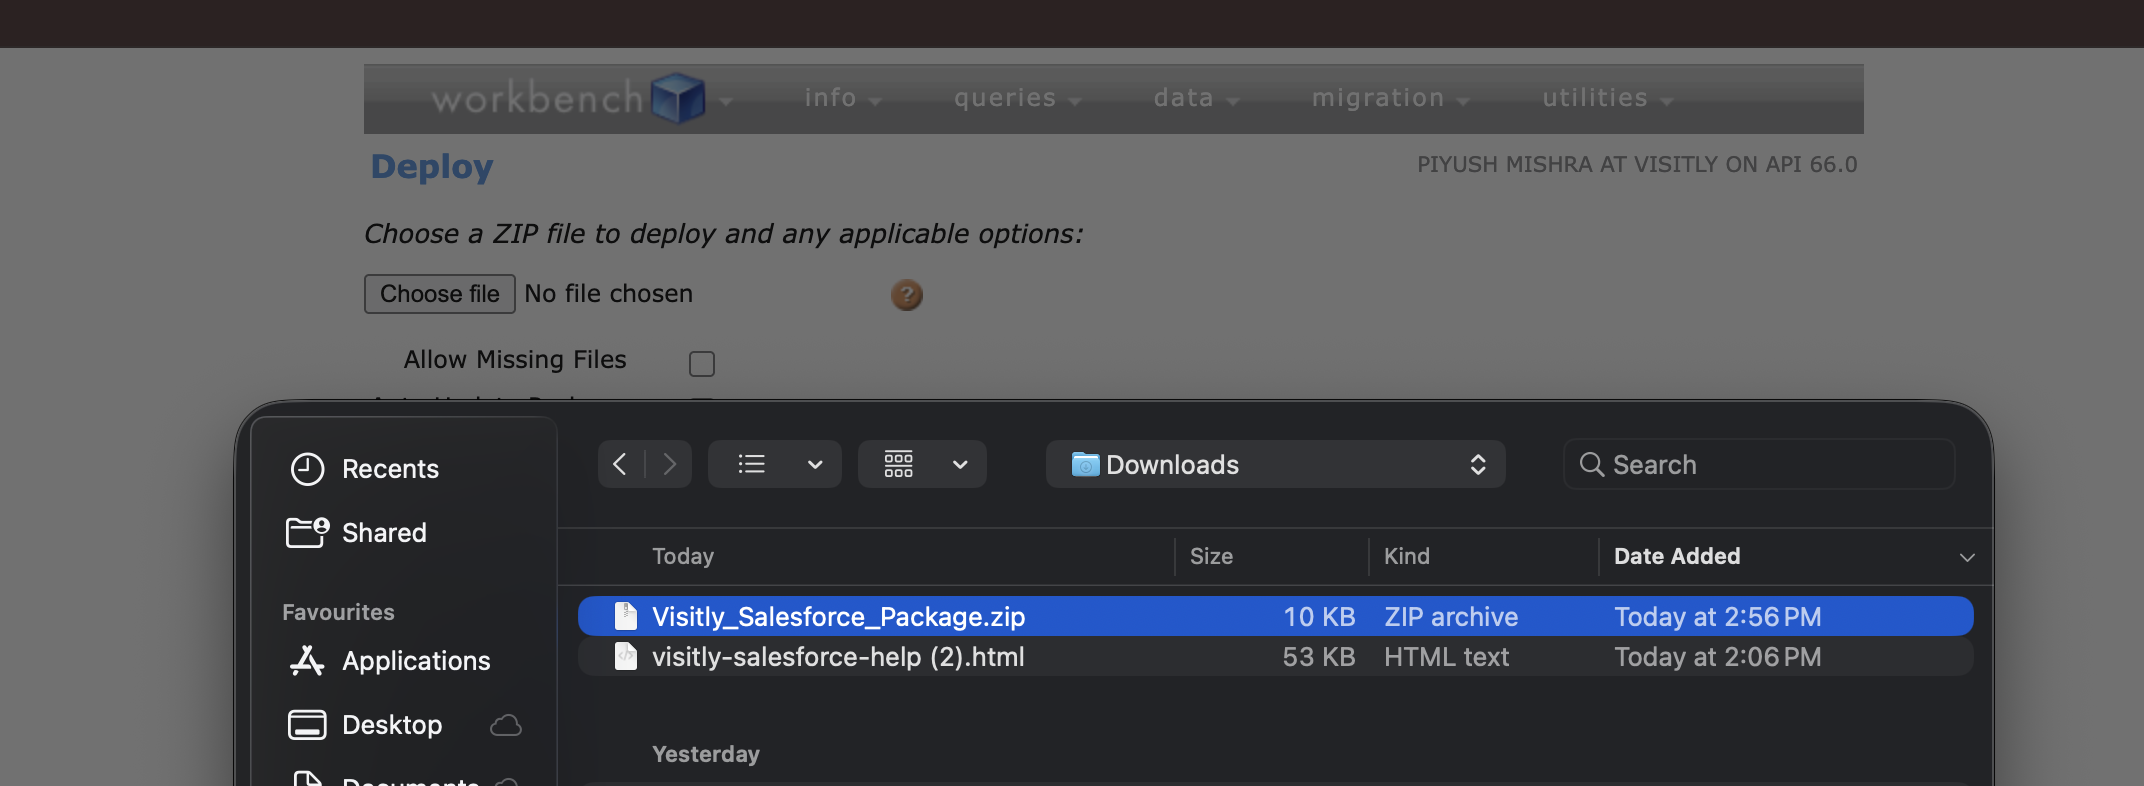
- Click Choose File, select the downloaded zip file.
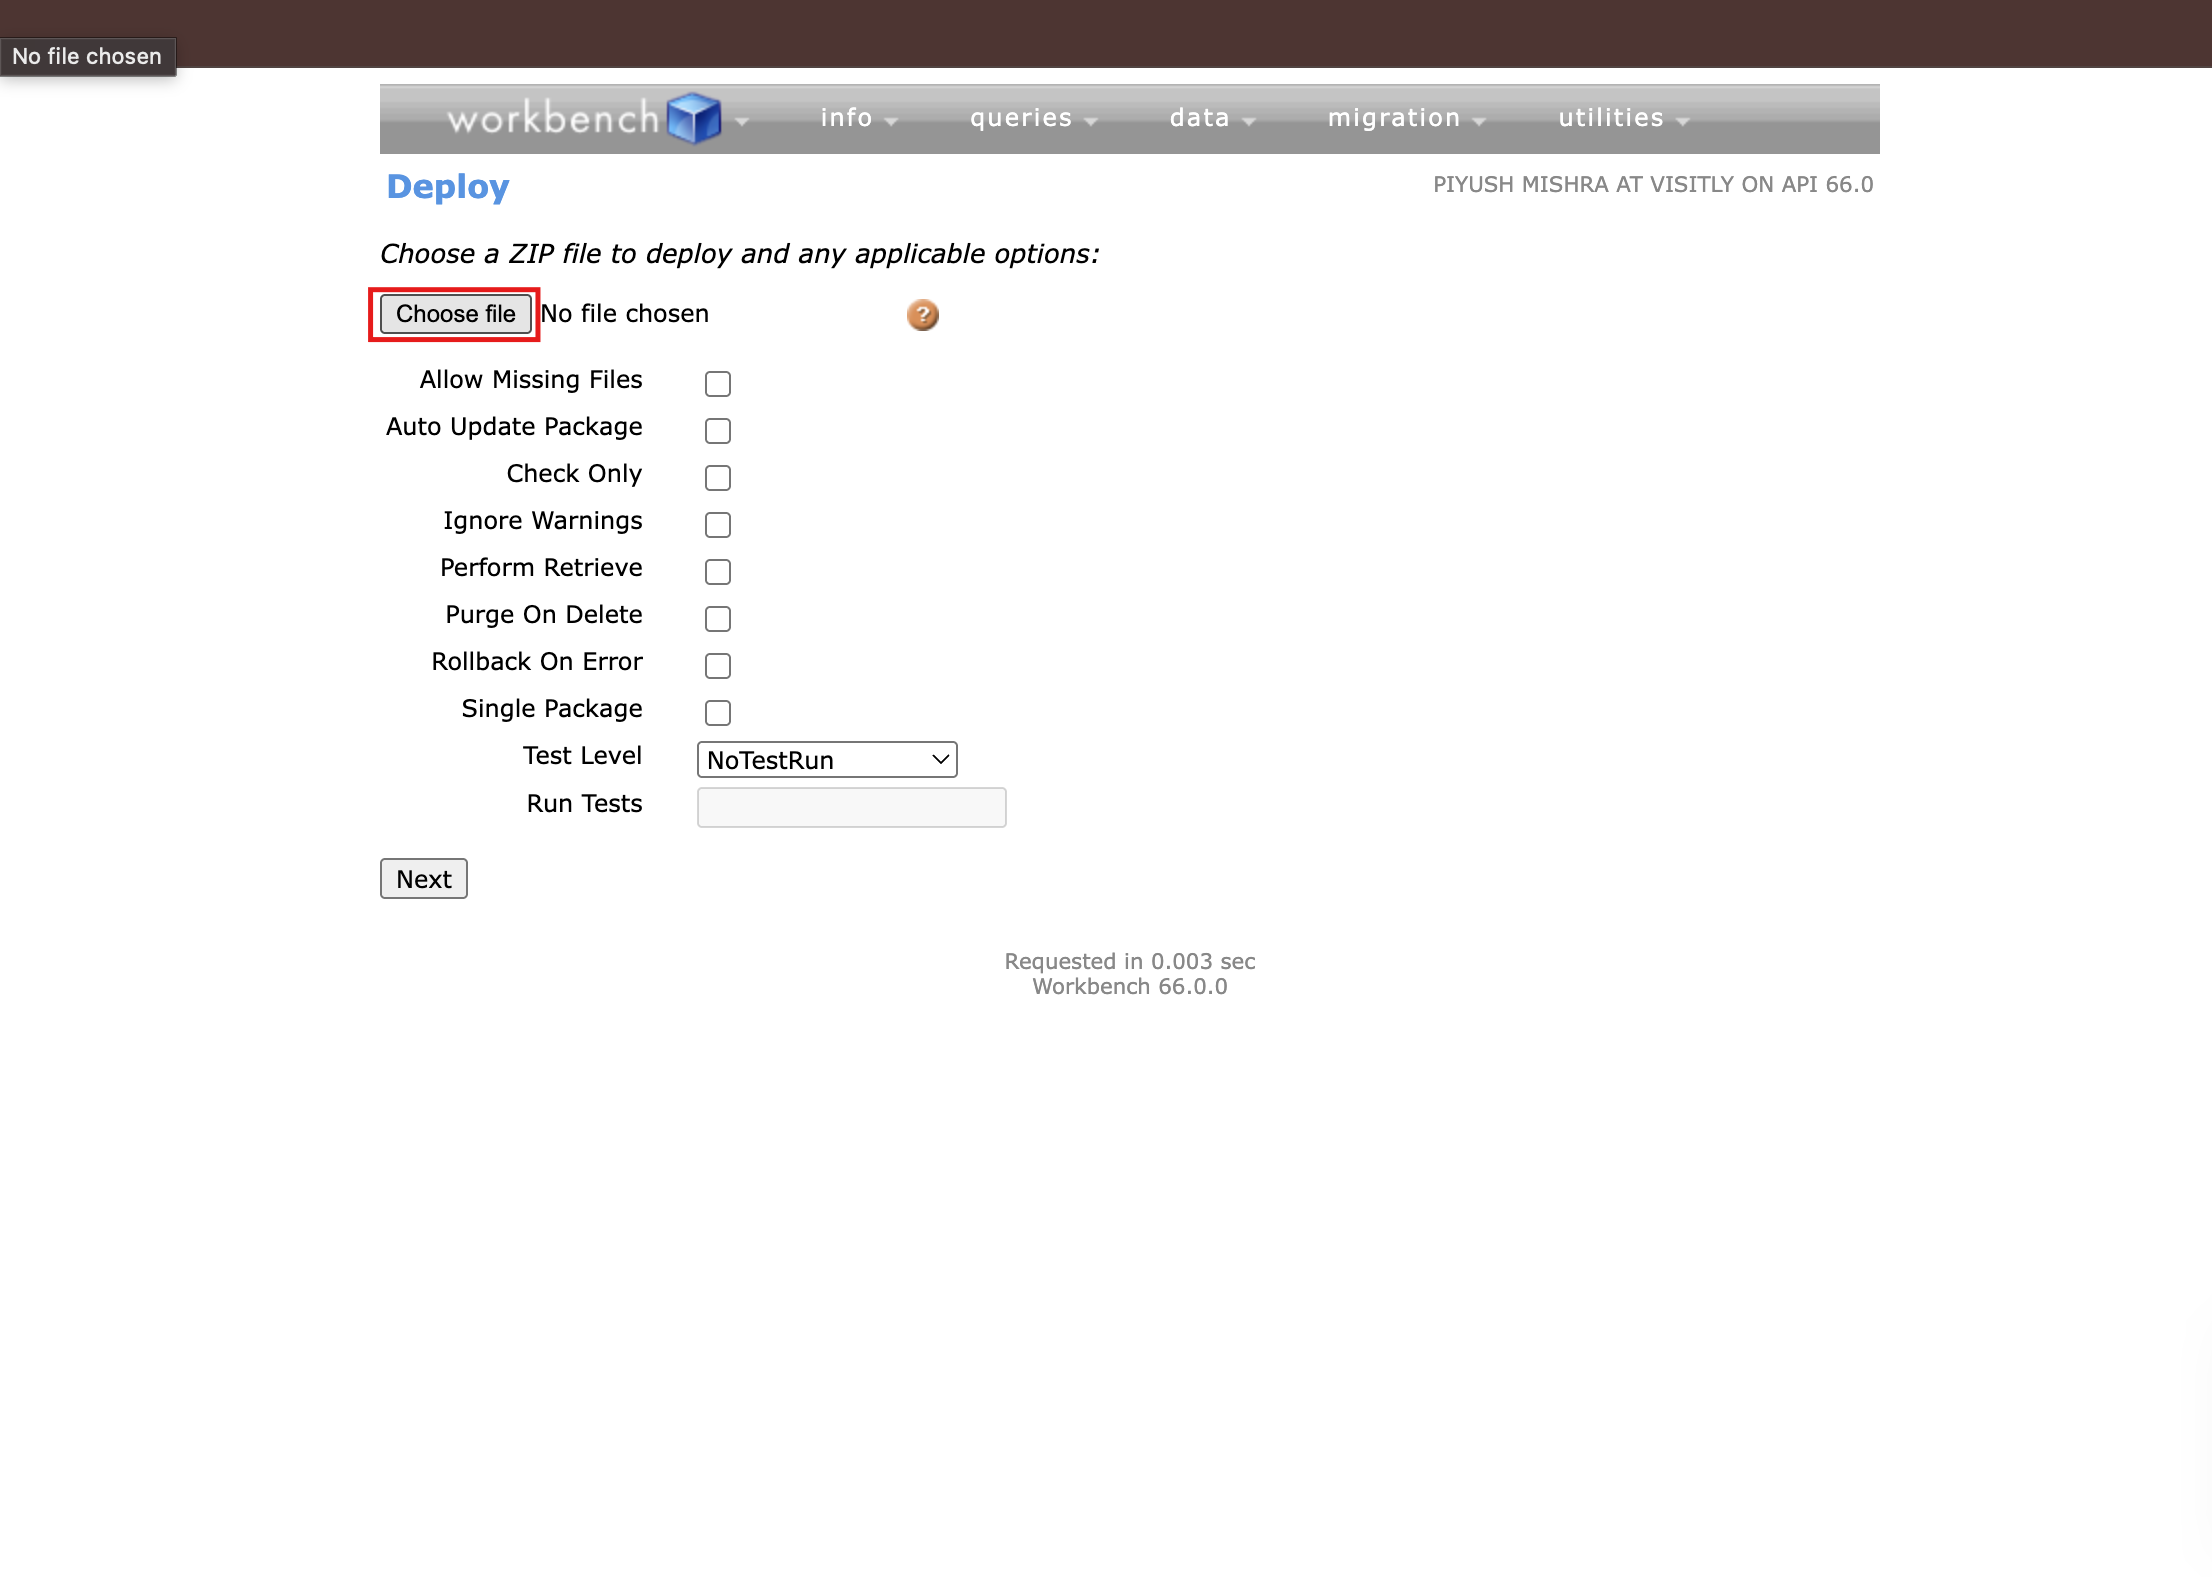
- Check Single Package: true. This is required because
package.xmlis at the zip root. - Set Test Level to
RunLocalTests. (Trial and Production orgs rejectNoTestRun.)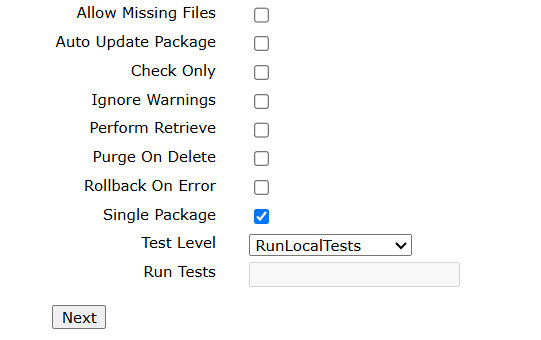
- Click Next, then Deploy. Wait for the Success status.
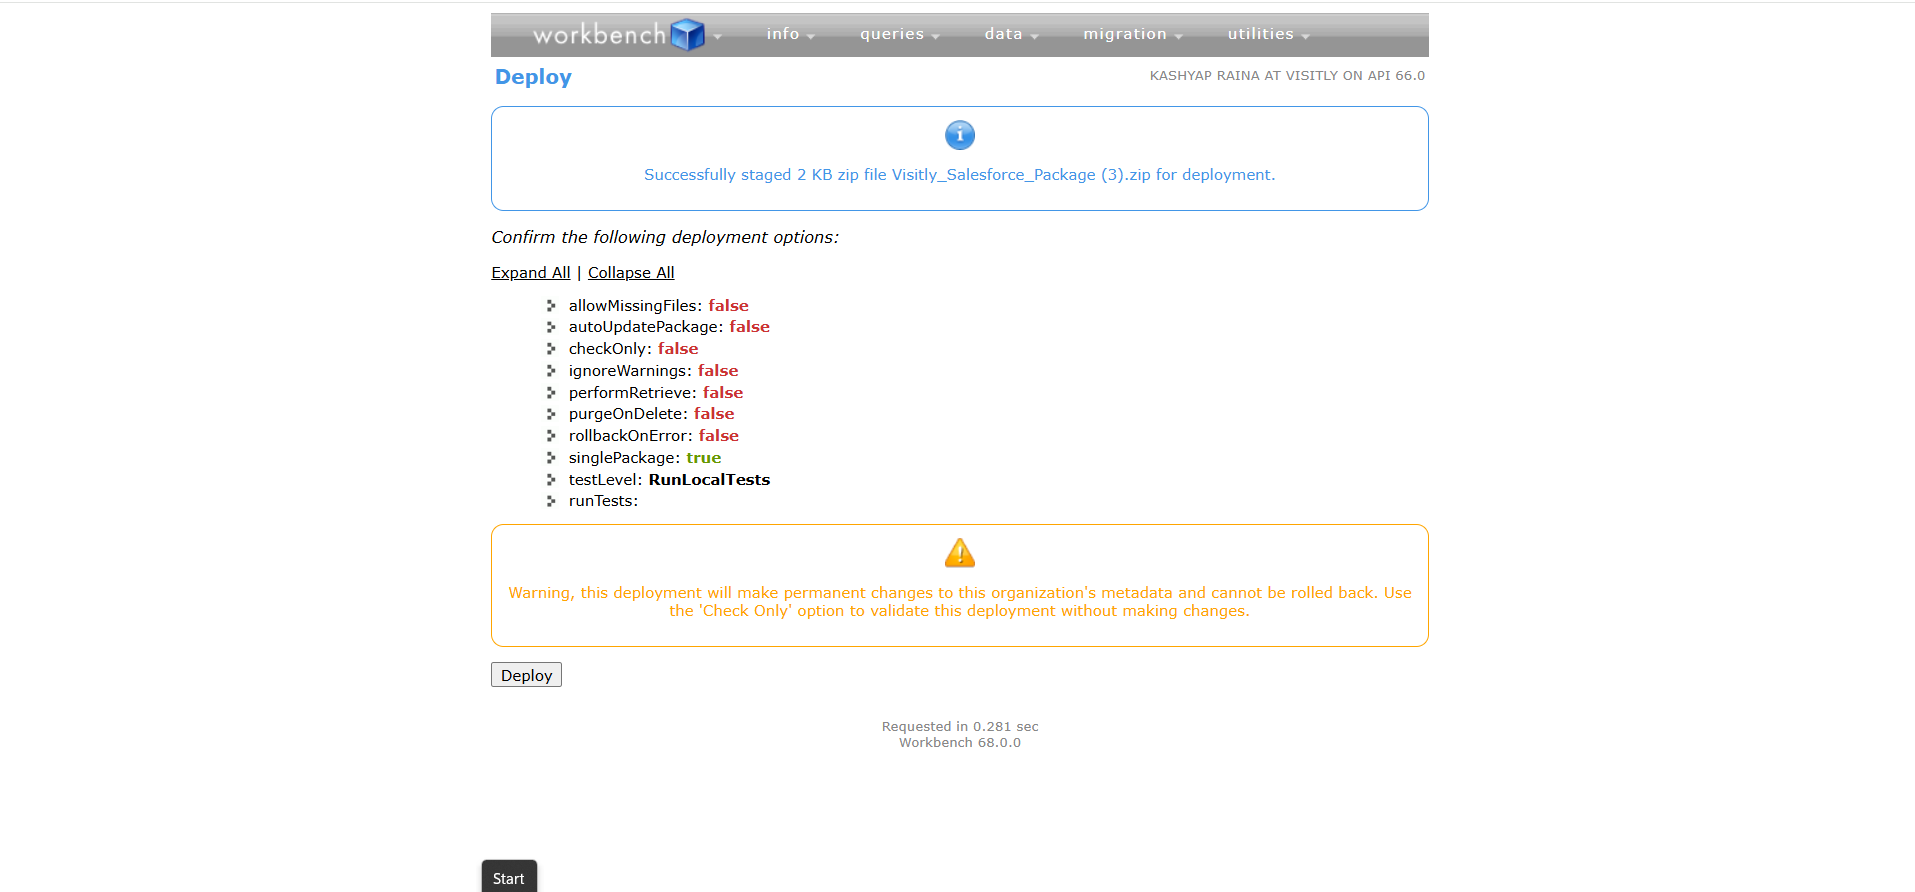 After deploying: You still need to set Field-Level Security for the new fields — see below.
Option B: Manual Setup
Create the custom object and each field individually through the Salesforce Setup UI. This takes longer but doesn’t require Workbench.
Create the Object (Manual Setup)
For detailed guidance, see Salesforce’s documentation on creating custom objects.
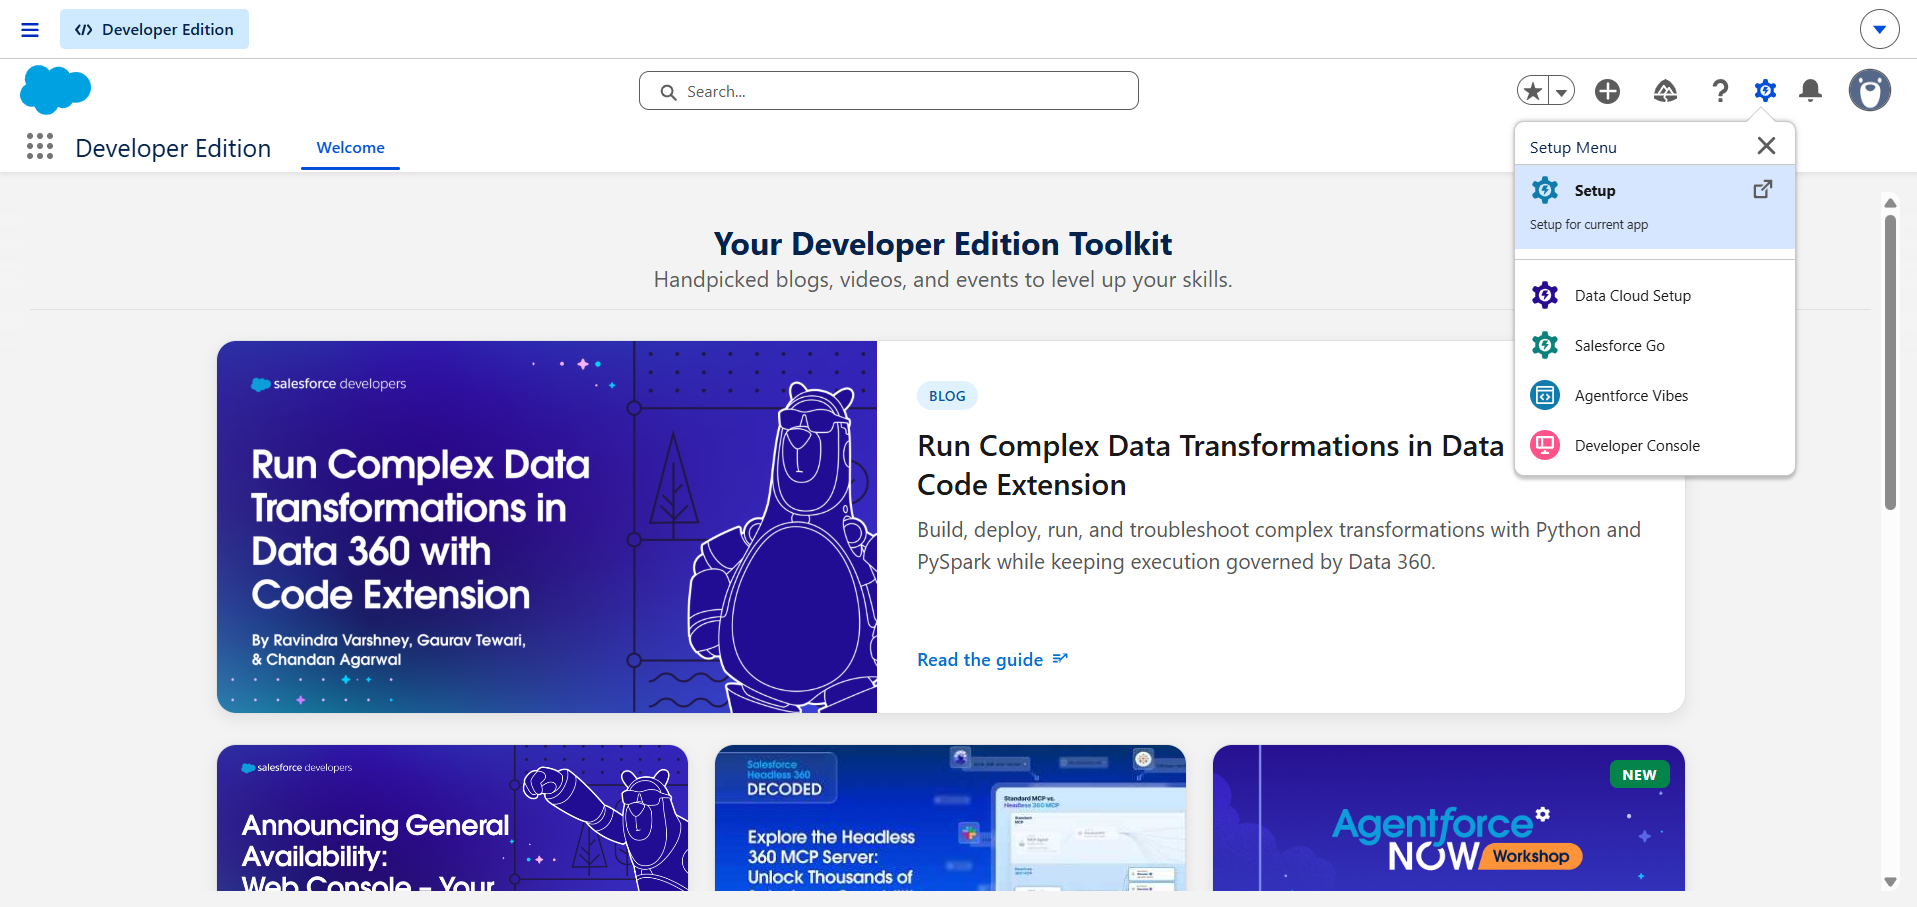
- In Salesforce, click the gear icon (top-right) → Setup.
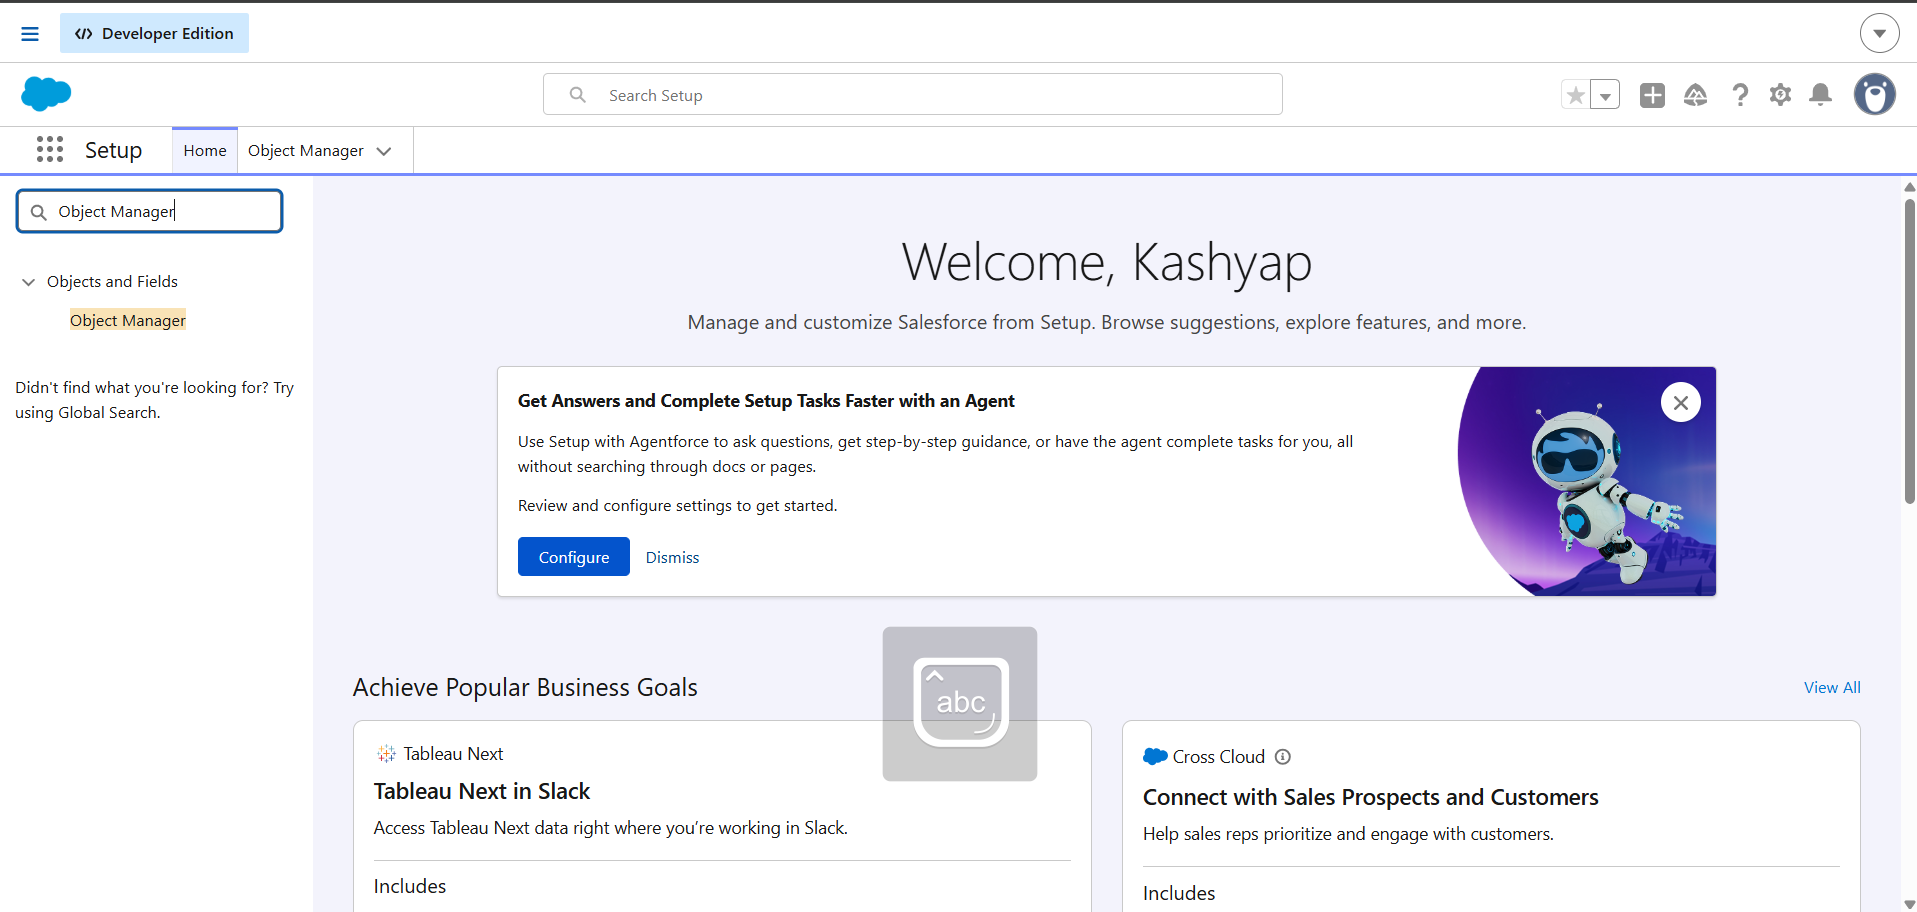
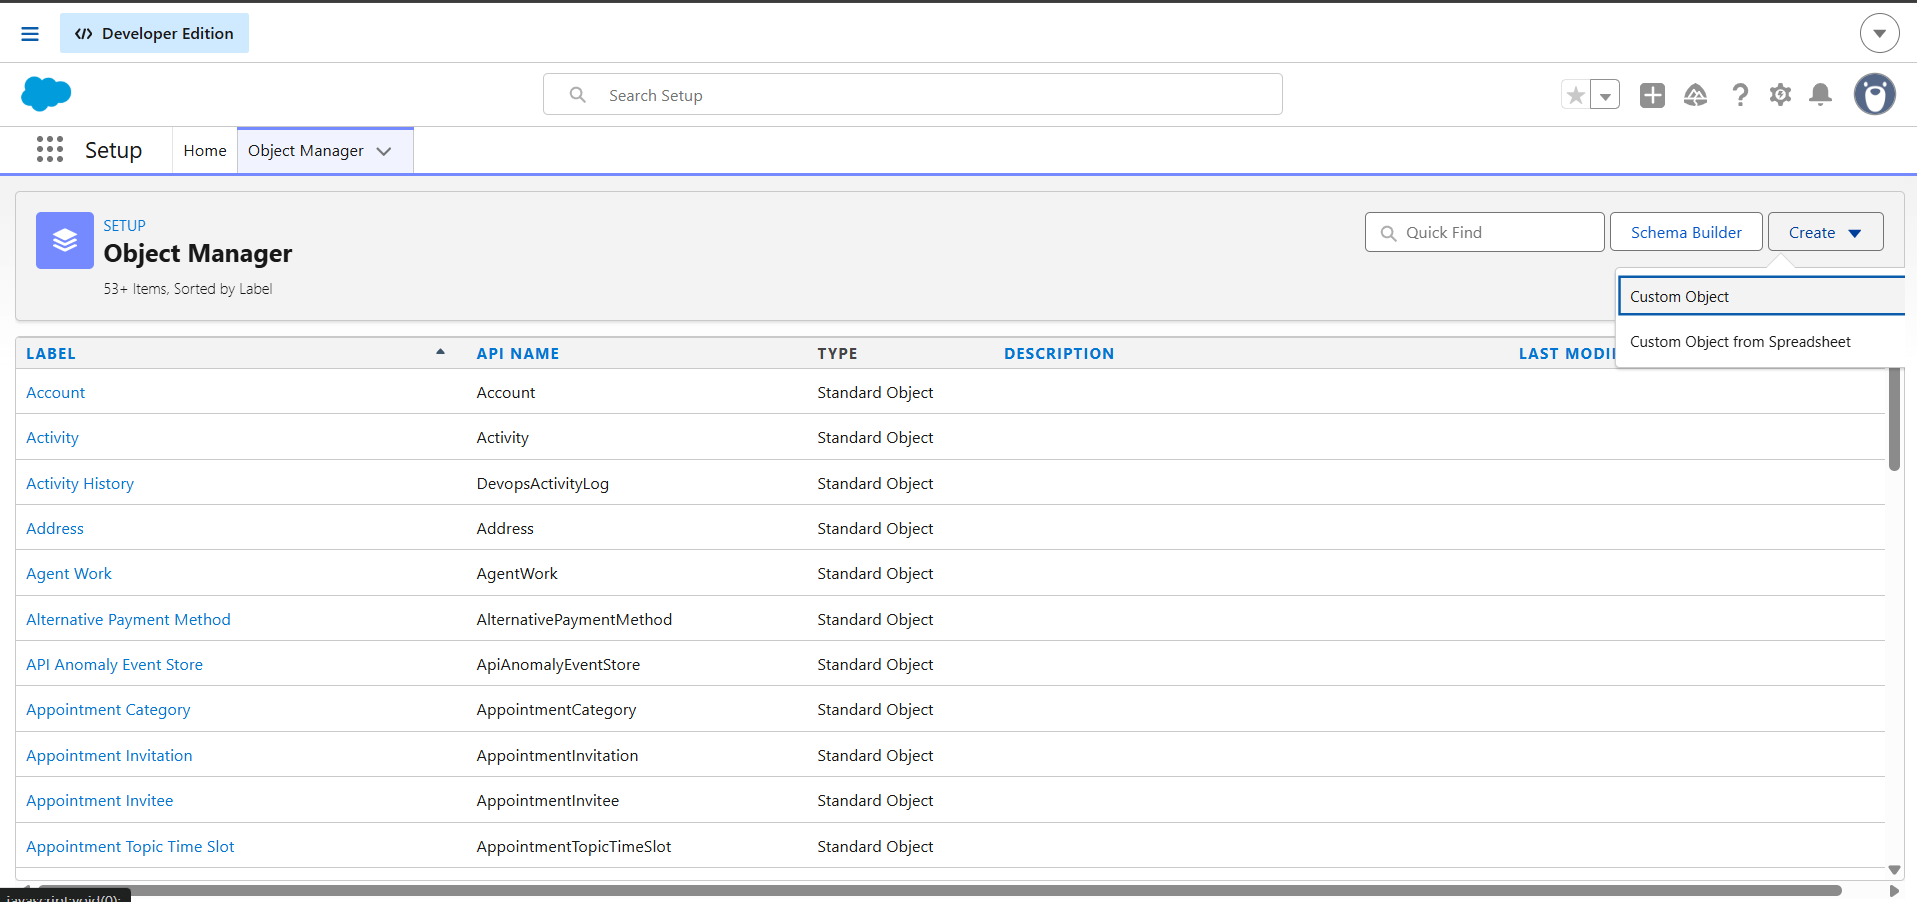
- In the Quick Find box, type Object Manager and click it.
- Click Create (top-right) → Custom Object.
- Fill in:
Label:Visitly Visit
Plural Label:Visitly Visits
Object Name:Visitly_Visit(auto-fills from Label)
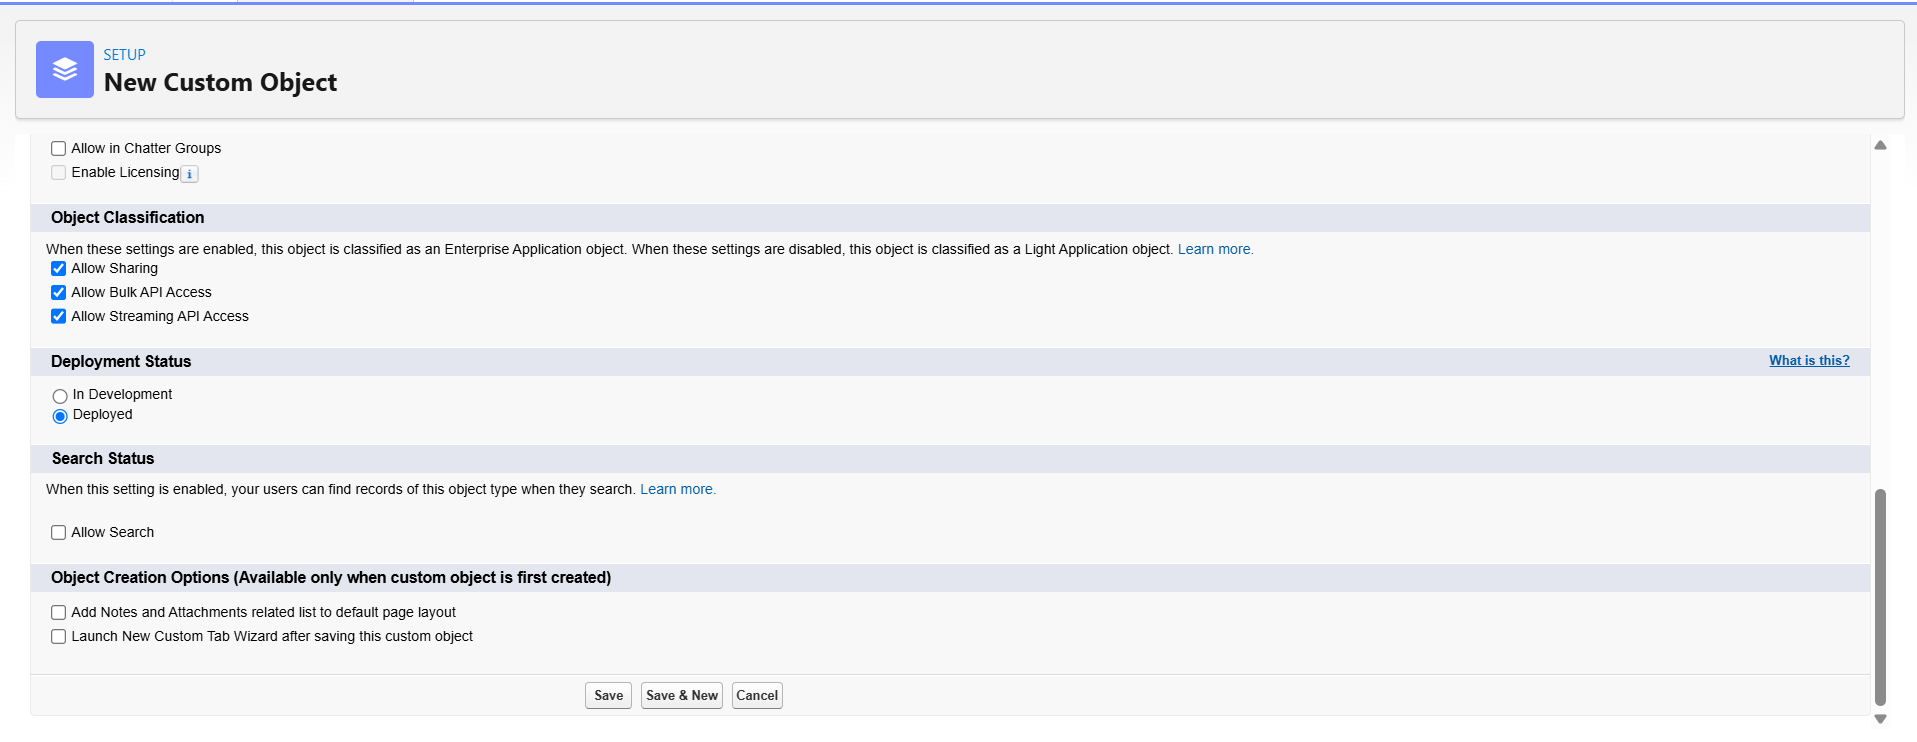
Record Name: Leave default (Visitly Visit Name)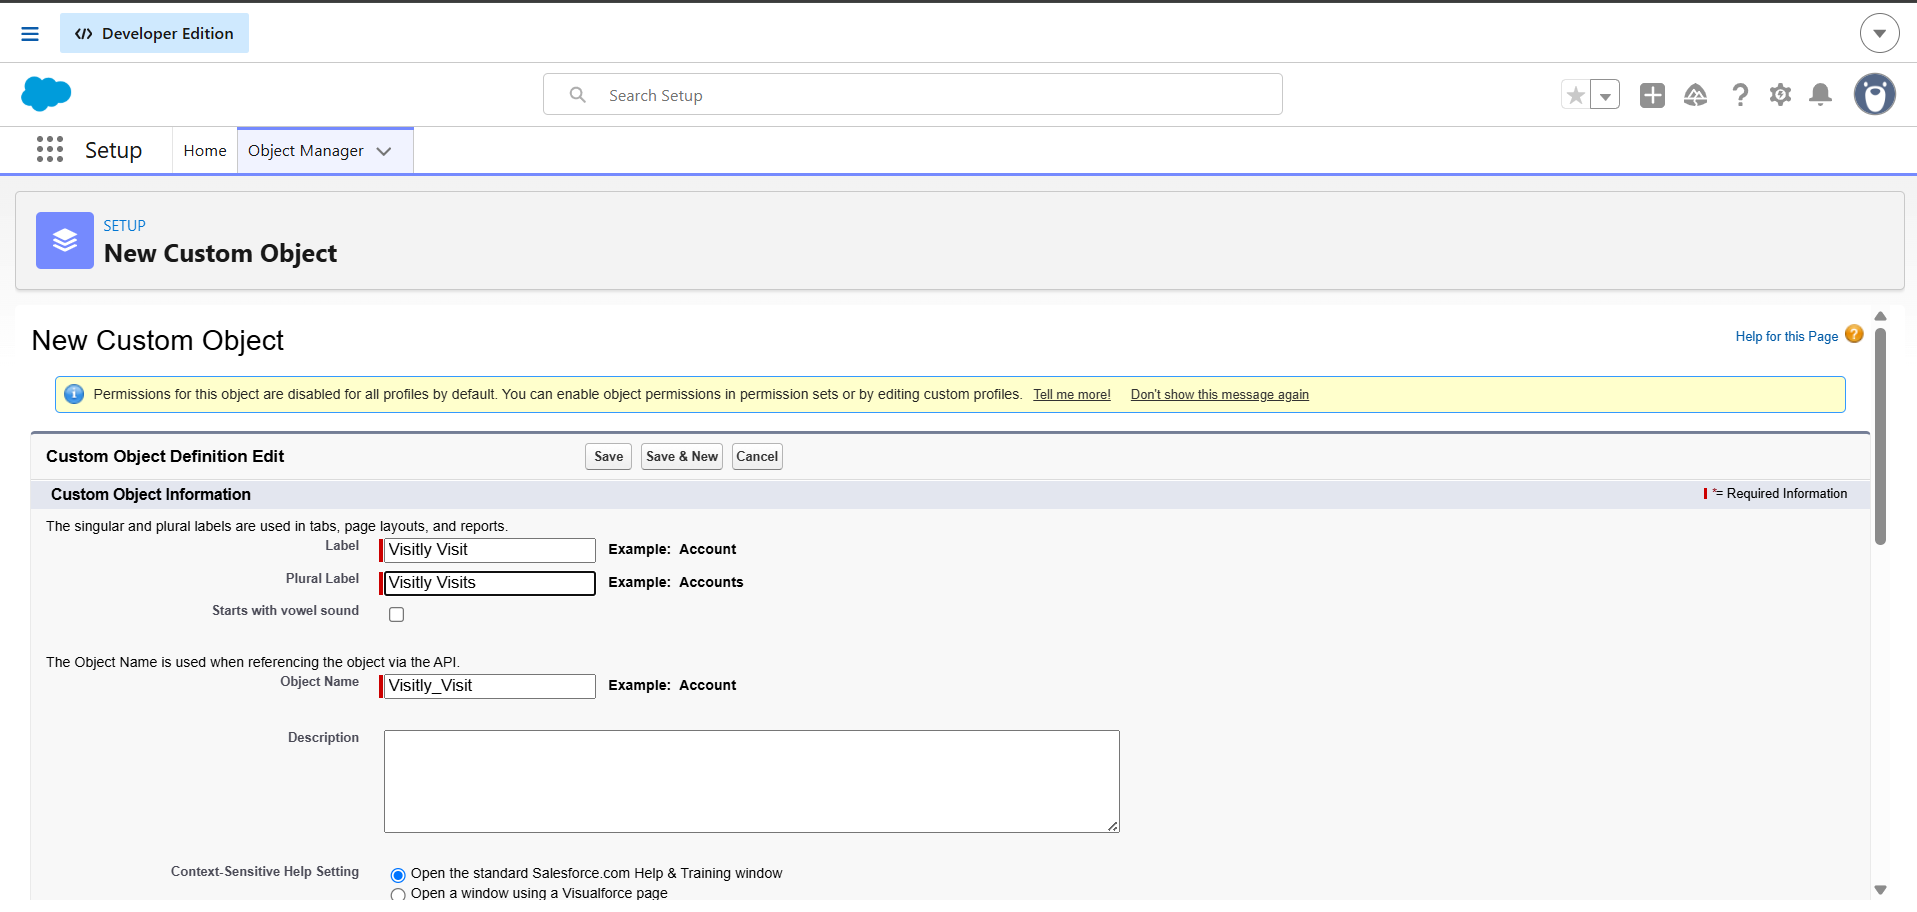
- Leave all other options at their defaults and click Save.
Step 2: Add the Required Fields (Manual Setup)
Navigate to Object Manager → Visitly Visit → Fields & Relationships, then click New for each field below. See Salesforce’s guide on adding custom fields.
Note: For each field: Select the data type → click Next → enter the Field Label (the API Name auto-fills) → click Next → set Field-Level Security (check Visible for your profile) → click Next → add to page layout → click Save & Newto continue with the next field.
Here’s an example: adding the first field step by step
- Go to Object Manager → Visitly Visit → Fields & Relationships → New.
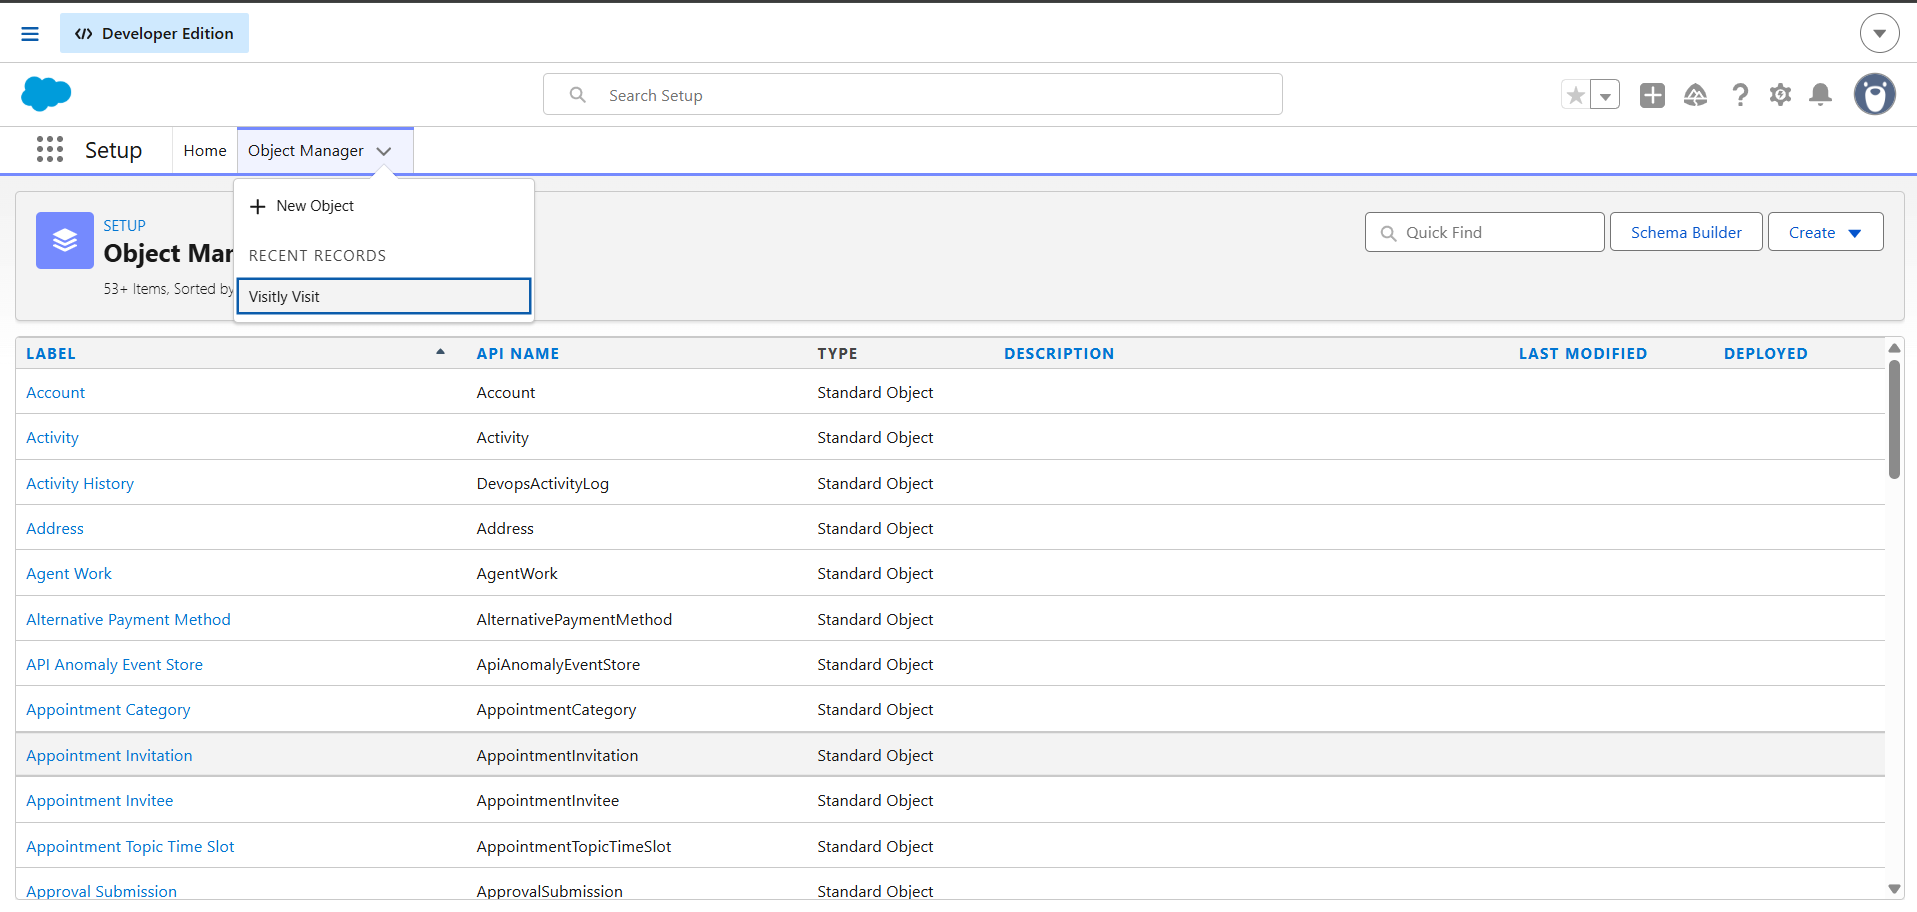
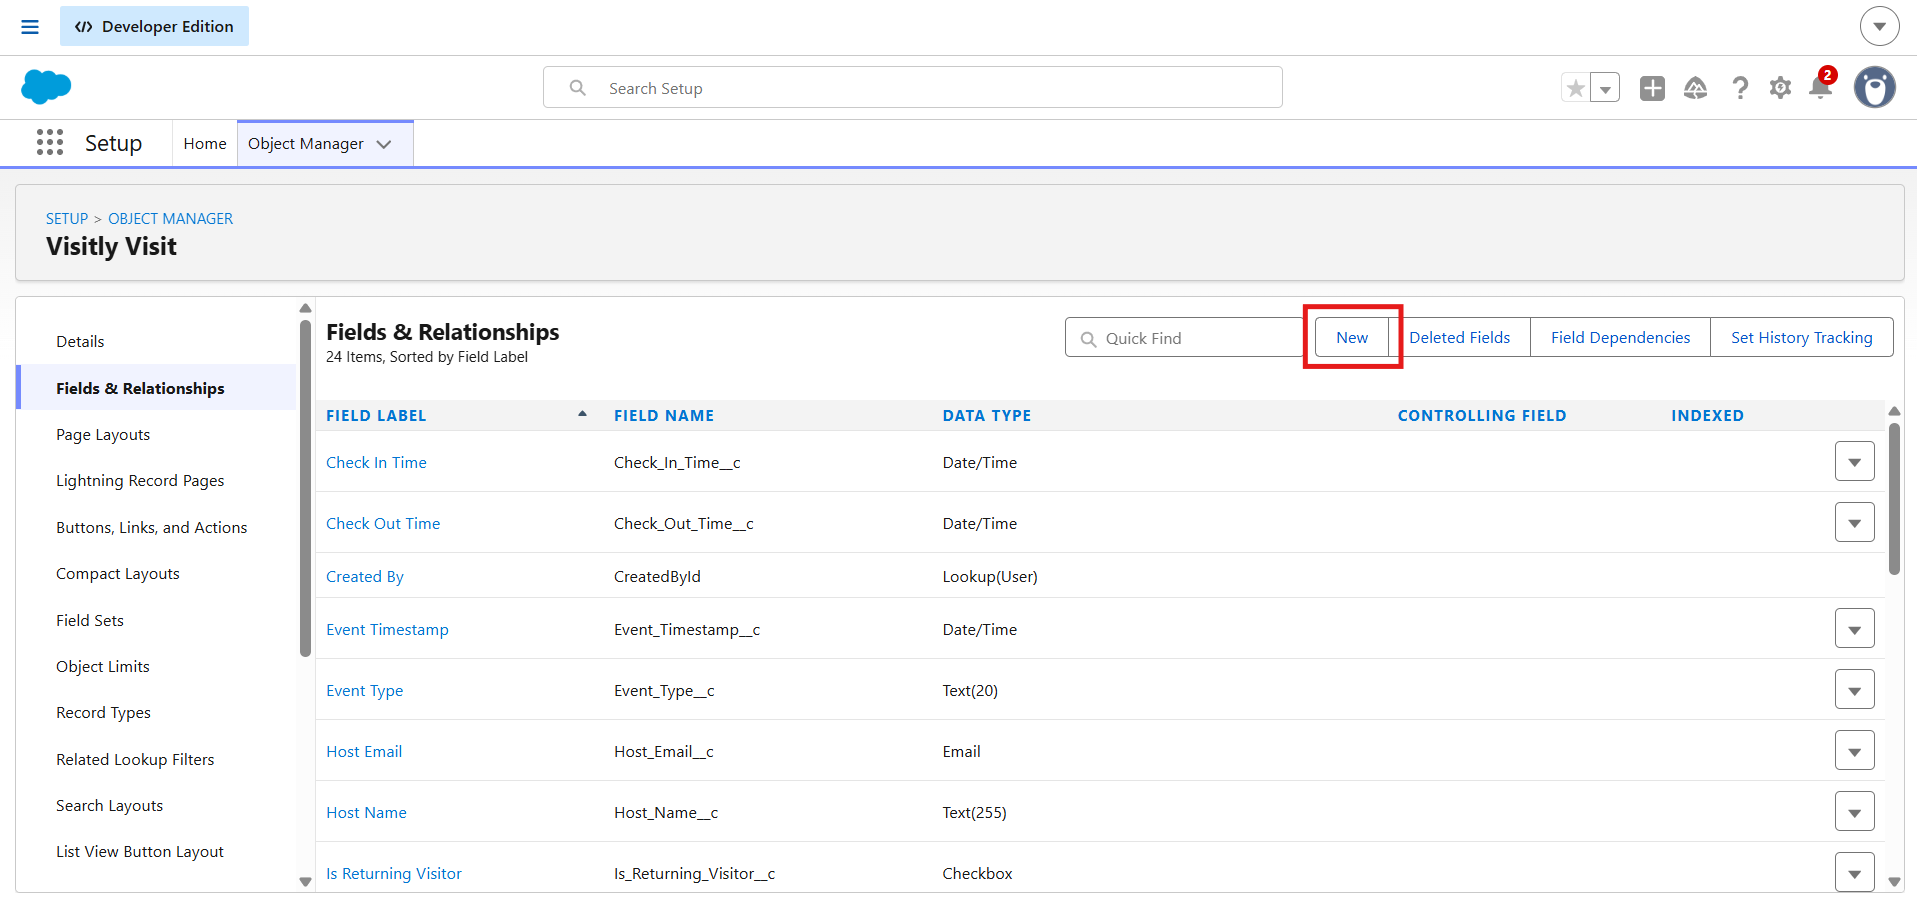
- Select Text as the data type, then click Next.
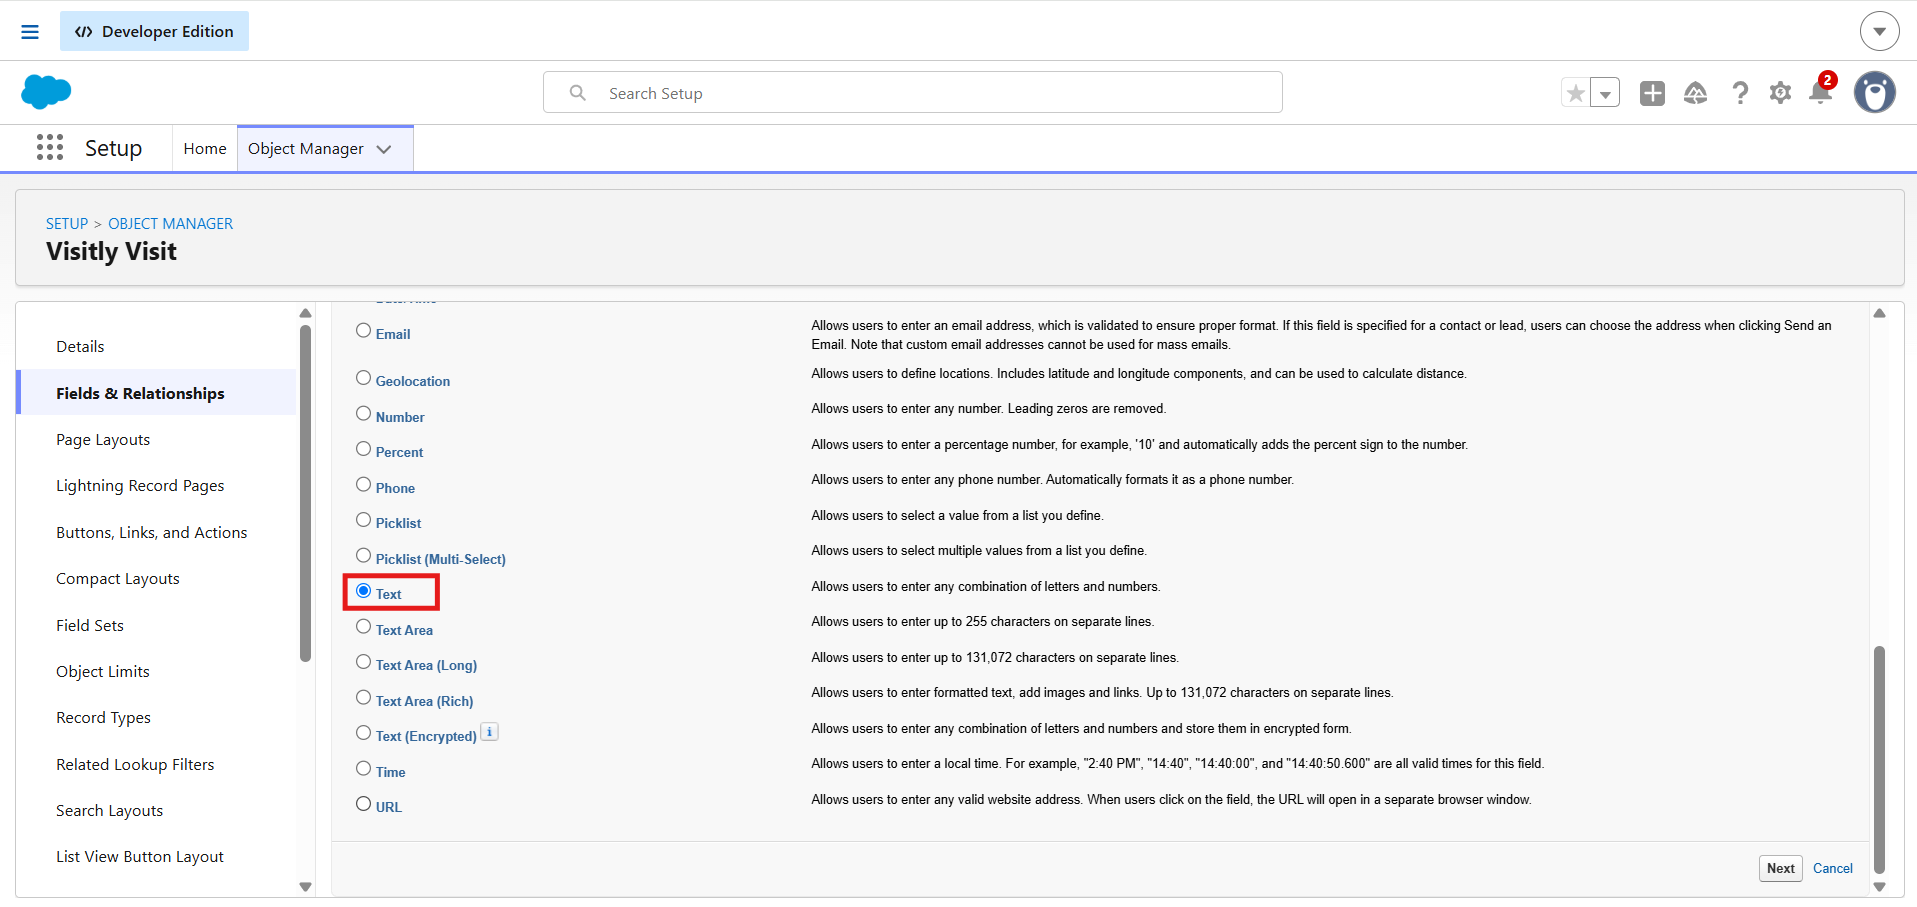
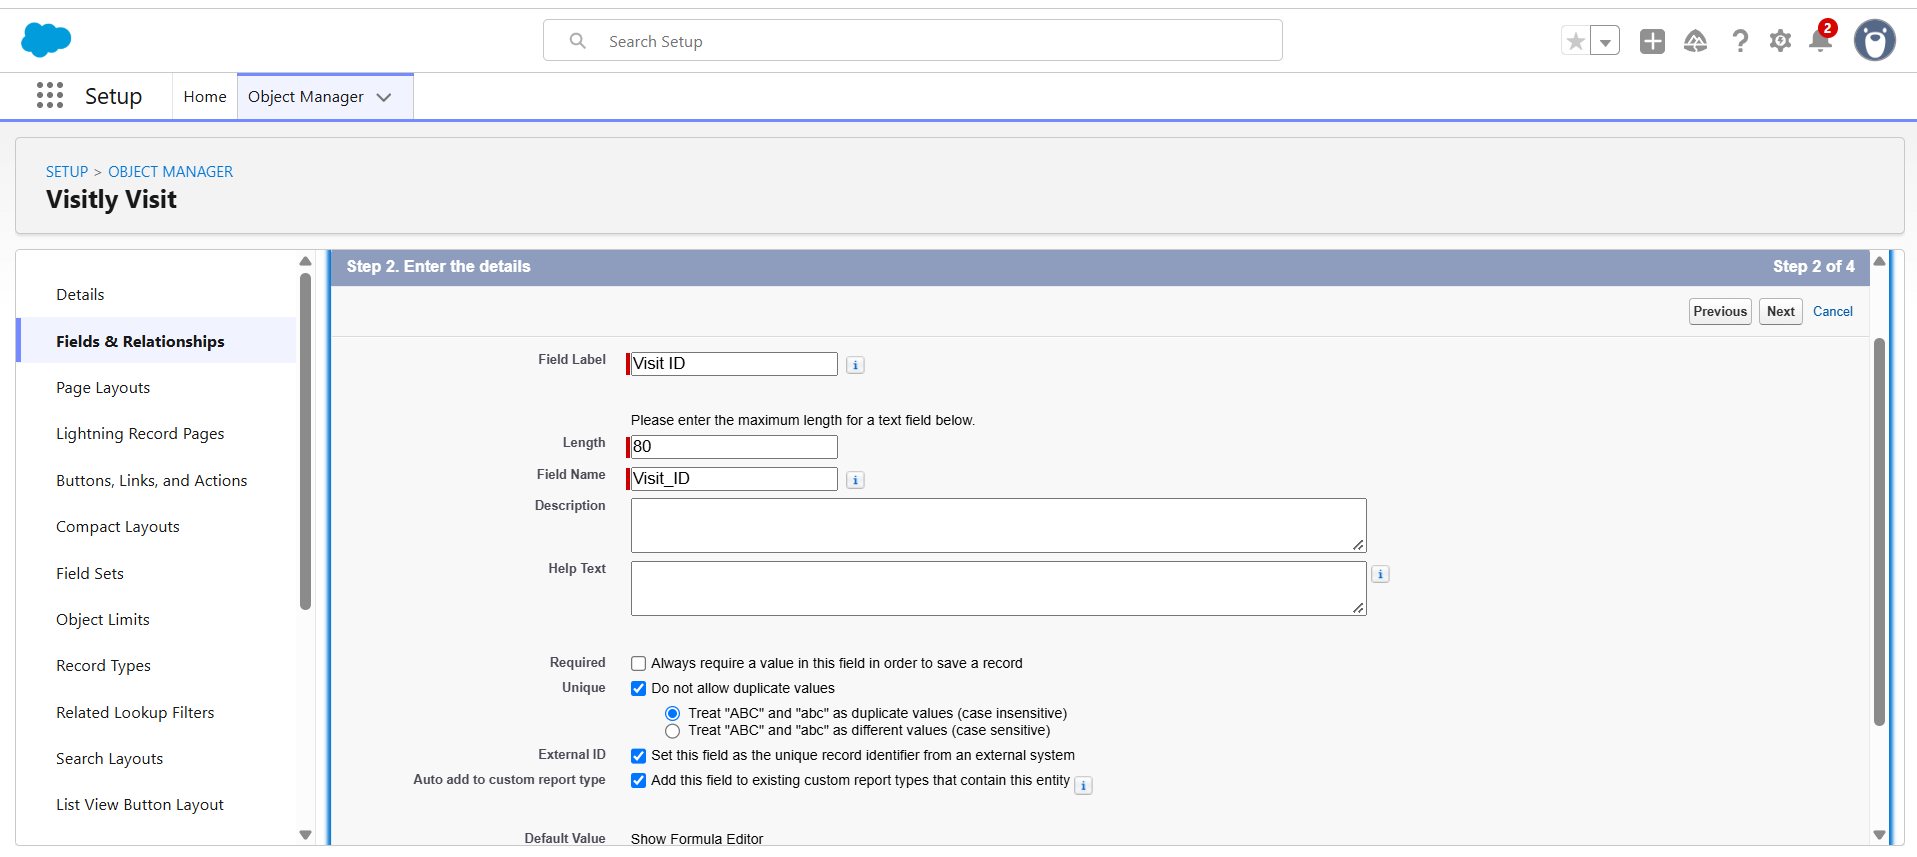
- Enter Field Label:
Visit ID. The API Name will auto-fill asVisitly_Visit_ID. Set Length to80. - Check External ID and Unique (these options appear on this same page for Text fields).
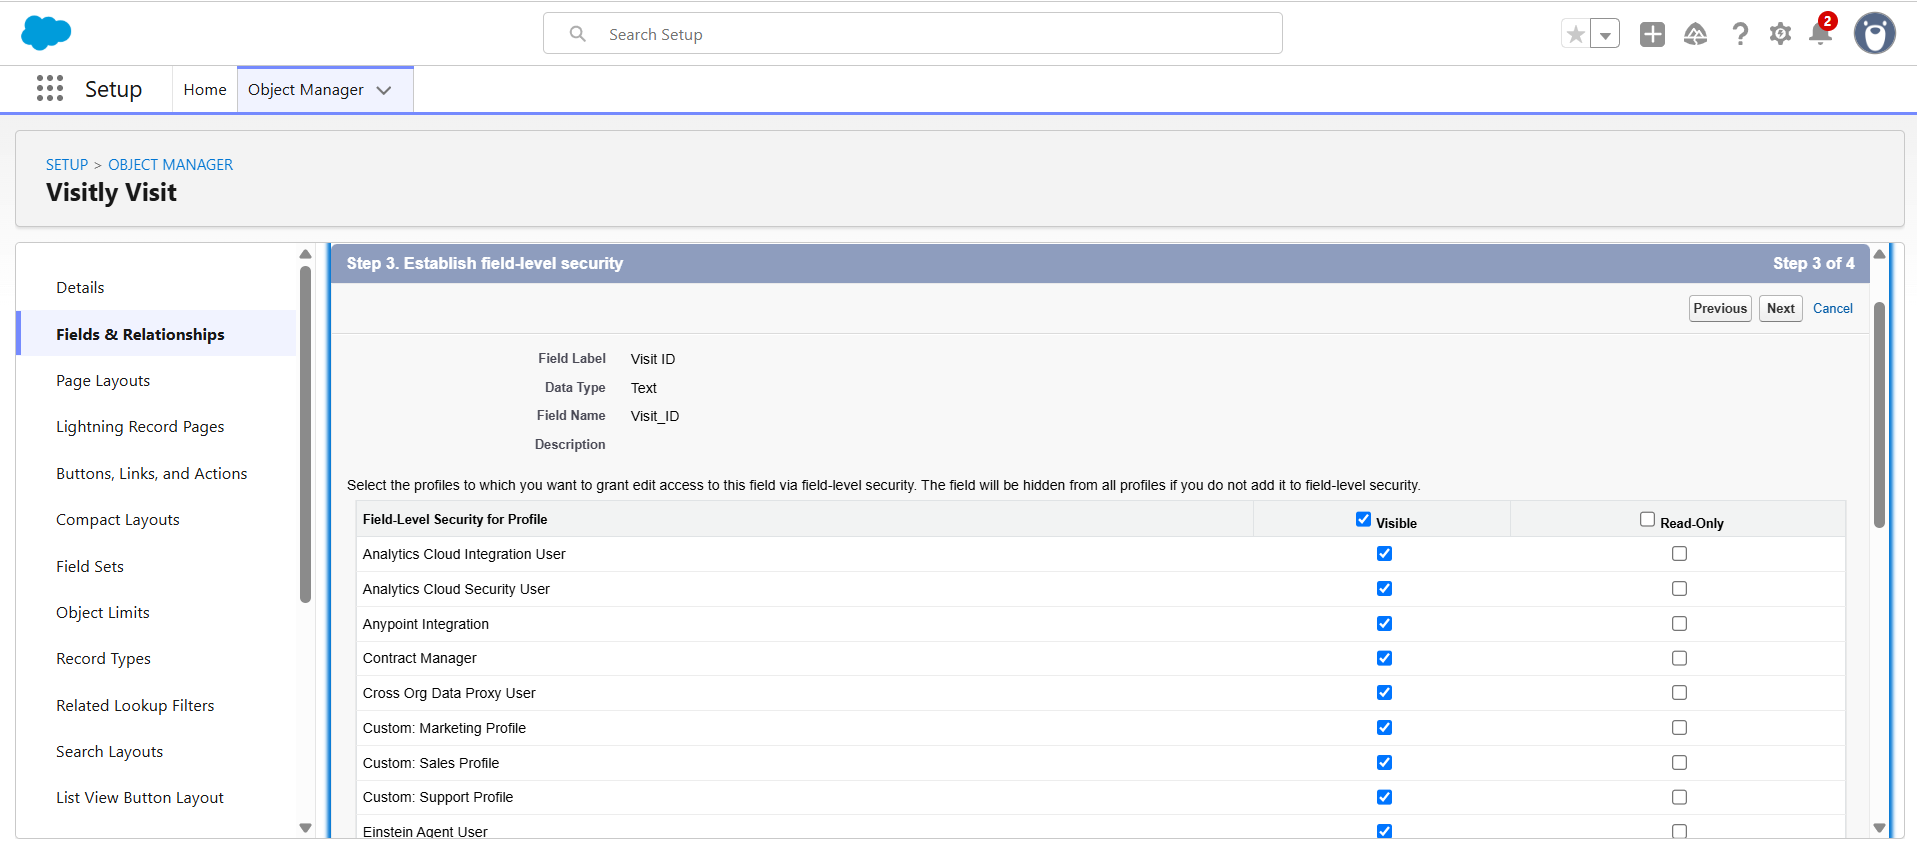
- Click Next. On the Field-Level Security page, check Visible for your profile (e.g., System Administrator).
- Click Next. Leave “Add to page layouts” checked, then click Save & New.
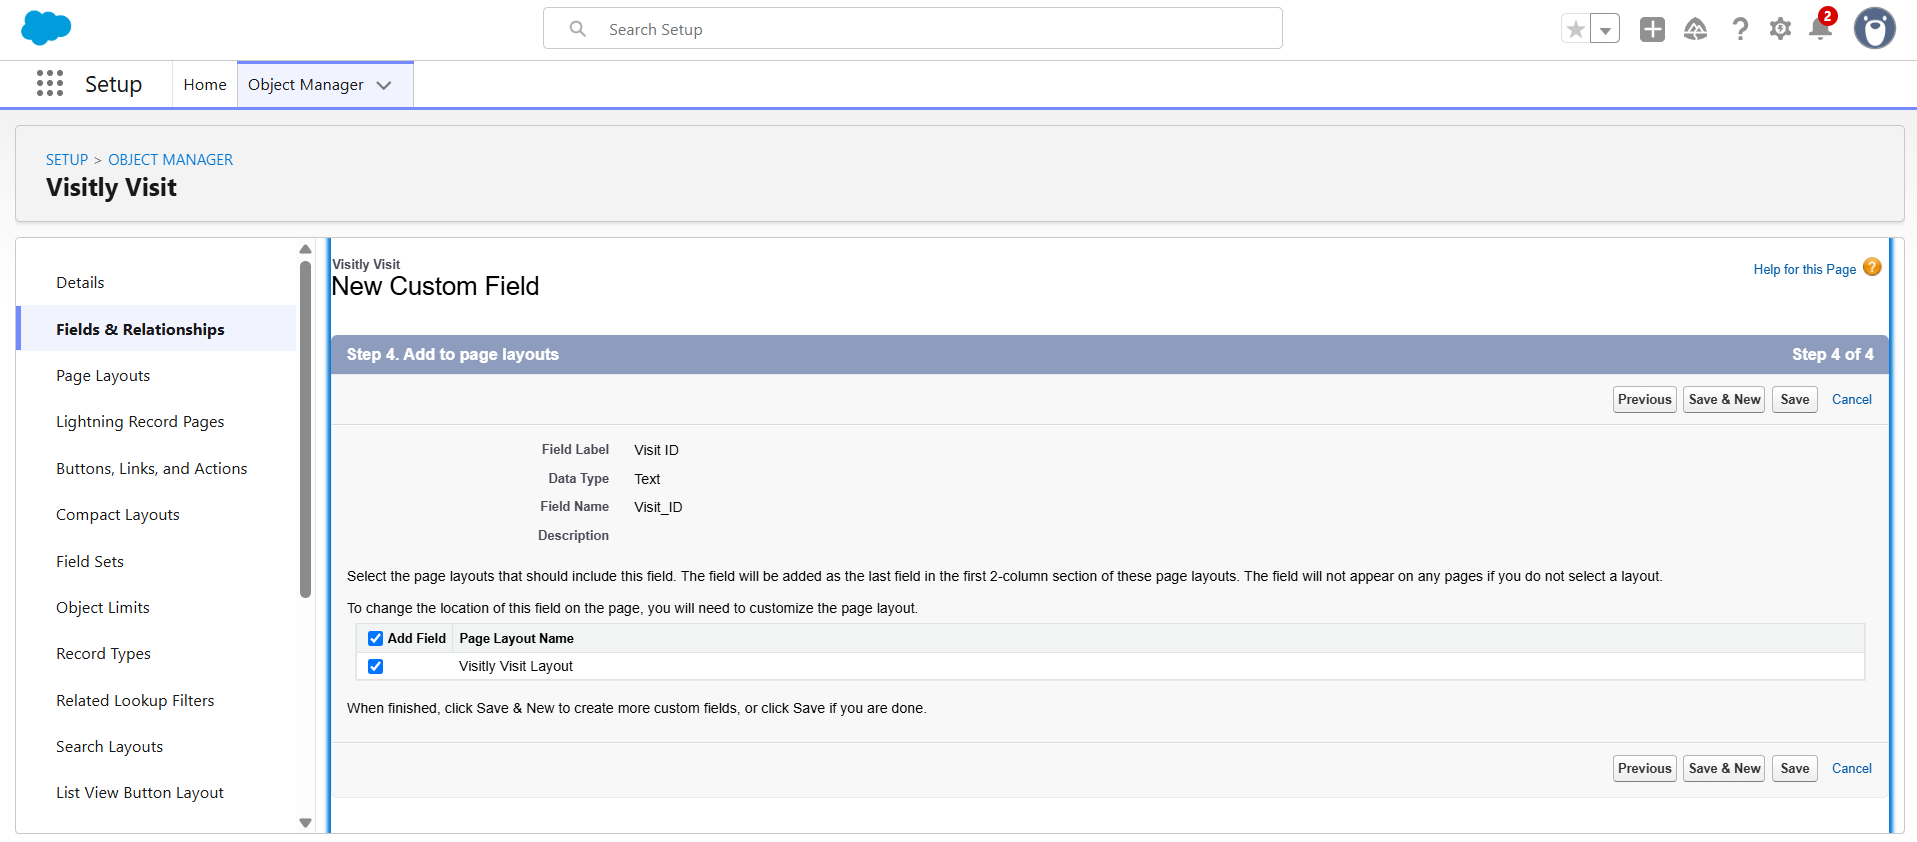
Repeat this process for each remaining field below, selecting the correct data type each time:
- Visit ID —
Visitly_Visit_ID__c— Text (80) — Mark as External ID + Unique - Visitly Org ID —
Visitly_Org_ID__c— Text (50) - Visitor Name —
Visitor_Name__c— Text (255) - Visitor Email —
Visitor_Email__c— Email - Visitor Phone —
Visitor_Phone__c— Phone - Visitor Company —
Visitor_Company__c— Text (255) - Host Name —
Host_Name__c— Text (255) - Host Email —
Host_Email__c— Email - Purpose of Visit —
Purpose_of_Visit__c— Text (255) - Location ID —
Visitly_Location_ID__c— Text (50) - Location Name —
Visitly_Location_Name__c— Text (255) - Visitor Type ID —
Visitly_Visitor_Type_ID__c— Text (50) - Visitor Type Name —
Visitly_Visitor_Type_Name__c— Text (100) - Event Type —
Event_Type__c— Text (20) — Values: sign_in, sign_out - Event Timestamp —
Event_Timestamp__c— Date/Time - Check-in Time —
Check_In_Time__c— Date/Time - Check-out Time —
Check_Out_Time__c— Date/Time - Is Returning Visitor —
Is_Returning_Visitor__c— Checkbox — Default: unchecked - Event Status —
Visitly_Event_Status__c— Text (50) - Visit Count —
Visit_Count__c— Number (5, 0)
Tip: The Visit ID field must be set as both External ID and Unique. This prevents duplicate visit records when the same event is retried. See Salesforce field types for more.
Set Field-Level Security
This step applies whether you used Option A (Workbench) or Option B (manual). Fields must be visible to the user profile that connects to Visitly. If you already set visibility during field creation, you can skip this.
- Go to Object Manager → Visitly Visit → Fields & Relationships.
- Click on each field → Set Field-Level Security.
- Check Visible for your admin profile (e.g., System Administrator).
- Click Save and repeat for each field.
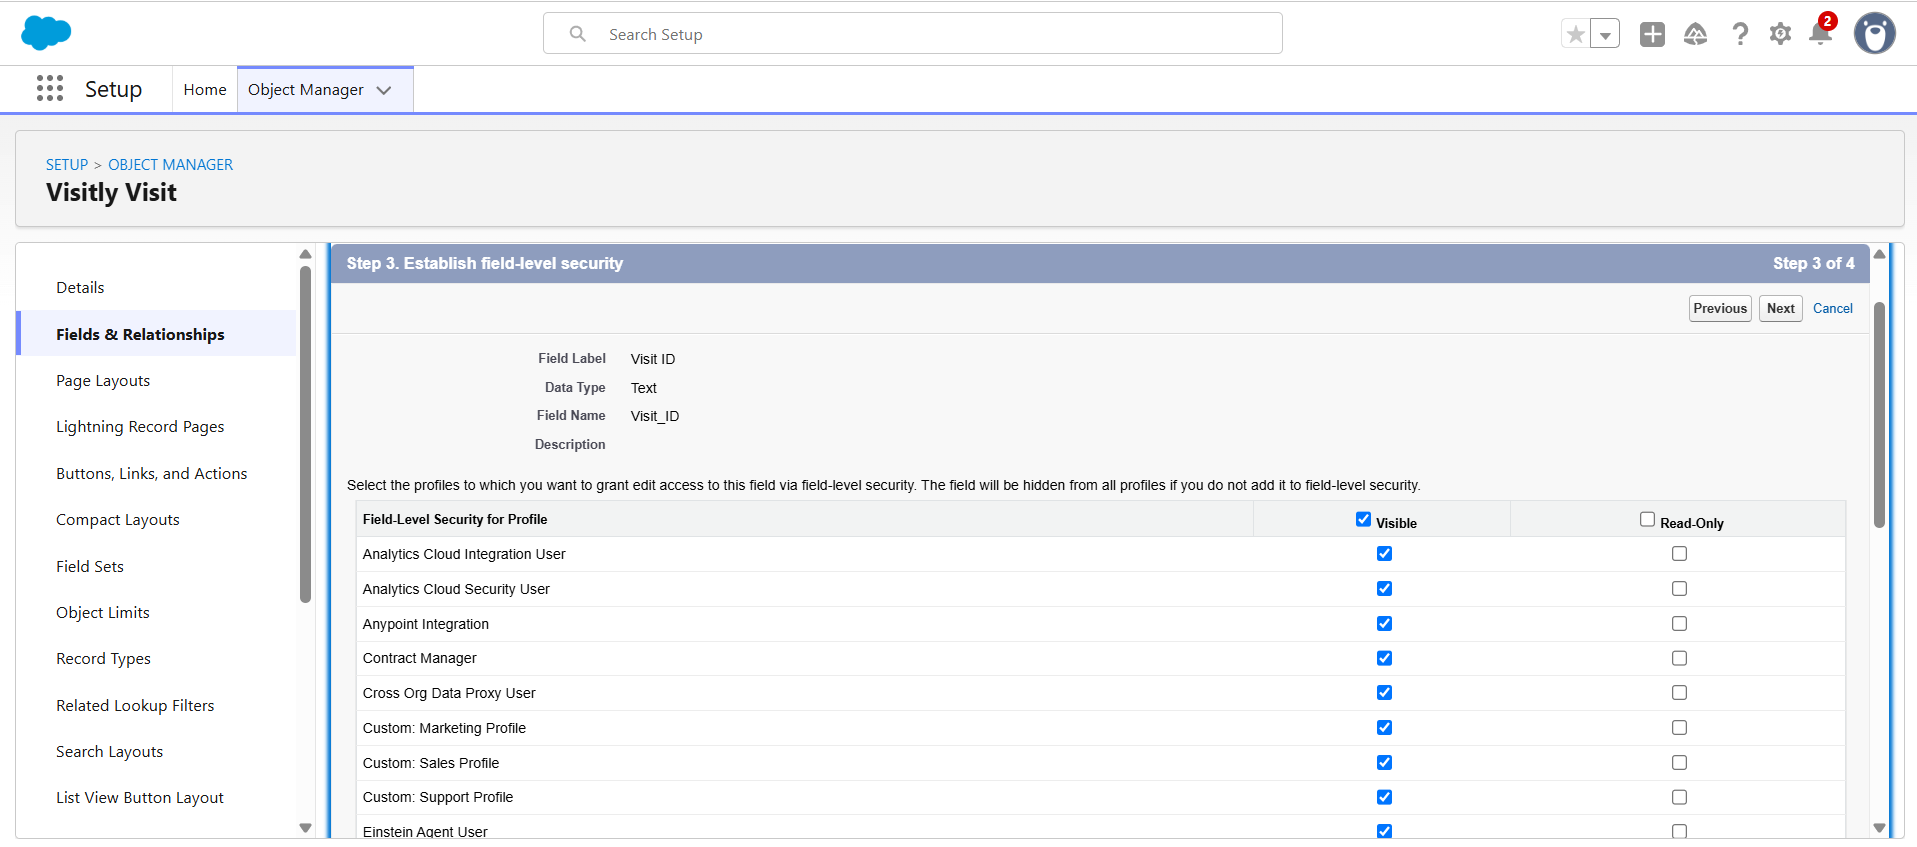
Warning: This step is critical. Without Field-Level Security, fields will exist in Object Manager but won’t appear in Flow Builder, reports, or API responses — causing confusing “field not found” issues down the line.
Step 2: Connect Visitly to Salesforce
Once the custom object is ready, connect your Visitly account to Salesforce via OAuth.
- In Visitly, navigate to Settings → Integrations.
- Find the Salesforce card under CRM Integrations and click it.
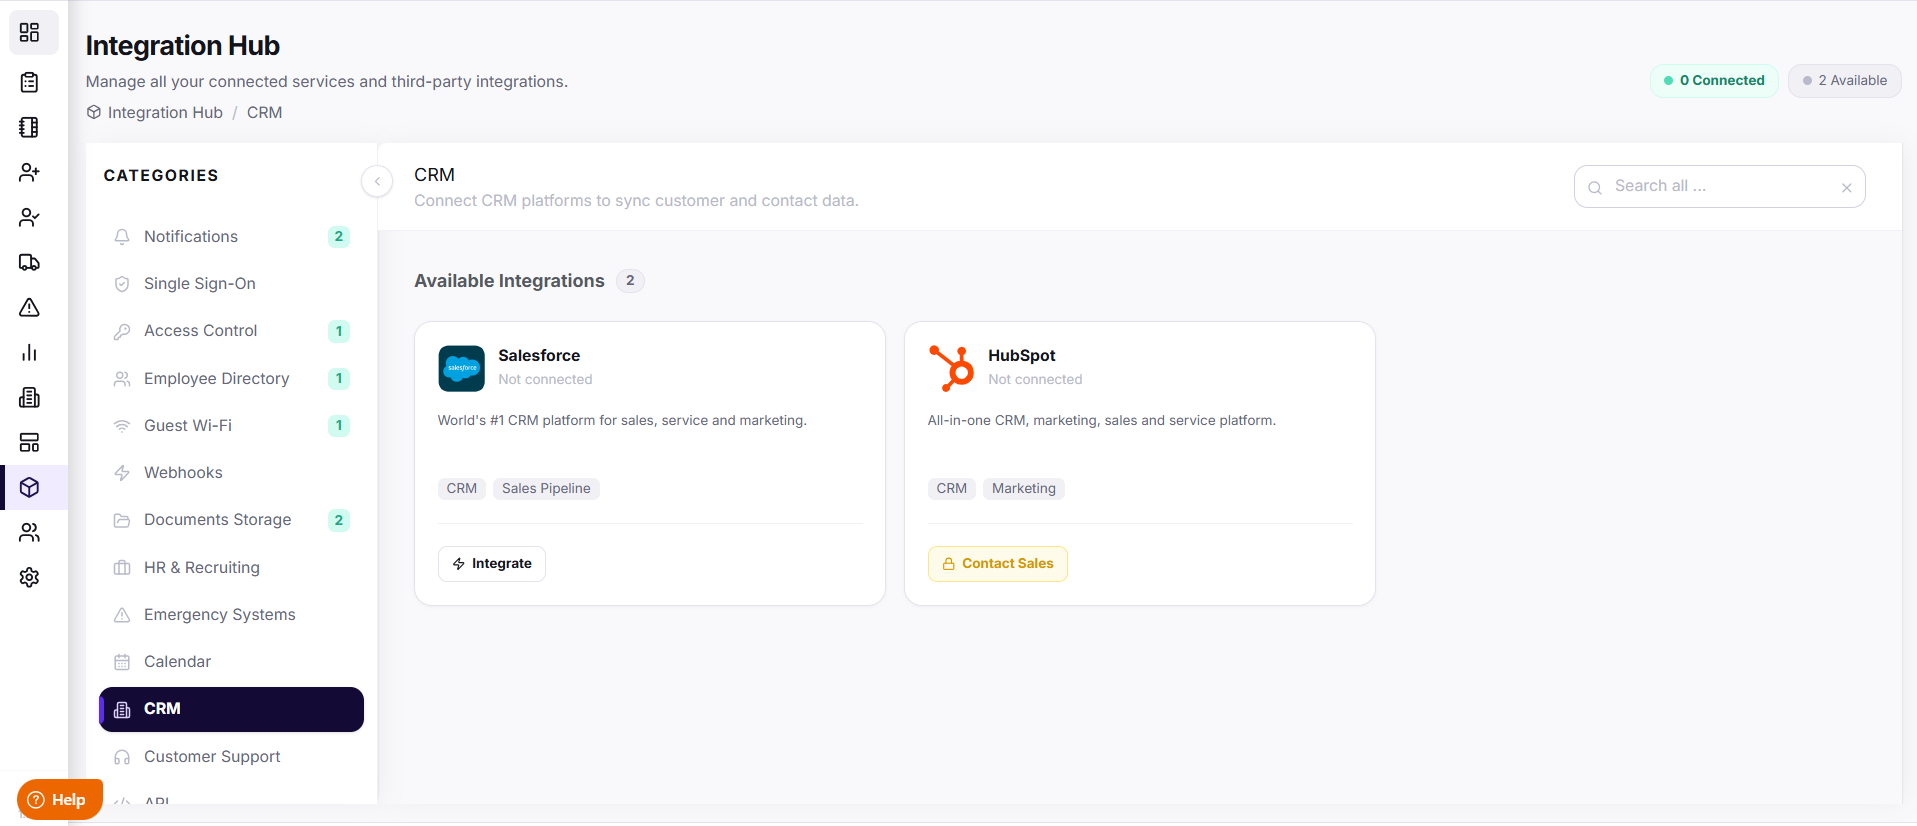
- Select your environment: Production or Sandbox.
- Click Connect to Salesforce.
- You’ll be redirected to Salesforce. Log in with an account that has admin permissions and API access.
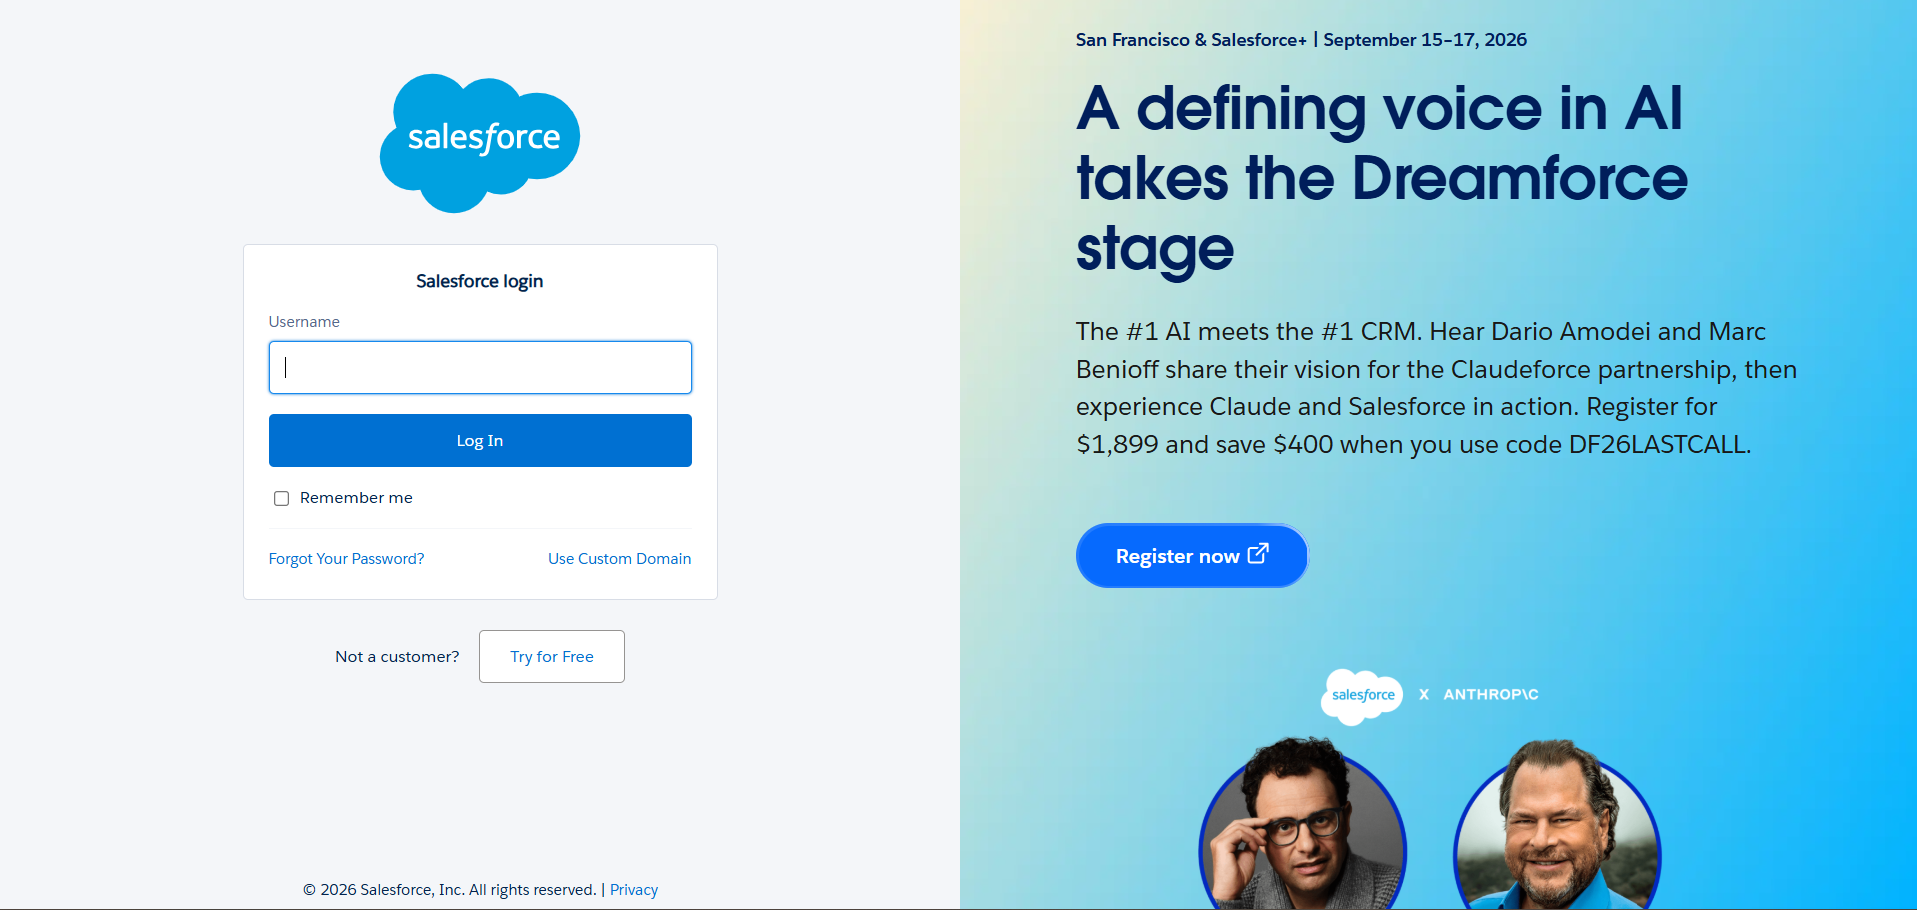
- Review the permissions Visitly is requesting and click Allow.
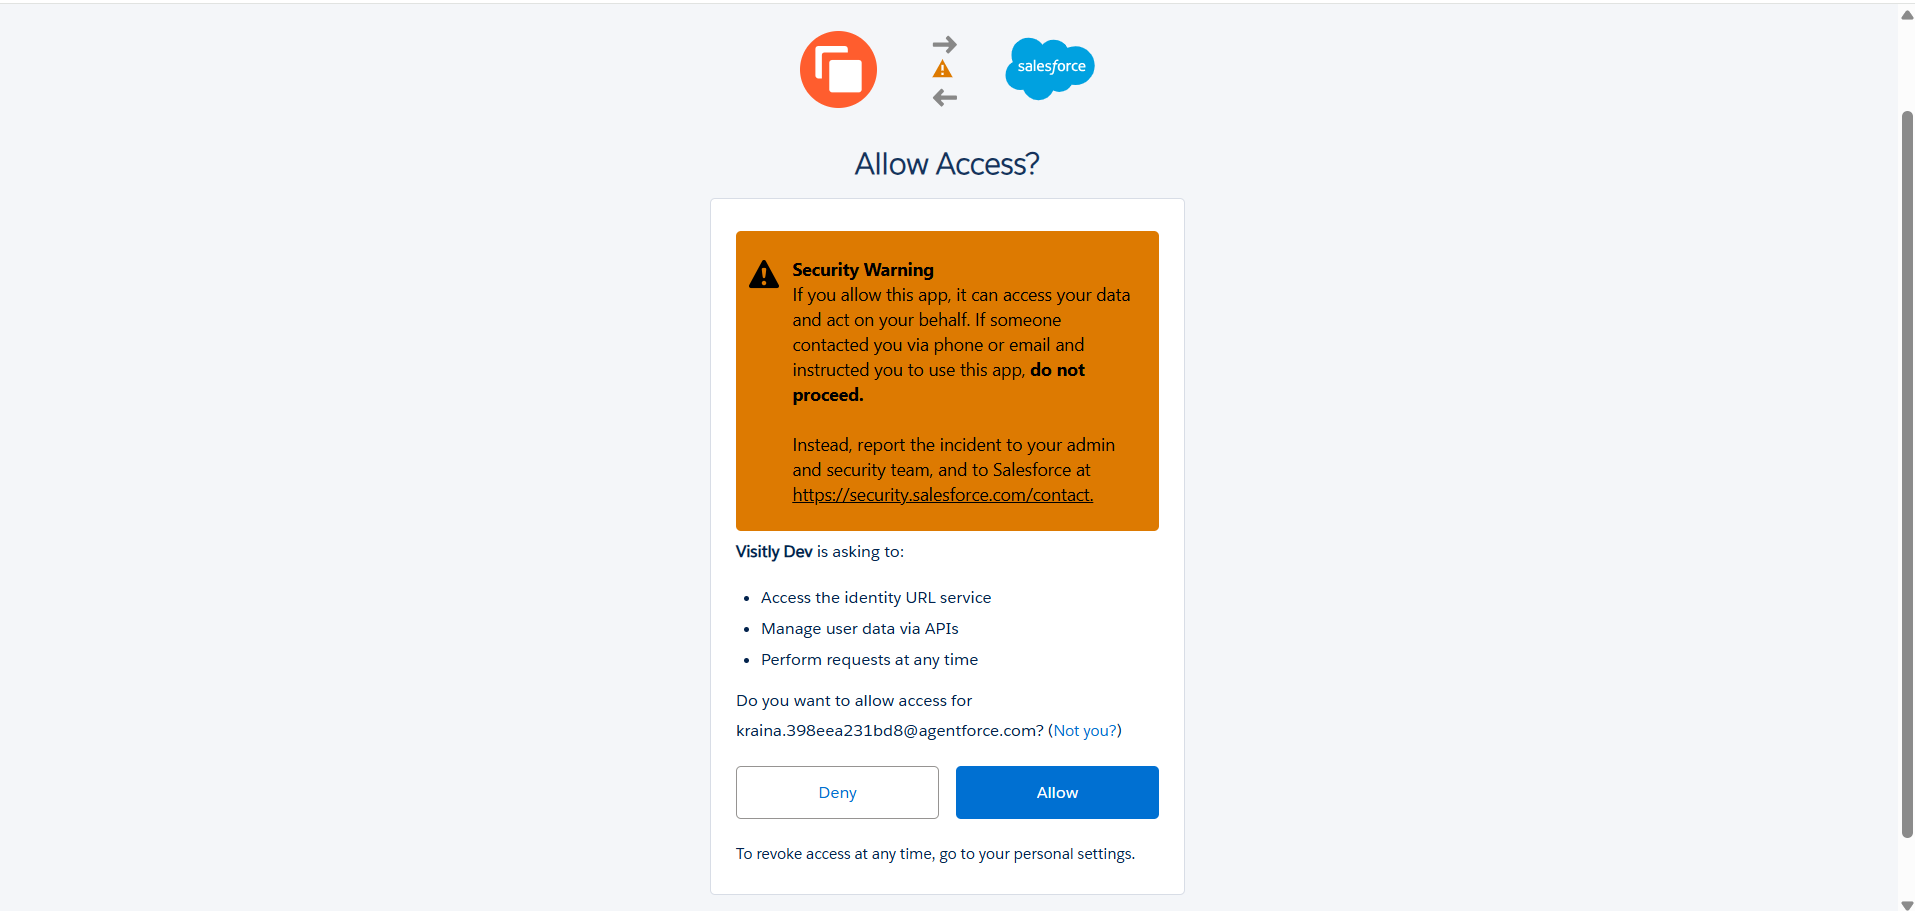
- You’ll be redirected back to Visitly with a Connected status.
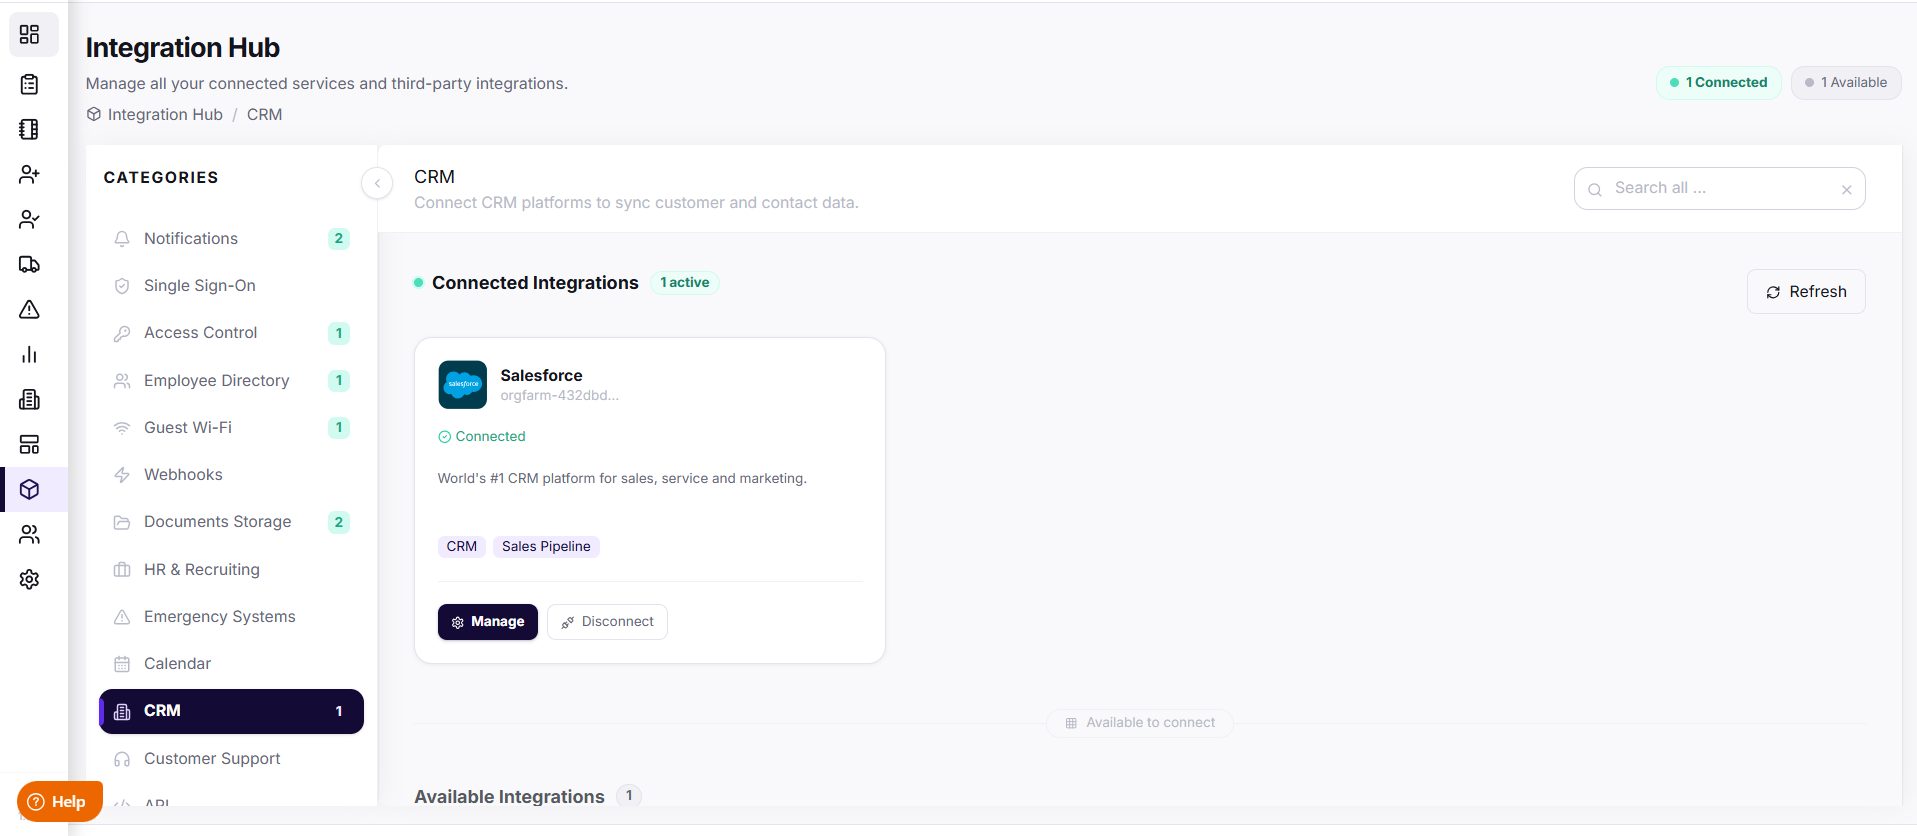
Tip: Visitly requests two OAuth scopes: API access (to read and write Salesforce data) and Refresh Token (to maintain the connection without re-authenticating). Visitly can only access data through the connected user’s profile permissions.
Step 4: Connection Status & Details
After connecting, the Salesforce configuration page in Visitly shows your connection details and health at a glance. You can access this page any time by clicking Manage on the Salesforce card in Integrations.
Connection Details
Connected Account — The Salesforce username used for the OAuth connection.
Instance URL — Your Salesforce org’s base URL (e.g., https://yourorg.my.salesforce.com).
Salesforce Org ID — The unique 18-character identifier for your Salesforce organization.
Permissions — Shows the OAuth scopes granted to Visitly.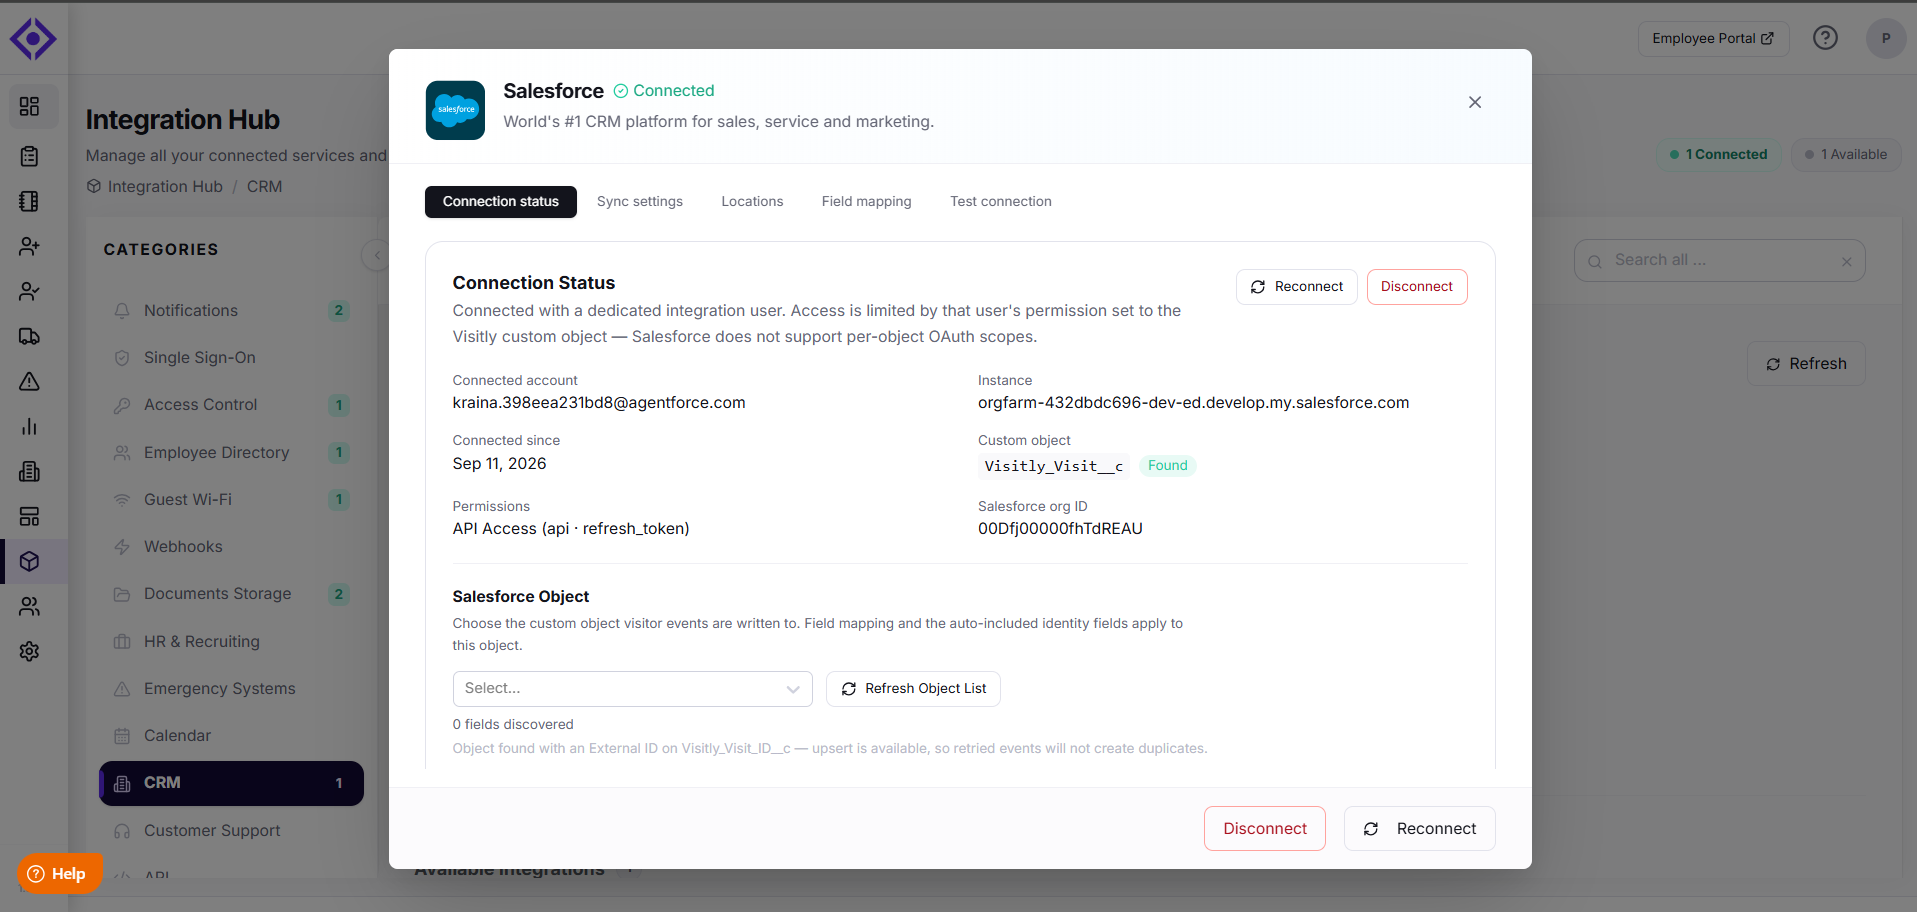
Custom Object Detection
Visitly automatically checks whether the Visitly_Visit__c custom object exists in your Salesforce org.
Detected — The custom object was found and is ready for syncing.
Not Found — The custom object is missing. Go back to Step 2 and create it.
Sync Status
Use the Sync Active / Paused toggle to start or pause event syncing. When paused, visitor events are queued and will sync once you resume.
Sync Active — Events are being pushed to Salesforce in real time.
Sync Paused — Events are queued but not synced until you resume.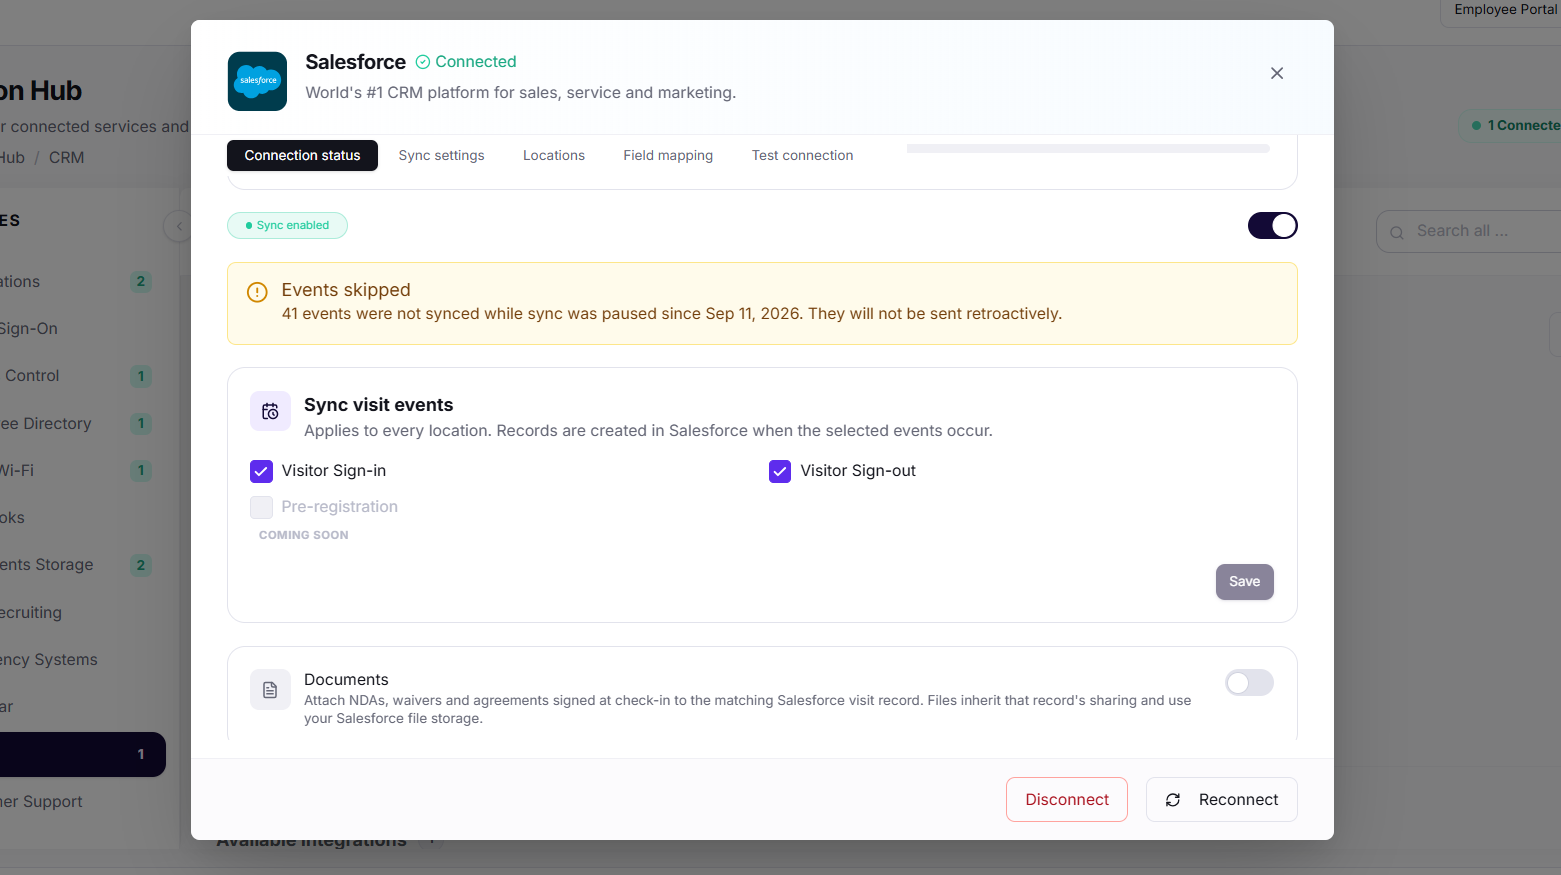
Reconnect or Disconnect
If your connection becomes stale (e.g., password change, token expiration), use the Reconnect button to re-authenticate without losing your configuration. To fully remove the integration, click Disconnect — you’ll be asked to type DISCONNECT to confirm.
Step 5: Salesforce Object Selection
After connecting, Visitly needs to know which Salesforce object to sync visitor data to. By default, it looks for Visitly_Visit__c, but you can select a different custom object if your org uses one.
- On the Salesforce configuration page, locate the Salesforce Object dropdown.
- Select the object you want to sync to (default:
Visitly_Visit__c). - Visitly will display how many fields were discovered (e.g., “20 fields discovered”) and whether an External ID field was detected.
- If you’ve recently added the object or new fields, click Refresh Object List to re-scan your org.
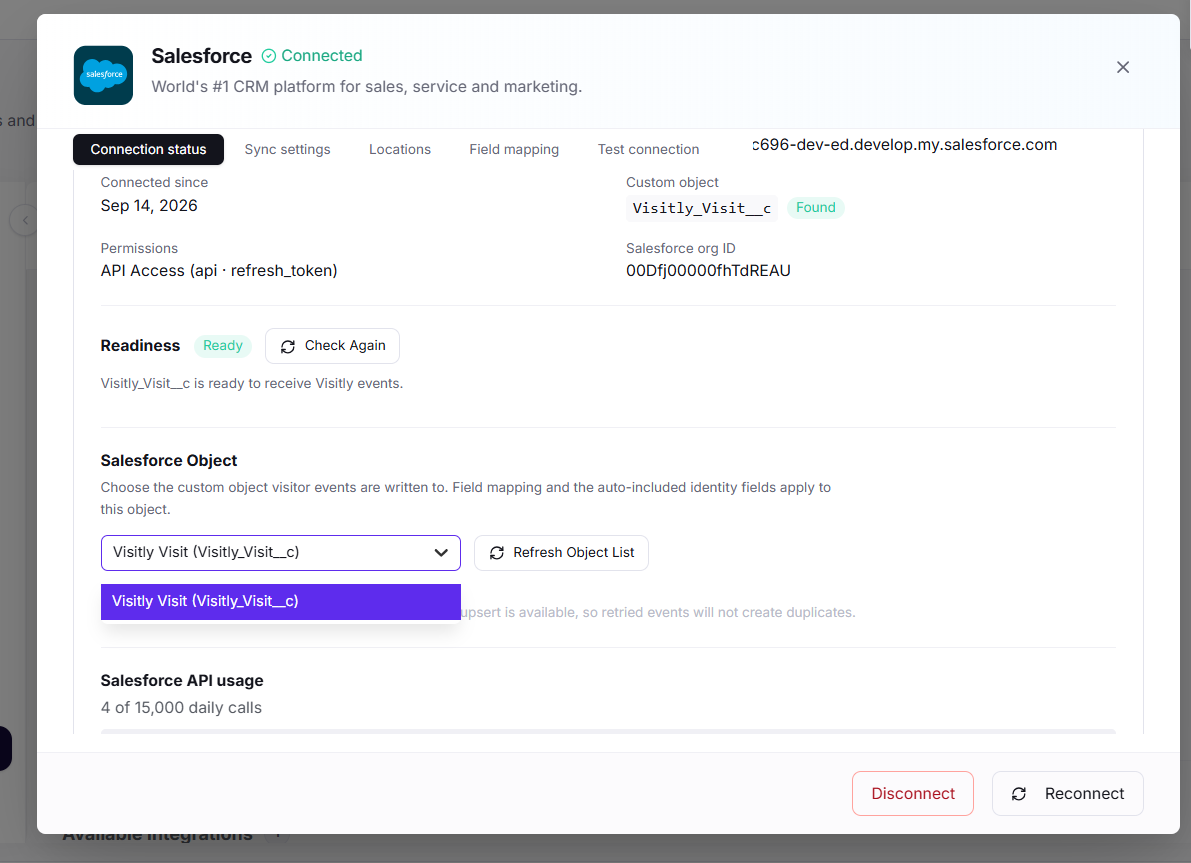
Note: If the object shows “0 fields discovered”, it likely means Field-Level Security hasn’t been set for the connected user’s profile. See the Field-Level Security section above.
Step 6: Configure Field Mapping
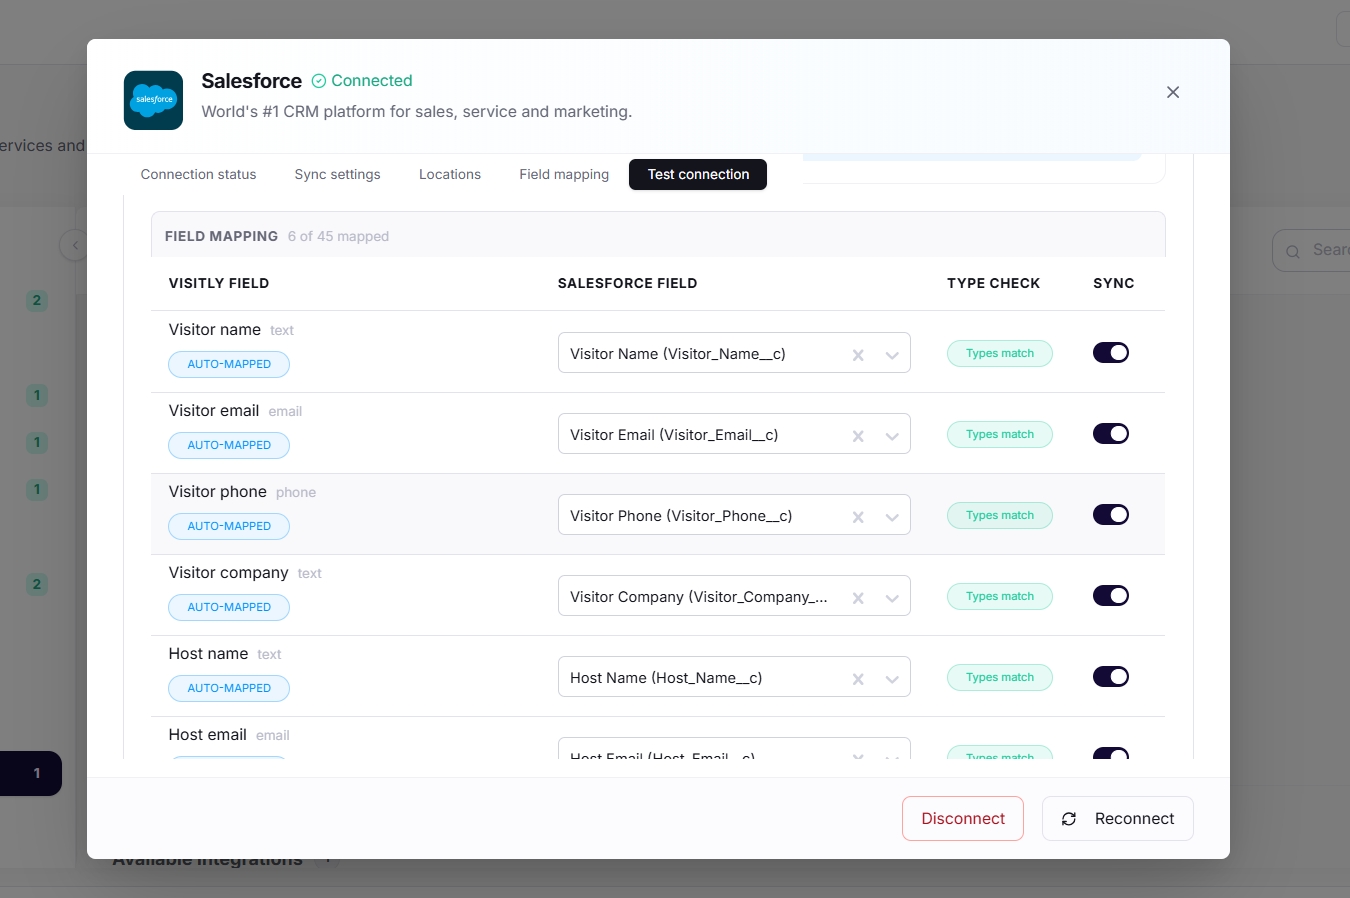
Field mapping controls which visitor data from Visitly gets sent to which fields in Salesforce. The mapping interface has two parts: auto-included identity fields and manually mappable fields.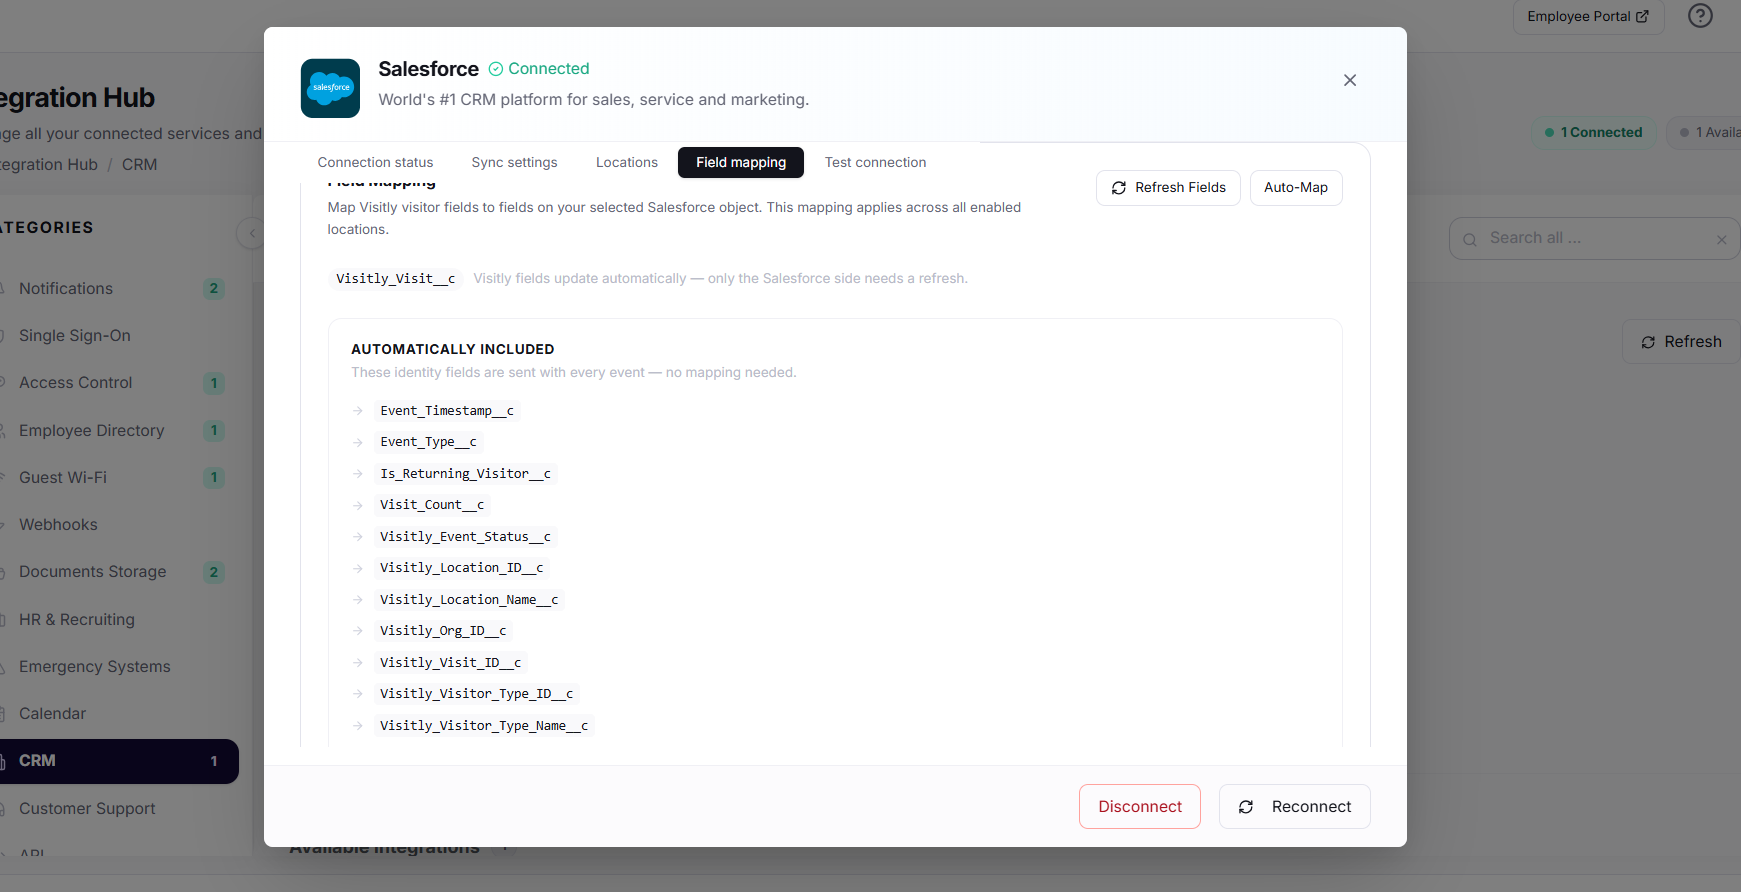
Auto-Included Fields
These 10 identity fields are always sent with every sync event — no configuration needed: Visit ID, Visitly Org ID, Location ID, Location Name, Visitor Type ID, Visitor Type Name, Event Type, Event Timestamp, Is Returning Visitor, and Visit Count.
Manual Field Mapping
The mapping grid lets you pair each Visitly field to a Salesforce field on the selected object. For each row you’ll see:
Mapping Grid Columns
Visitly Field — The source field from Visitly (e.g., Visitor Name, Email, Phone, Company, Host Name, Host Email, Purpose of Visit, Check-in Time, Check-out Time).
Salesforce Field — A dropdown listing all available fields on your selected object. Pick the target field.
Type Check — A compatibility indicator. A green checkmark means the field types are compatible; a warning icon means a type mismatch that could cause sync errors (e.g., mapping a Text field to a Number field).
Sync — A toggle to enable or disable syncing for that specific field.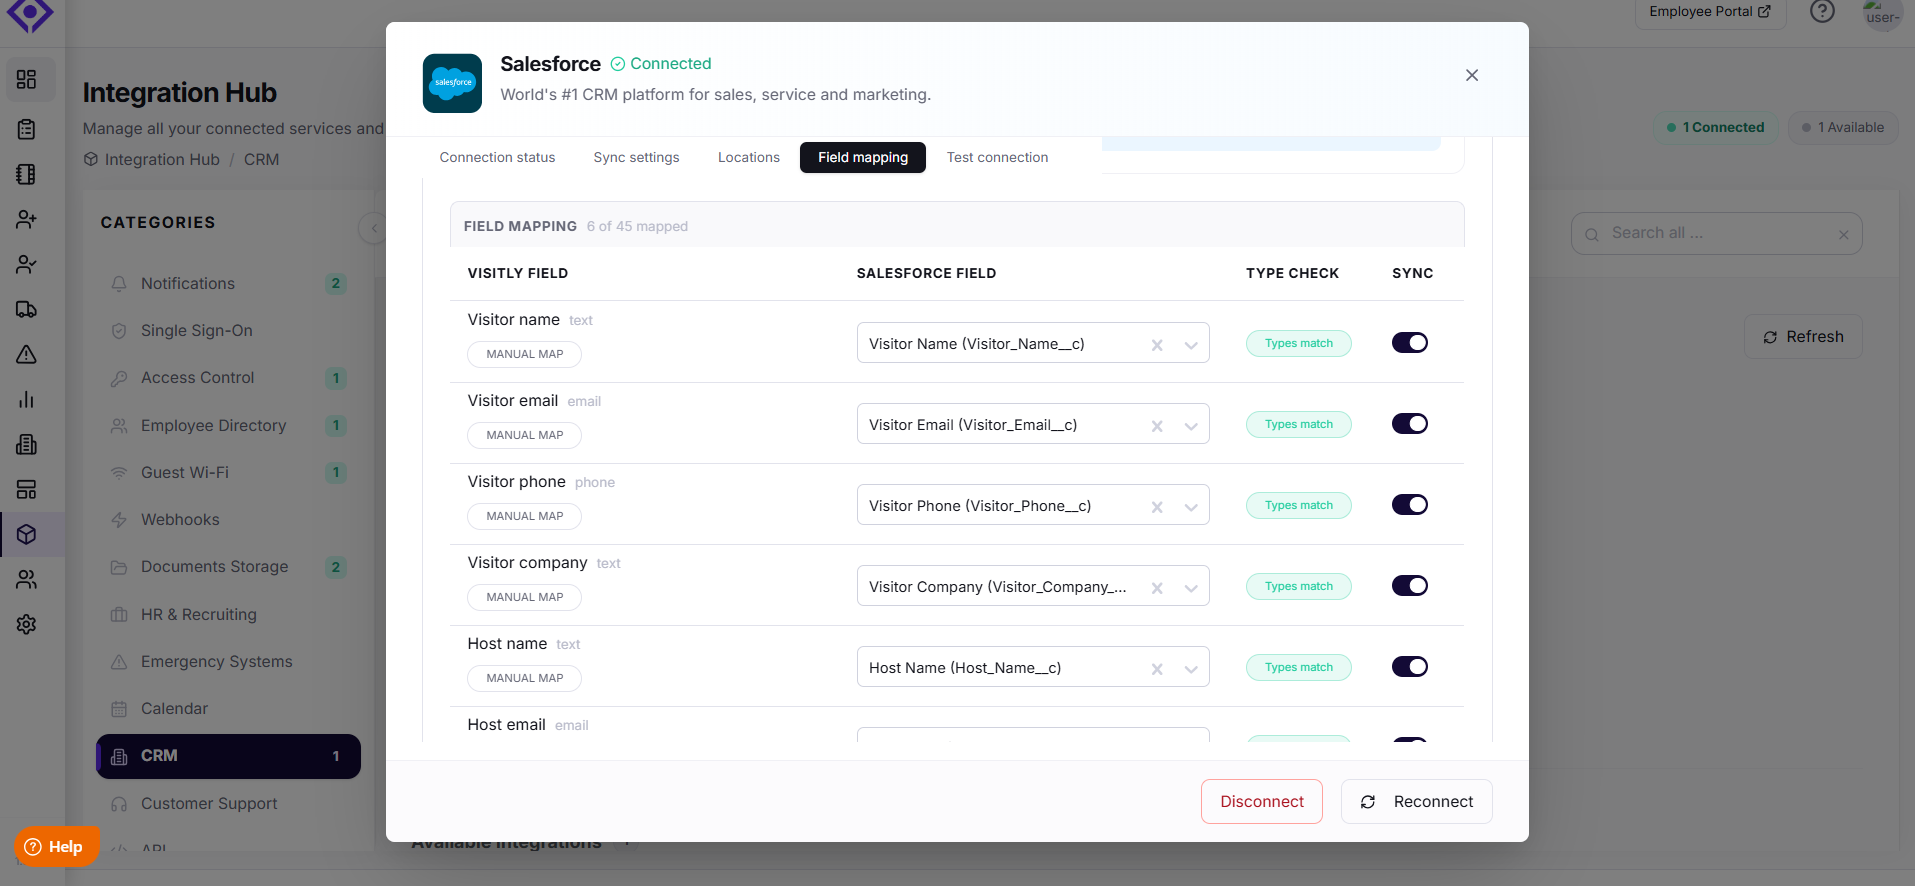
Note: Field type compatibility matters. When mapping fields, make sure the Visitly field type matches the Salesforce field type. For example, Visitor Email (Email type) should map to an Email field in Salesforce, not a Text field. The type check indicator will warn you about mismatches, but it’s good practice to verify. Date/Time fields must be mapped to Date/Time fields in Salesforce — mapping them to Text fields will cause sync errors.
Auto-Map
Click the Auto-Map button to let Visitly automatically match fields by name. Visitly compares field labels and API names to find the best matches. Review the results and adjust any incorrect pairings. The mapping counter (e.g., “10 of 39 mapped”) updates to show your progress.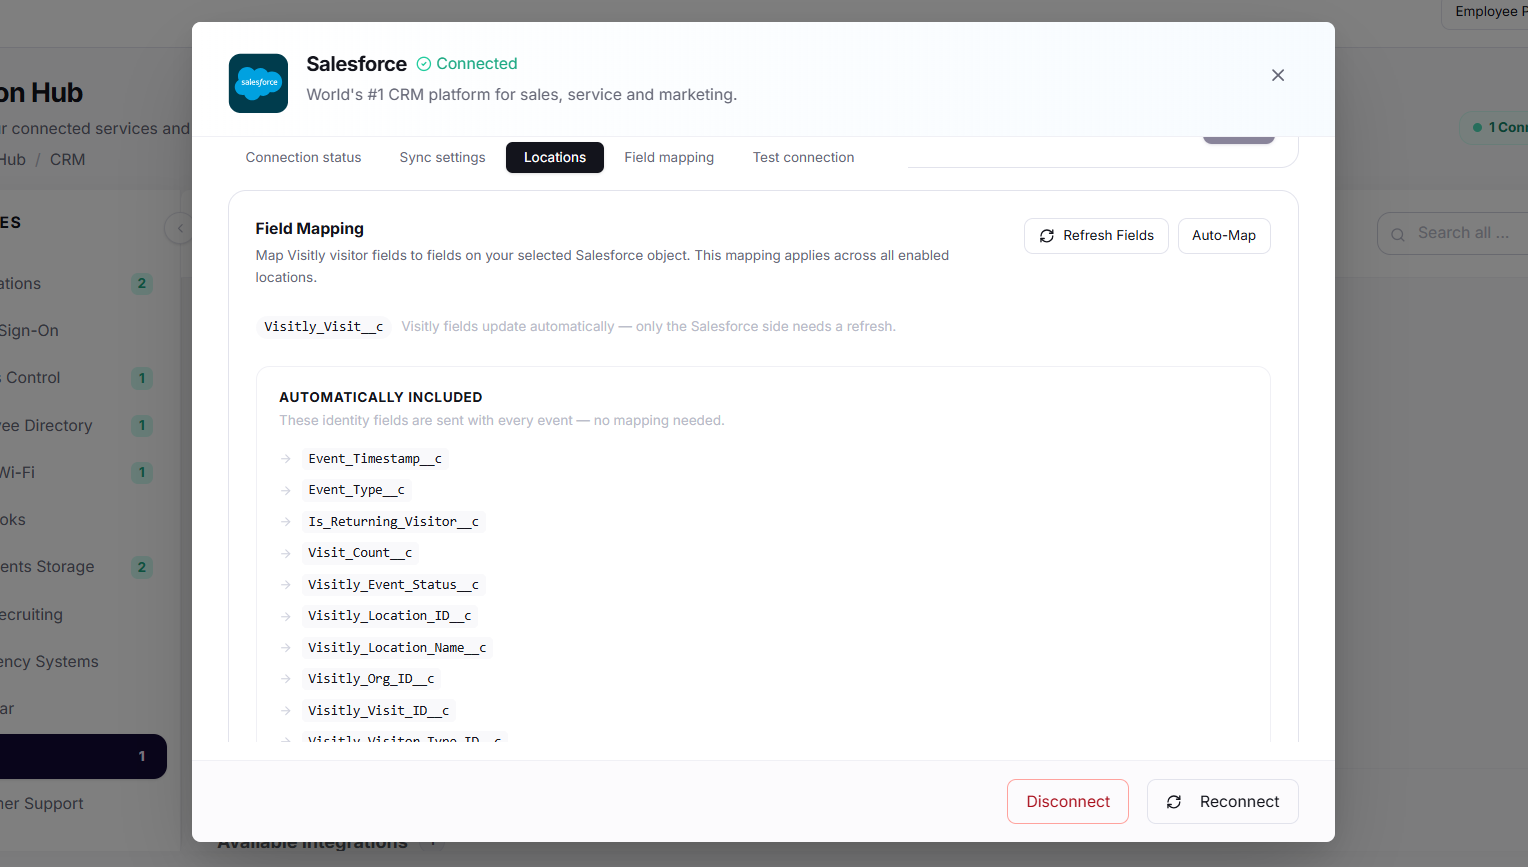
Custom Fields
If you’ve configured custom sign-in fields in your Visitly org (e.g., Building, Badge Number), they’ll appear in the Visitly Field column alongside the standard fields. Map them to any compatible field on your Salesforce object.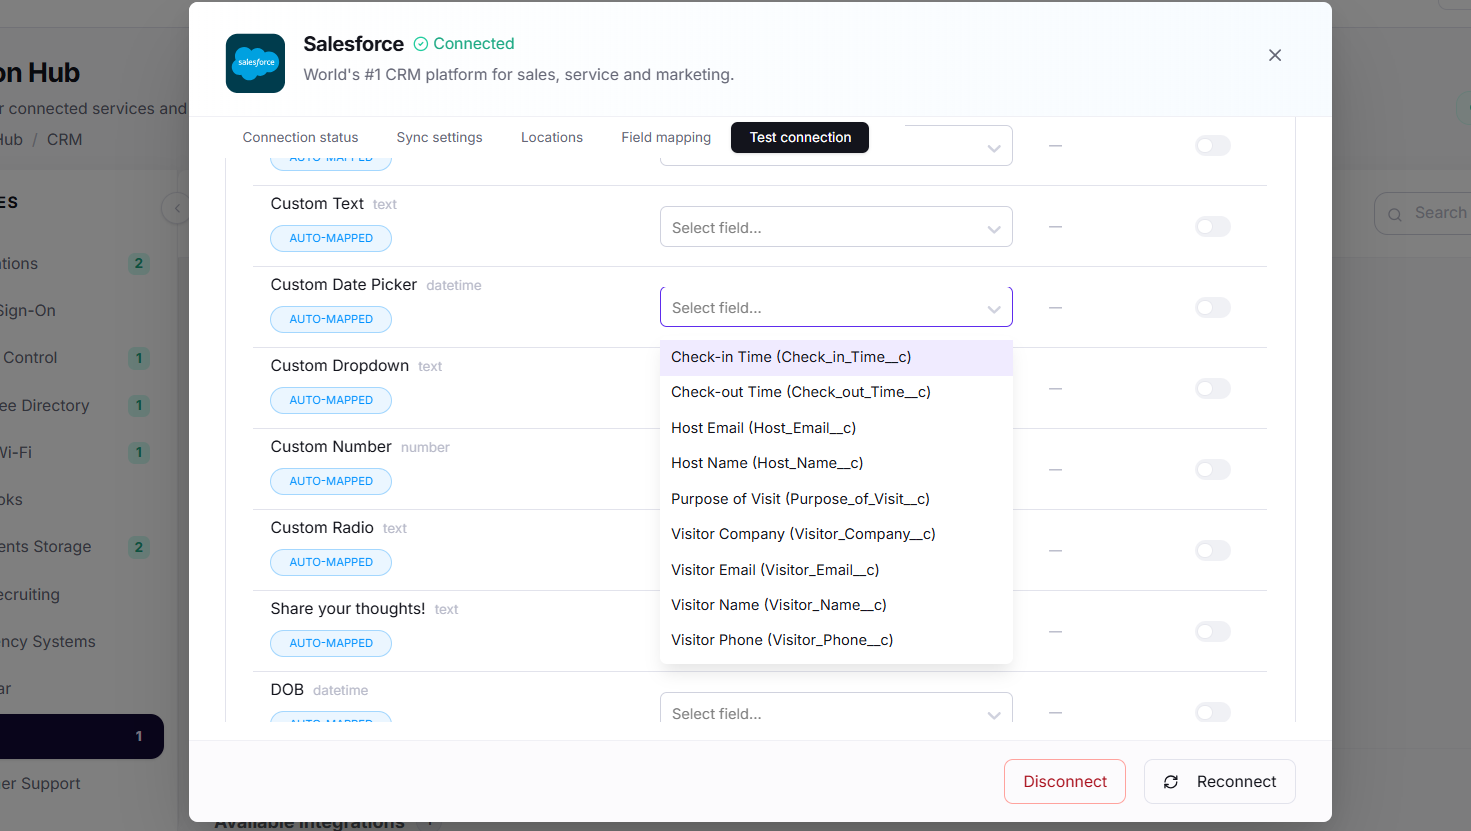
Tip: Use the Refresh Fields button to re-scan both Visitly custom fields and Salesforce object fields after making changes in either system. Click Reload Mapping to reset the mapping to its last saved state.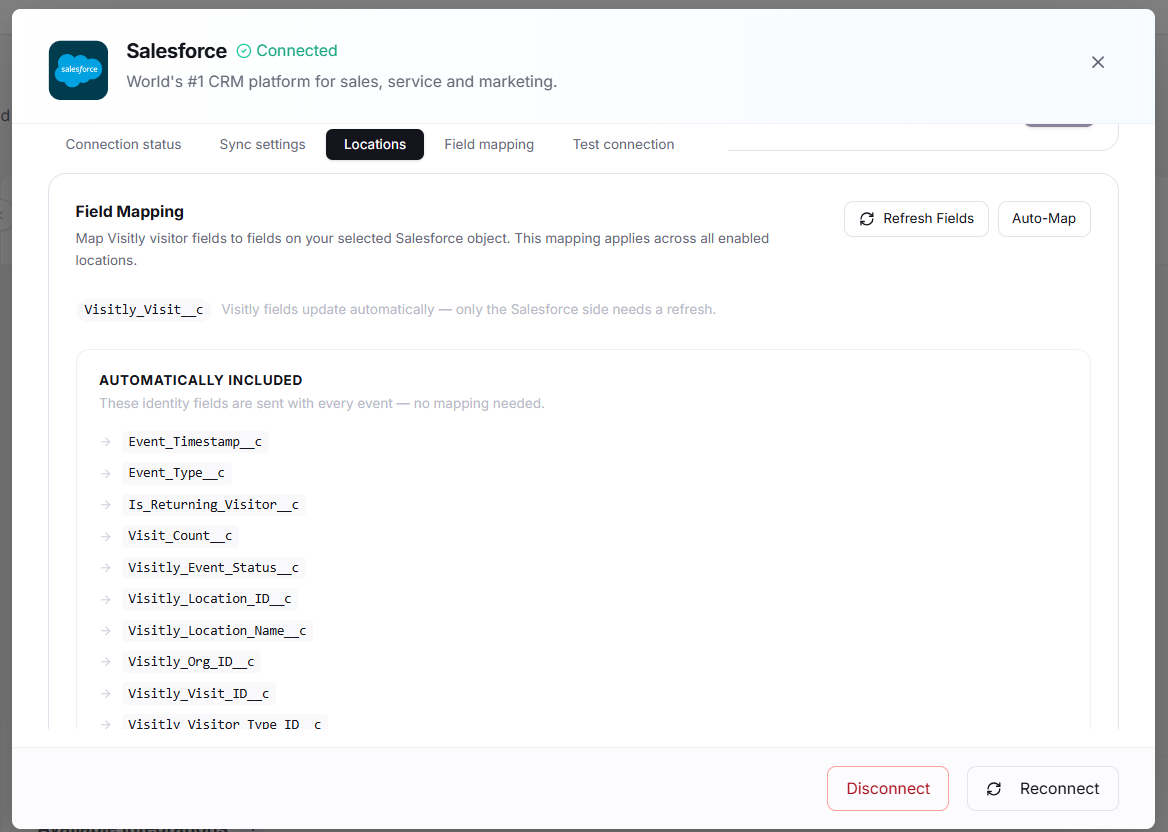
Step 7: Sync Settings
Sync settings let you control which visitor events trigger a sync to Salesforce and whether documents are included.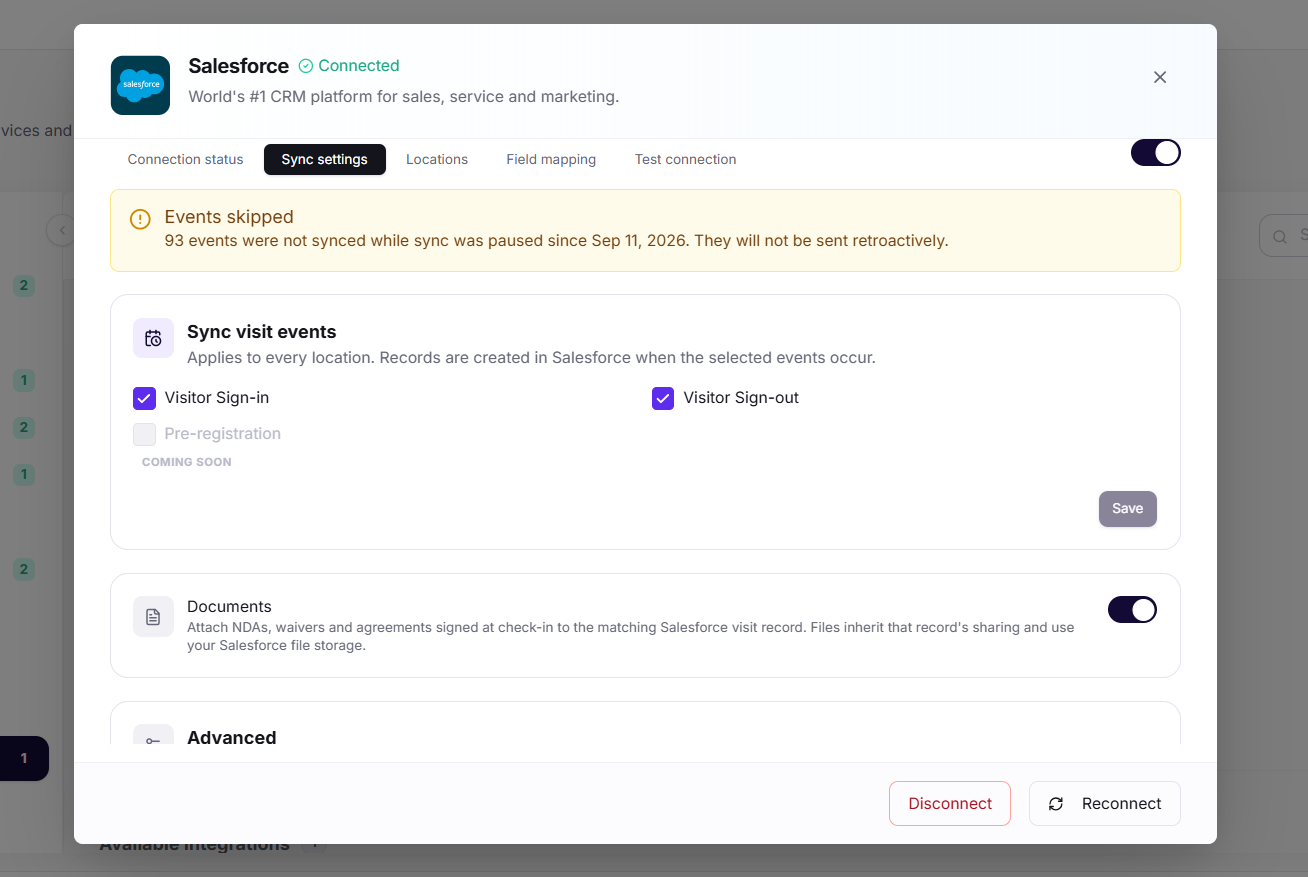
Event Selection
Visitor Sign-in (Default On)
A new record is created in Salesforce when a visitor checks in at any synced location.
Visitor Sign-out (Default On)
The existing visit record is updated with the check-out time when the visitor signs out.
Pre-registration (Coming Soon)
When available, a record will be created when a visitor is pre-registered — before they physically arrive.
Document Sync
Toggle Document Sync to include visitor attachments — signed NDAs, photo IDs, and uploaded documents — as file attachments on the visit record in Salesforce.
Warning: Storage limits: Document sync is subject to your Salesforce org’s file storage limits. Monitor your storage usage if you have a high volume of visitors with document uploads.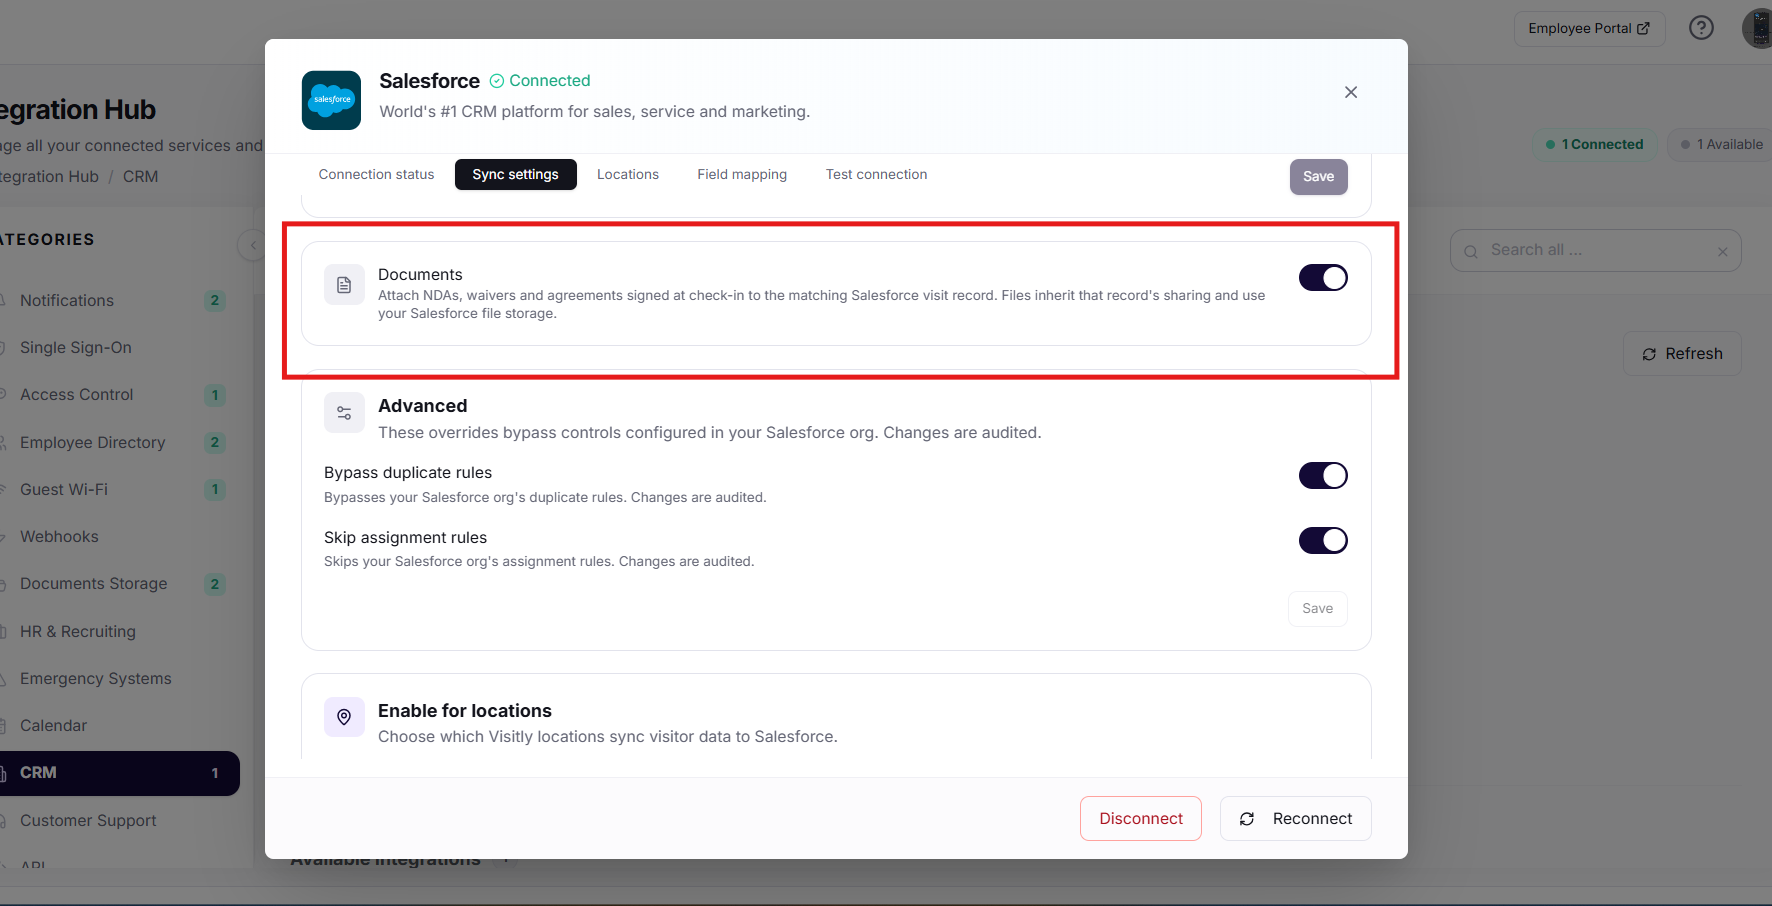
Step 8: Location Configuration
Control which Visitly locations sync their visitor data to Salesforce.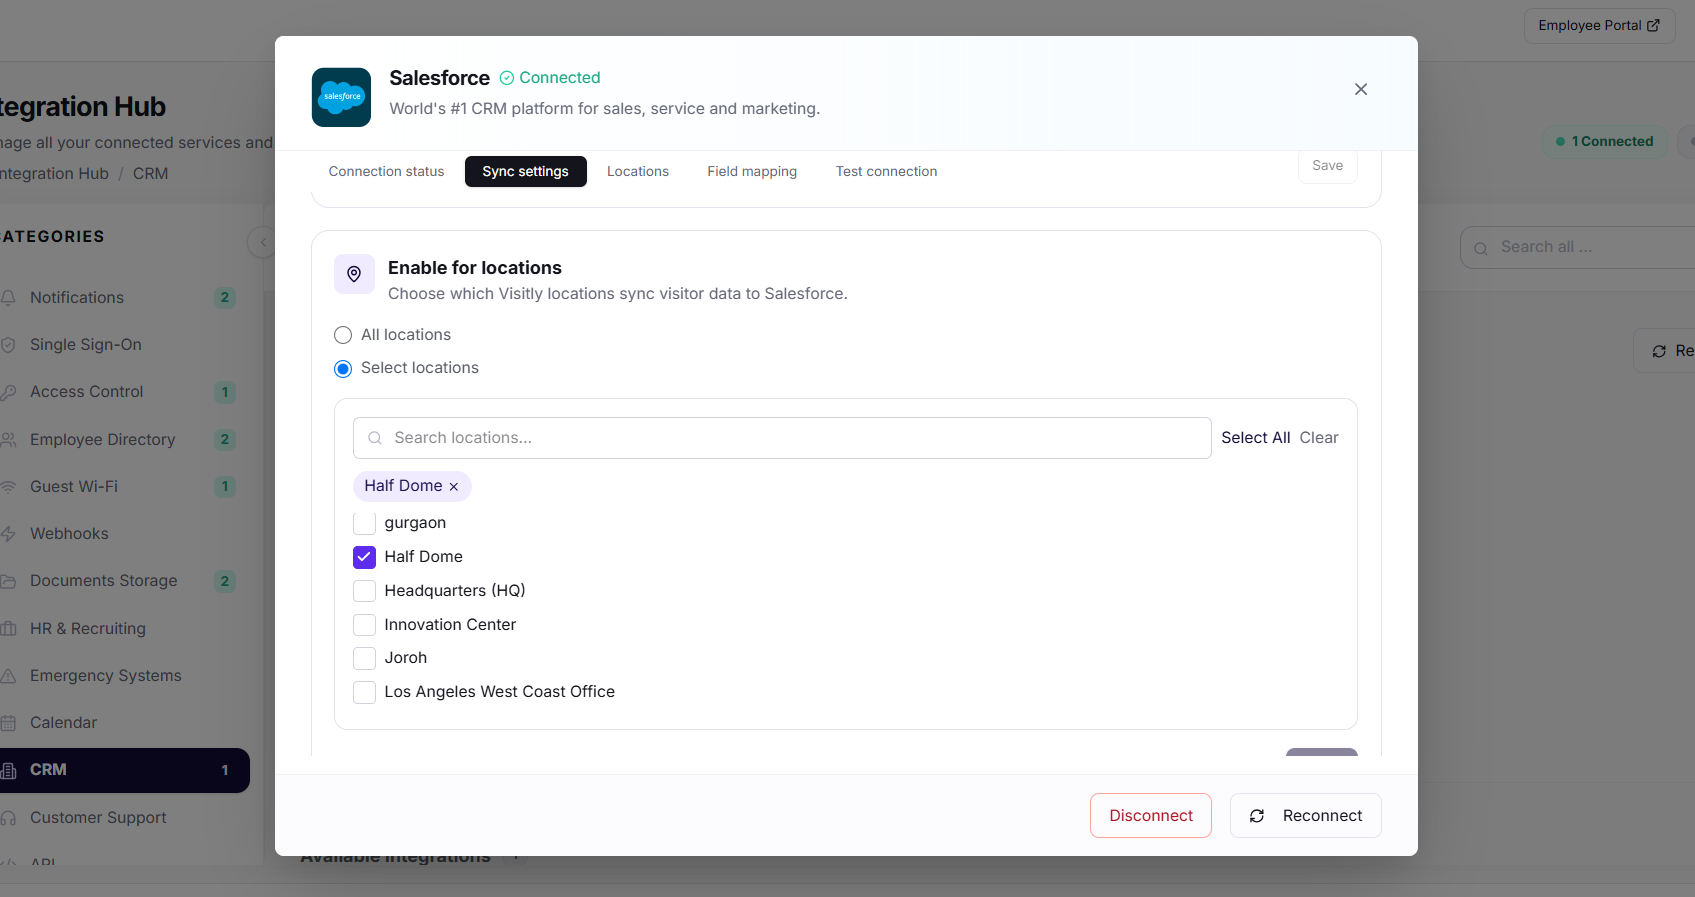
All Locations
Every location in your Visitly org syncs to Salesforce, including any new locations you add in the future.
Select Locations
Pick specific locations from a searchable list. New locations you add later are not automatically included — you’ll need to select them manually.
Tip: Use Select Locations when you have a mix of internal-only and customer-facing locations and only want customer visits to reach Salesforce.
Step 9: Advanced Settings
These settings are optional — most customers can leave them at their defaults.
Bypass Duplicate Rules
When enabled, Visitly will bypass your Salesforce org’s duplicate rules when creating or updating visit records. Enable this if you’re seeing sync failures caused by duplicate detection.
Skip Assignment Rules
When enabled, Visitly will skip Salesforce’s lead or case assignment rules when writing visit records. Useful if assignment rules would incorrectly route Visitly records.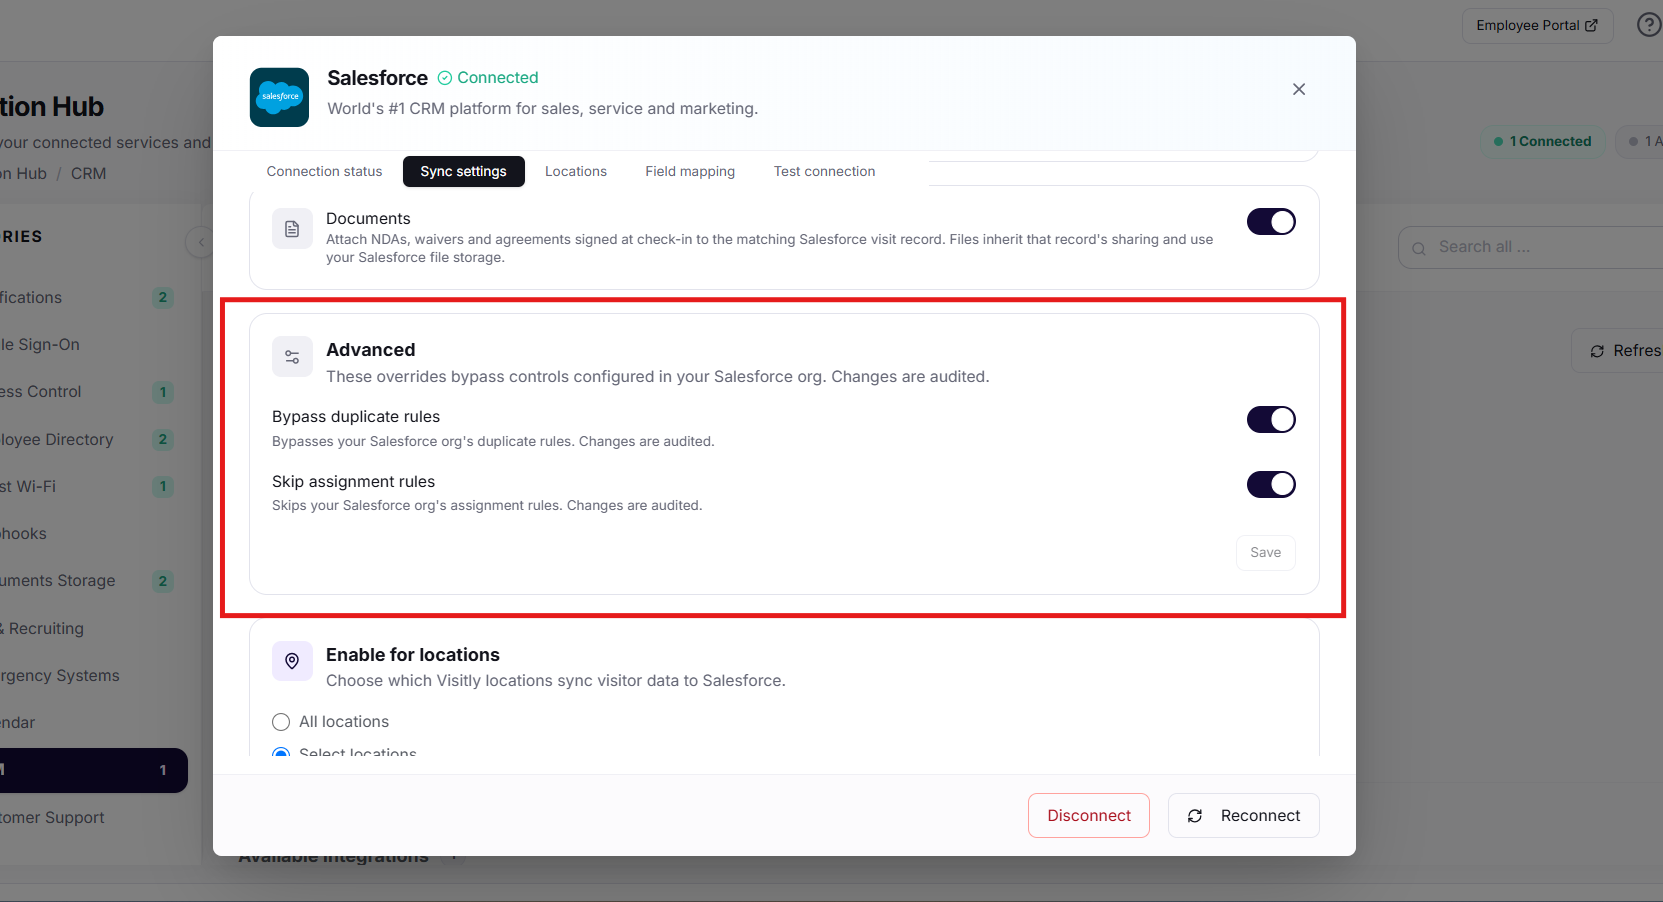
Step 10: Test the Connection
After configuring your mapping and sync settings, send a test event to verify the integration works end to end.
- On the Salesforce configuration page, scroll to Test Connection.
- Click Send Test Event.
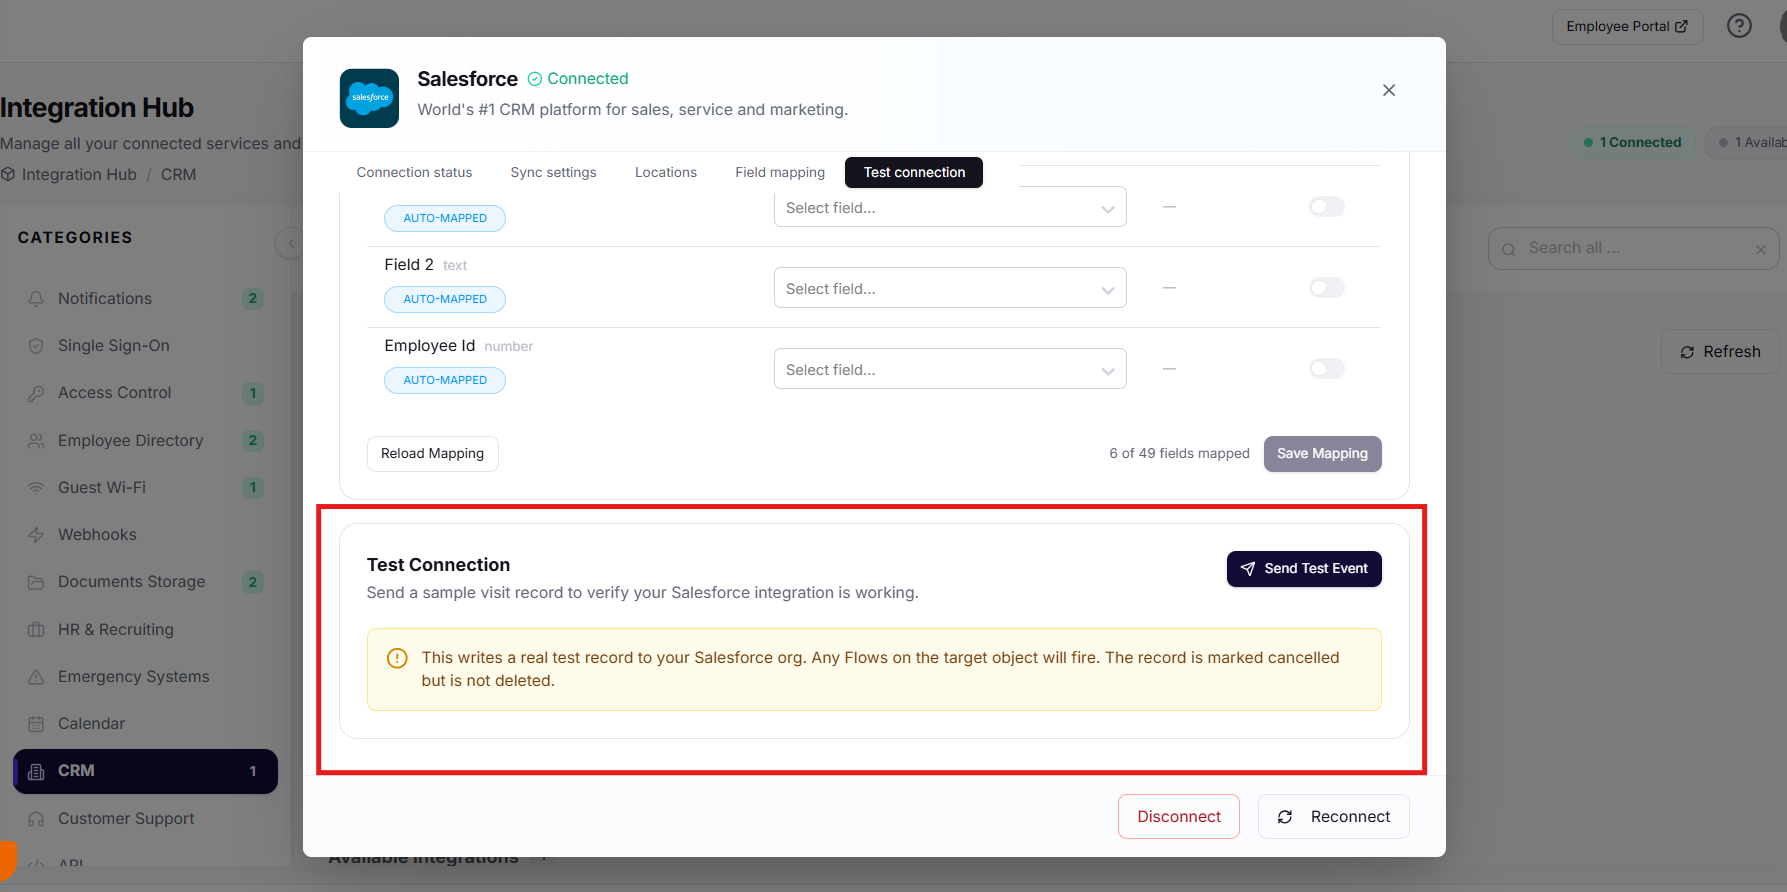
- Visitly will push a sample visit record using your current field mapping and sync settings.
- In Salesforce, open the App Launcher (grid icon), search for Visitly Visits, and confirm the test record appears with correct field values.
Important: This writes a real record. The test event creates an actual Visitly_Visit__c record in your Salesforce org (and may trigger Flows or automation you’ve configured). You can delete the test record manually afterward.
Step 11: Automatic Lead Creation
Automatically create a Salesforce Lead whenever a new visitor record arrives from Visitly. This uses Salesforce Flow Builder — no code needed for the basic setup.
Before You Start: Add Check-in/Check-out Fields to the Lead Object
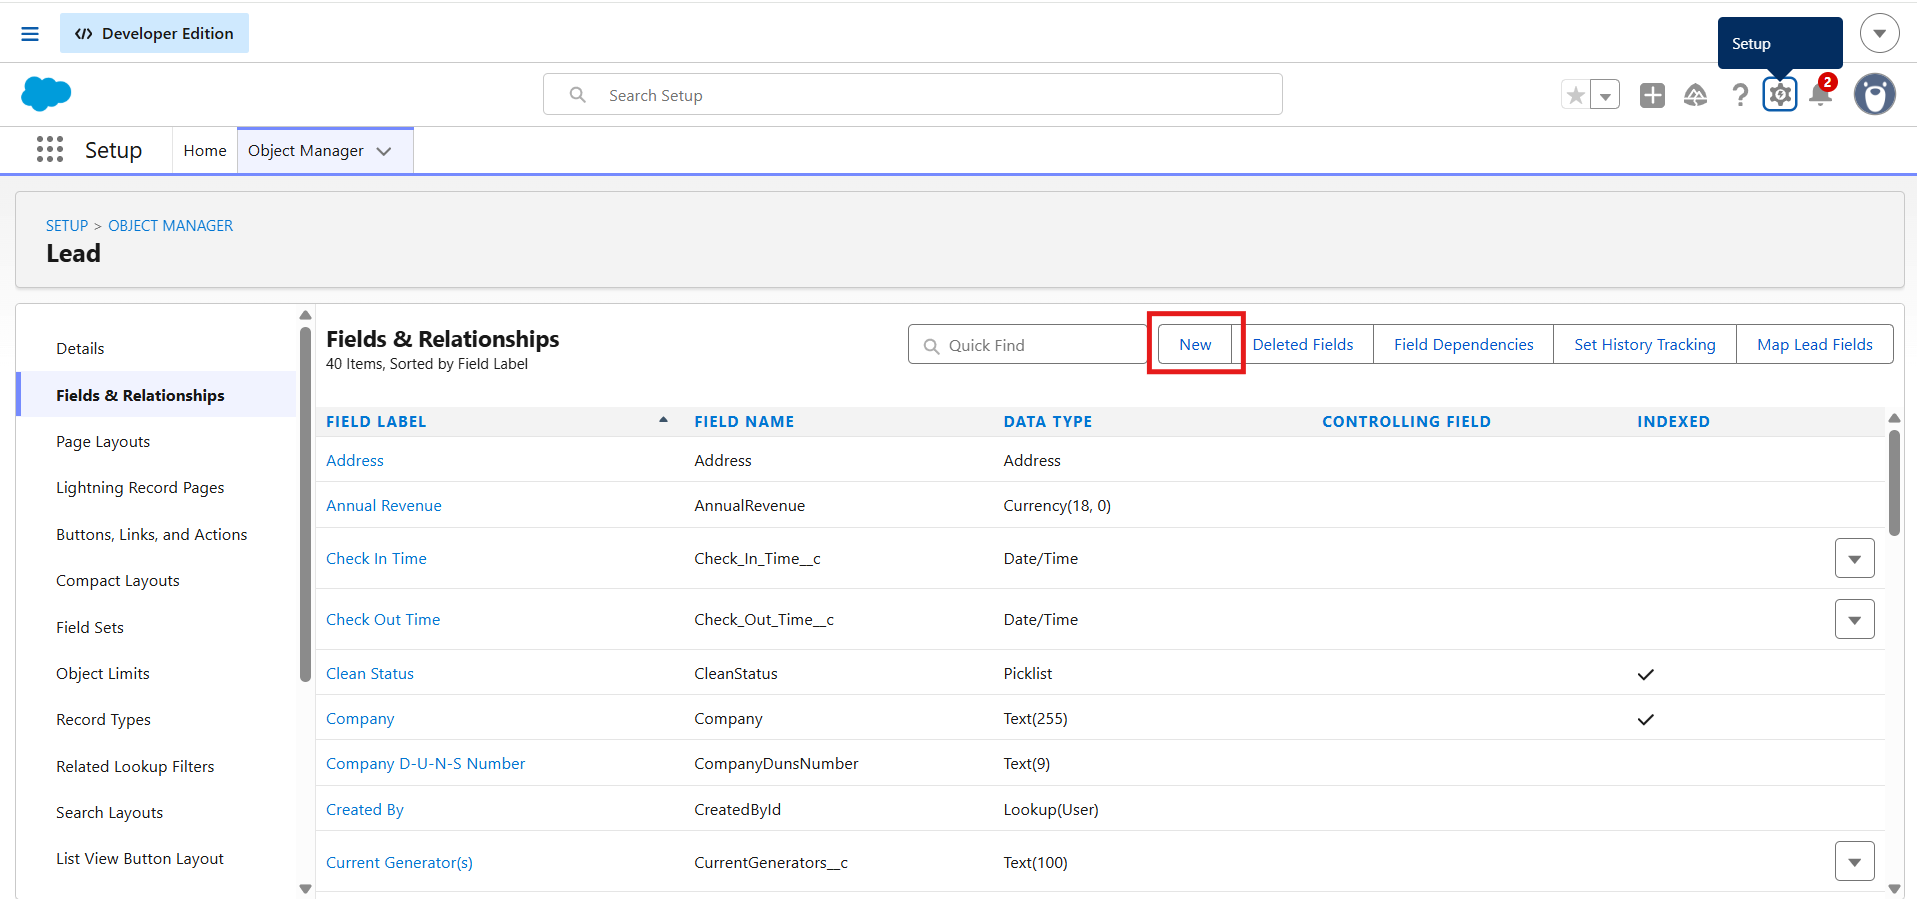
If you want visitor check-in and check-out times to appear on the Lead record, you need to create two custom DateTime fields on the Lead object first:
- Go to Setup → Object Manager → Lead → Fields & Relationships → New.
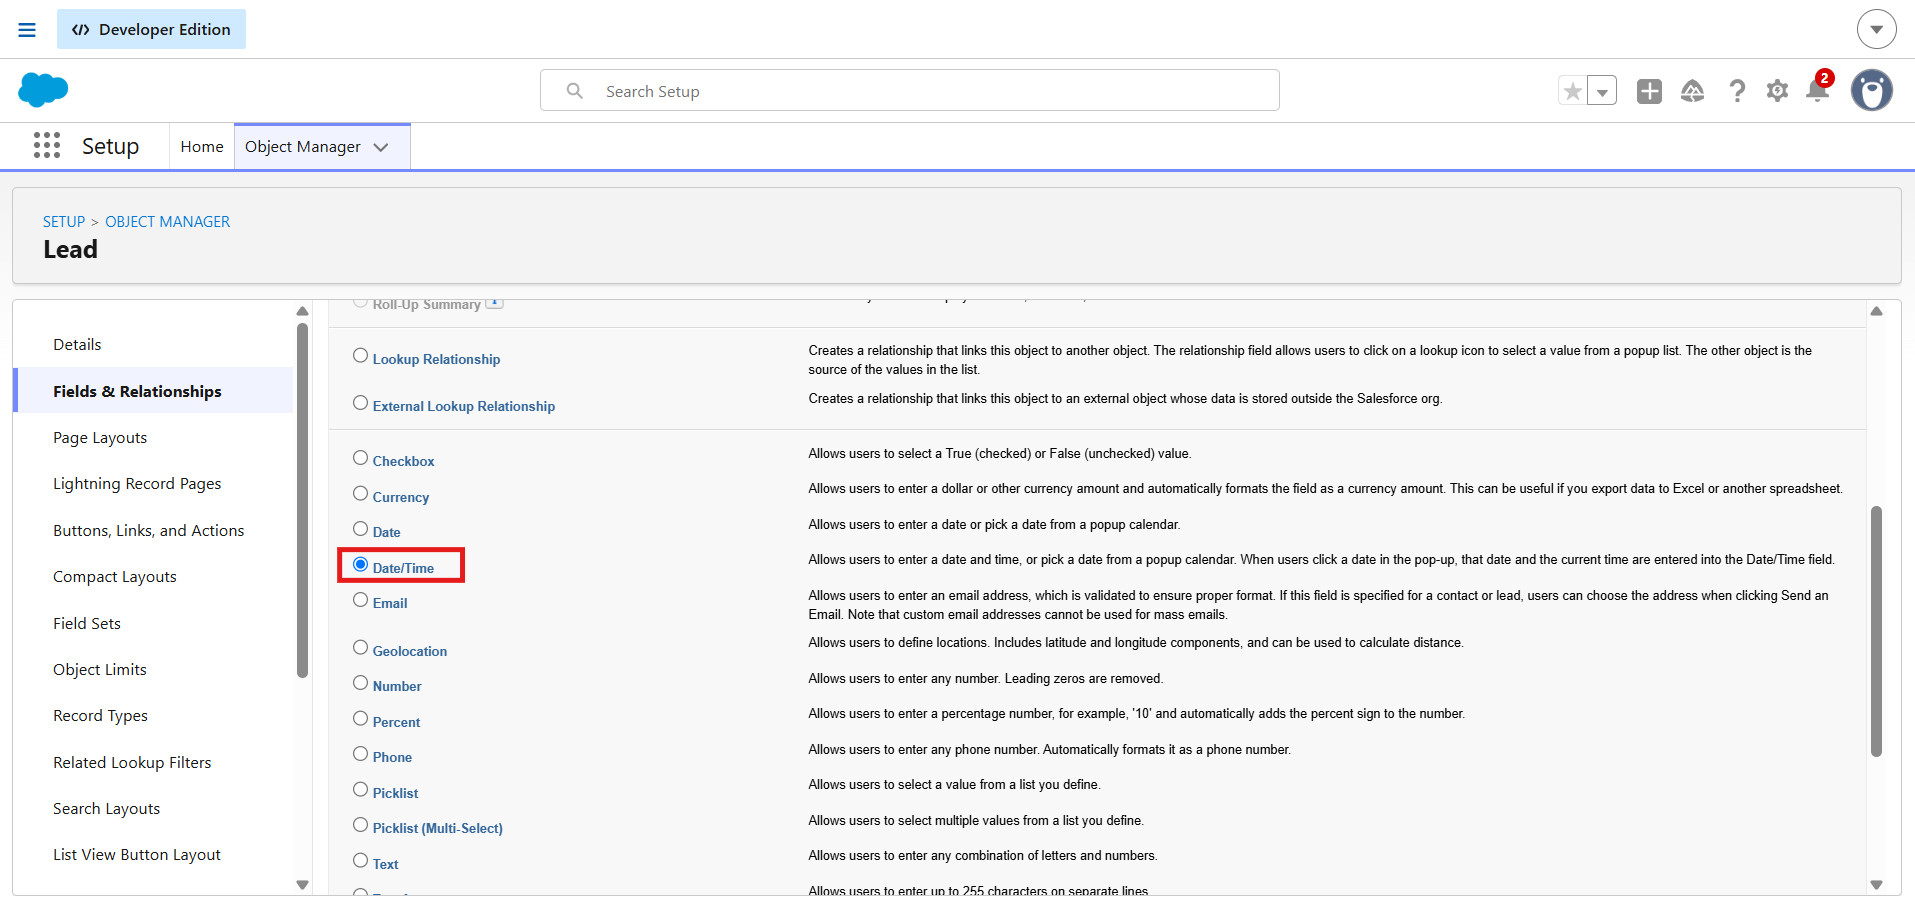
- Select Date/Time as the data type, click Next.
- Enter Field Label:
Check In Time. The API Name will auto-fill asCheck_In_Time. - Click Next, set Field-Level Security to Visible for your profile, click Next, then Save & New.
- Repeat for
Check Out Time(same steps, different label).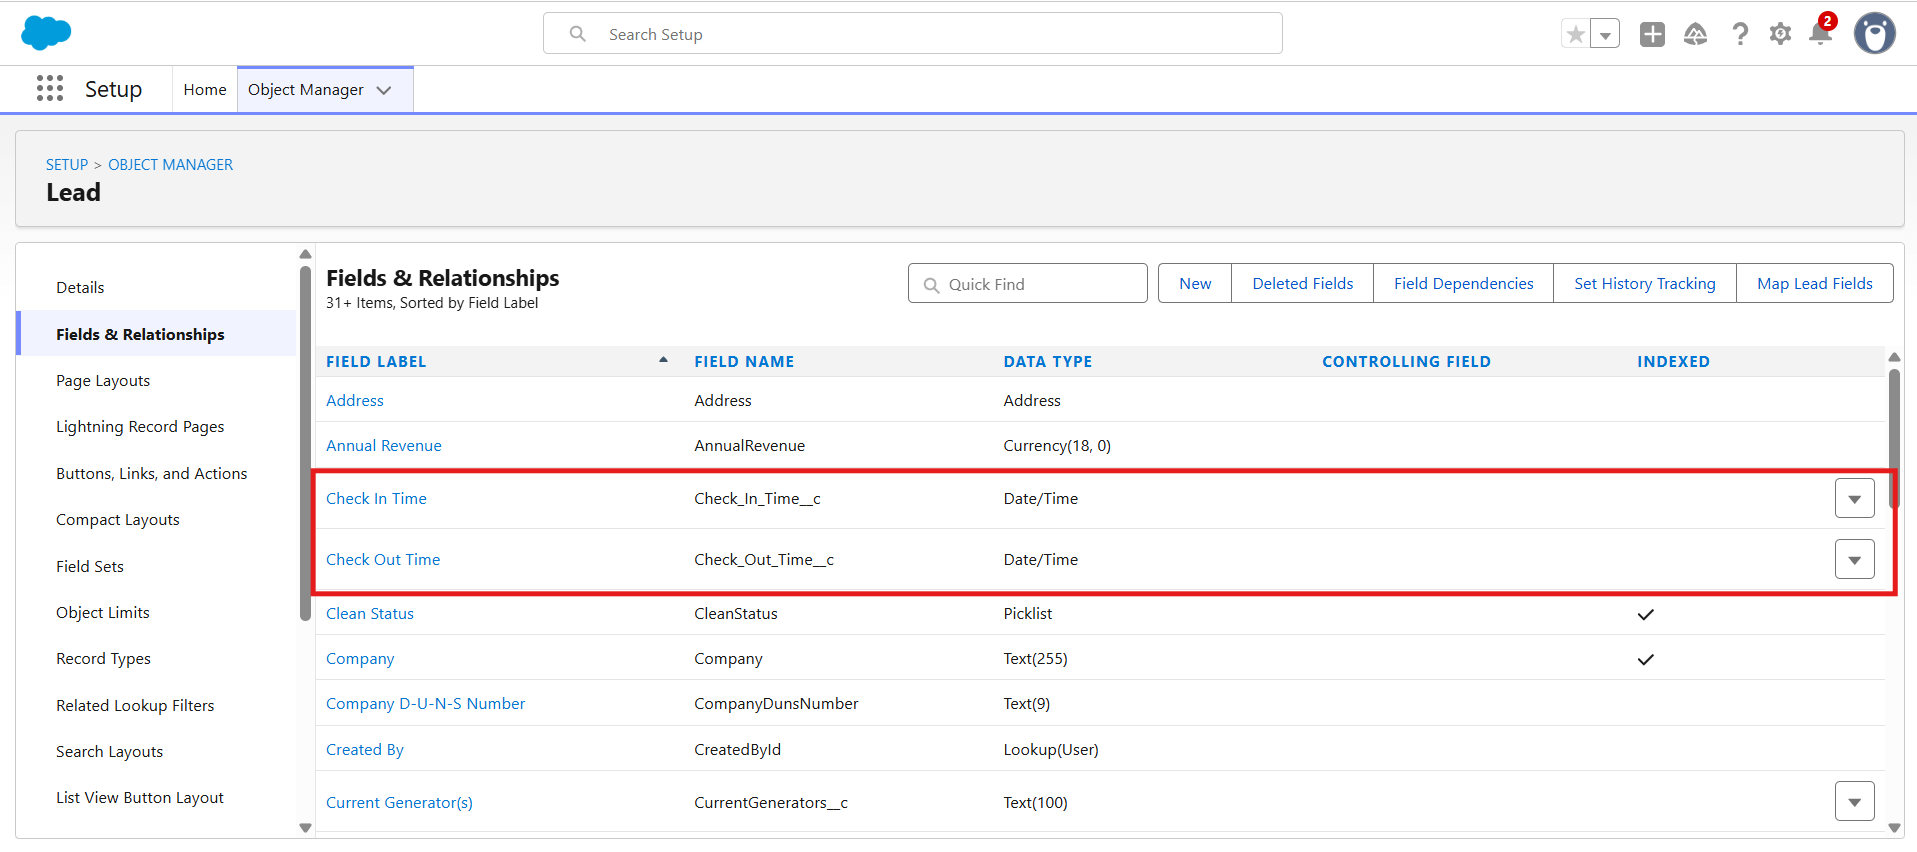
Create the Flow
- Go to Setup → Flows → New Flow.
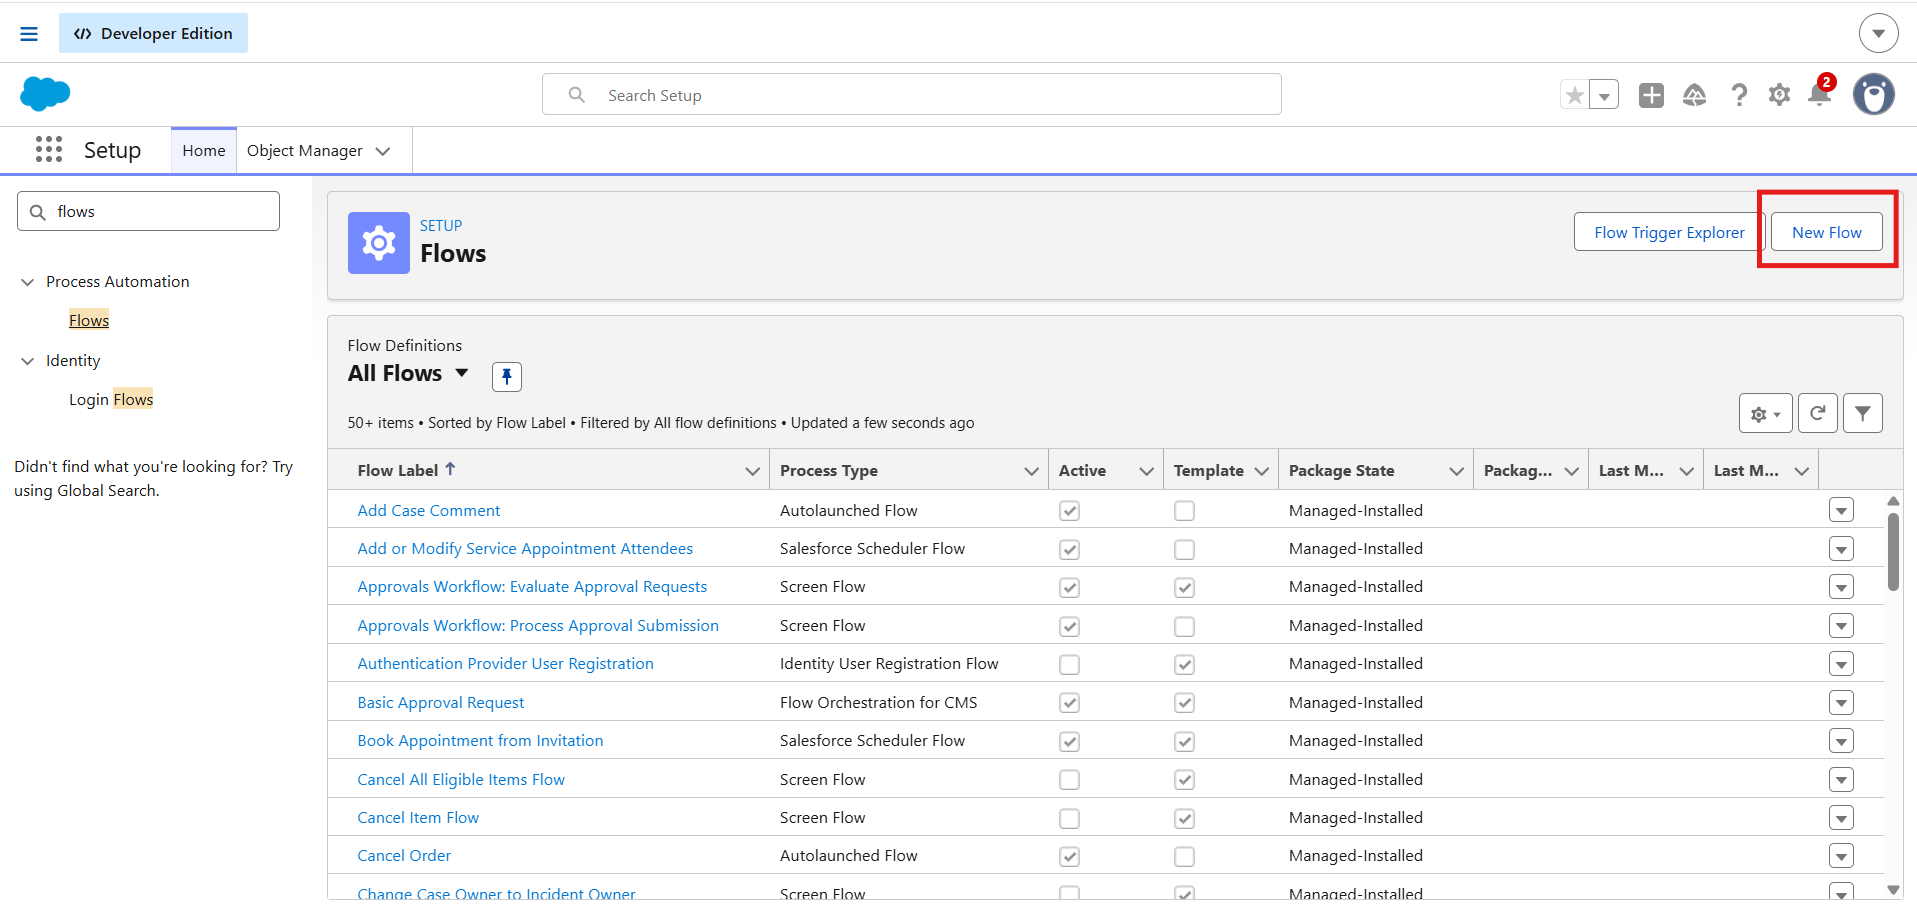
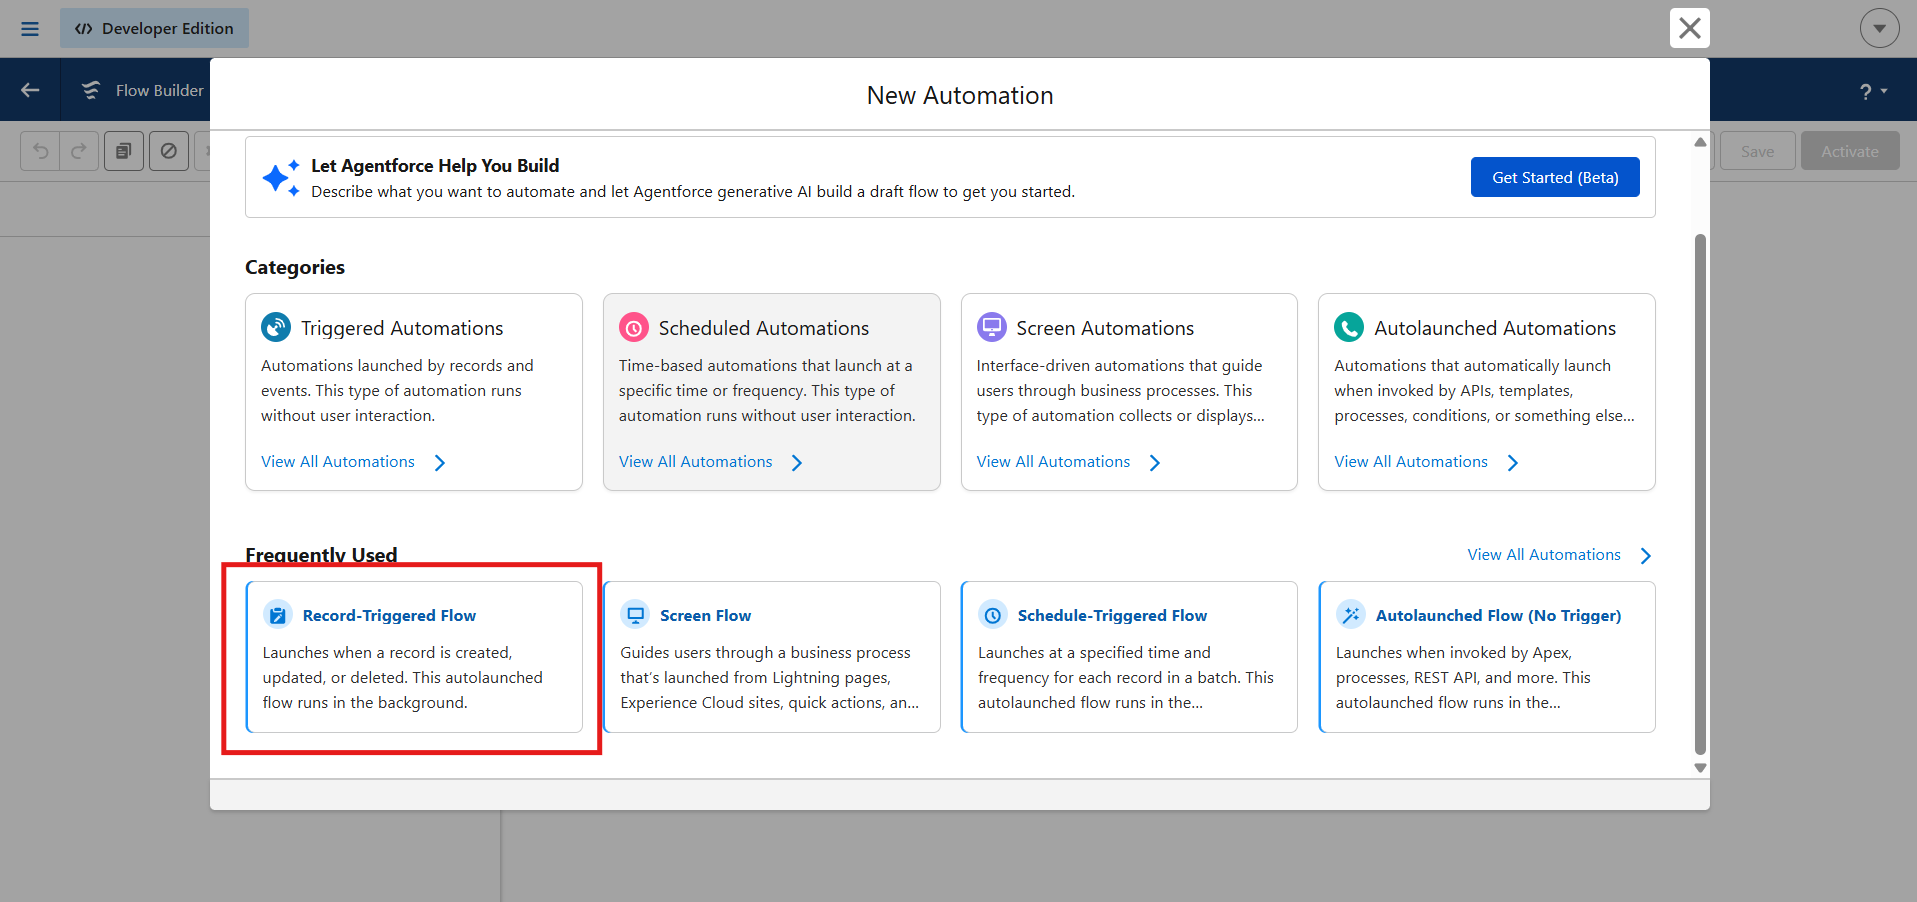
- Select Record-Triggered Flow → Create.
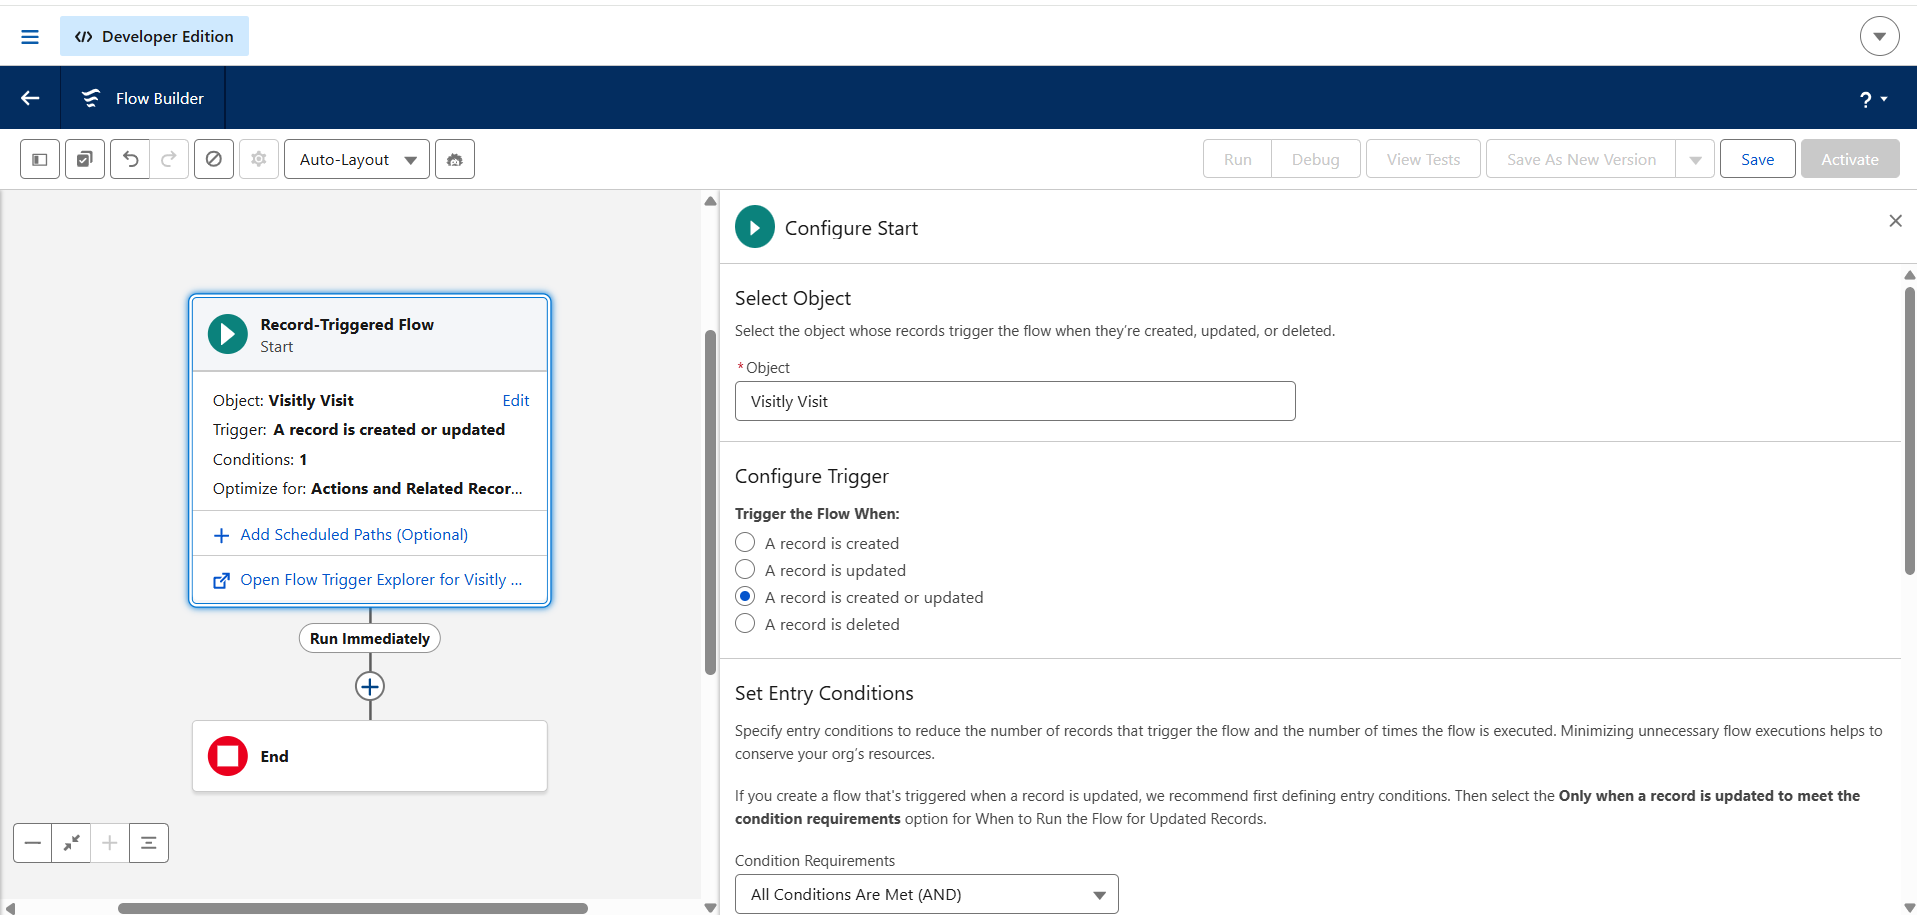
- Configure the trigger:
Object:Visitly Visit
Trigger When: A record is created
Optimize for: Actions and Related Records - Click Save and fill the Flow Label.
Add a Create Records Element
- Click + after the Start element → Create Records.
- Set How Many Records: One. Set Object: Lead.
- Map the fields as shown in the table below.
- Click Done.
Lead Field Mappings
LastName—{!$Record.Visitor_Name__c}— Required by SalesforceEmail—{!$Record.Visitor_Email__c}Phone—{!$Record.Visitor_Phone__c}Company—{!CompanyFormula}— Use Formula resource (see below)Check_In_Time__c—{!$Record.Check_In_Time__c}— Custom field you created aboveCheck_Out_Time__c—{!$Record.Check_Out_Time__c}— Custom field you created above
Company Formula Resource
Salesforce requires the Company field on every Lead. To handle visitors who don’t provide a company, create a Formula resource in the Flow:
- In Flow Builder, click New Resource (in the left panel, under the Toolbox).
- Resource Type: Formula. API Name:
CompanyFormula. Data Type: Text. - Enter this formula:
IF(ISBLANK({!$Record.Visitor_Company__c}), "Not Provided", {!$Record.Visitor_Company__c})Then map the Lead’s Company field to {!CompanyFormula} instead of directly to {!$Record.Visitor_Company__c}.
Save and Activate
- Click Save. Name the Flow:
Visitly to Lead. - Click Activate.
Start (Visit created) → Create Lead (Create Records) → End
Tip: This basic Flow creates a new Lead for every visit. To prevent duplicate Leads for returning visitors, continue to Section 12.
Step 12: Prevent Duplicate Leads
Without a duplicate check, the Flow creates a new Lead every time someone visits — even returning visitors. Add a check so the Flow updates the existing Lead instead of creating a duplicate.
Start (Visit created) → Find Lead (Get Records) → Exists? (Decision) → Create or Update (Lead) → Link Docs (Apex Action)
Step-by-Step Instructions
- Add a Get Records element right after the Start element. Set Object to
Lead. Add a filter:EmailEquals{!$Record.Visitor_Email__c}. Sort byCreatedDatedescending. Choose Only the first record, and store it in a variable (e.g.,{!existingLead}). - Add a Decision element after Get Records. Name: “Lead Exists?”. Create an outcome called “Yes — Lead Found” with the condition:
{!existingLead.Id}Is Null = False. Set the default outcome to “No — Create New Lead”. - “No” path → Create Records. This is your existing Create Lead element with all the field mappings from Section 11.
- “Yes” path → Update Records. Use the record from
{!existingLead}. Update the fields you want refreshed on return visits (e.g.,Check_In_Time__c,Check_Out_Time__c,Phone). - Connect both paths to the Link Documents Apex Action (see Section 14). For the “Yes” path, pass
{!existingLead.Id}as the Lead Record ID. For the “No” path, pass{!Create_Lead}.
Warning: Use email as the primary match key. Email is the most reliable identifier for matching visitors to Leads. If your visitors don’t always provide an email, you can add a second filter on LastName as a fallback — but name-only matching can produce false positives with common names.
Step 13: Configure the Lead Page Layout
After the Flow is creating Leads, you need to make the Visitly fields visible on the Lead record page so your sales team can see visitor details at a glance.
Note: Important distinction: In Salesforce Lightning, there are two separate things that control what you see on a record page. The classic page layout controls which fields appear in the Details tab. The Lightning record page (edited in Lightning App Builder) controls the overall layout of the page — which components (like Related Lists) appear and where. You may need to edit both.
Add Fields to the Classic Page Layout
The Details tab on a Lead record pulls its fields from the classic page layout. You cannot drag individual fields into it from the Lightning App Builder — you must edit the classic layout:
- Go to Setup → Object Manager → Lead → Page Layouts.
- Click on Lead Layout (or whichever layout is assigned to your users).
- In the field palette at the top, find
Check In TimeandCheck Out Time. - Drag them into the layout body where you’d like them to appear (e.g., in the Lead Information section).
- Click Save.
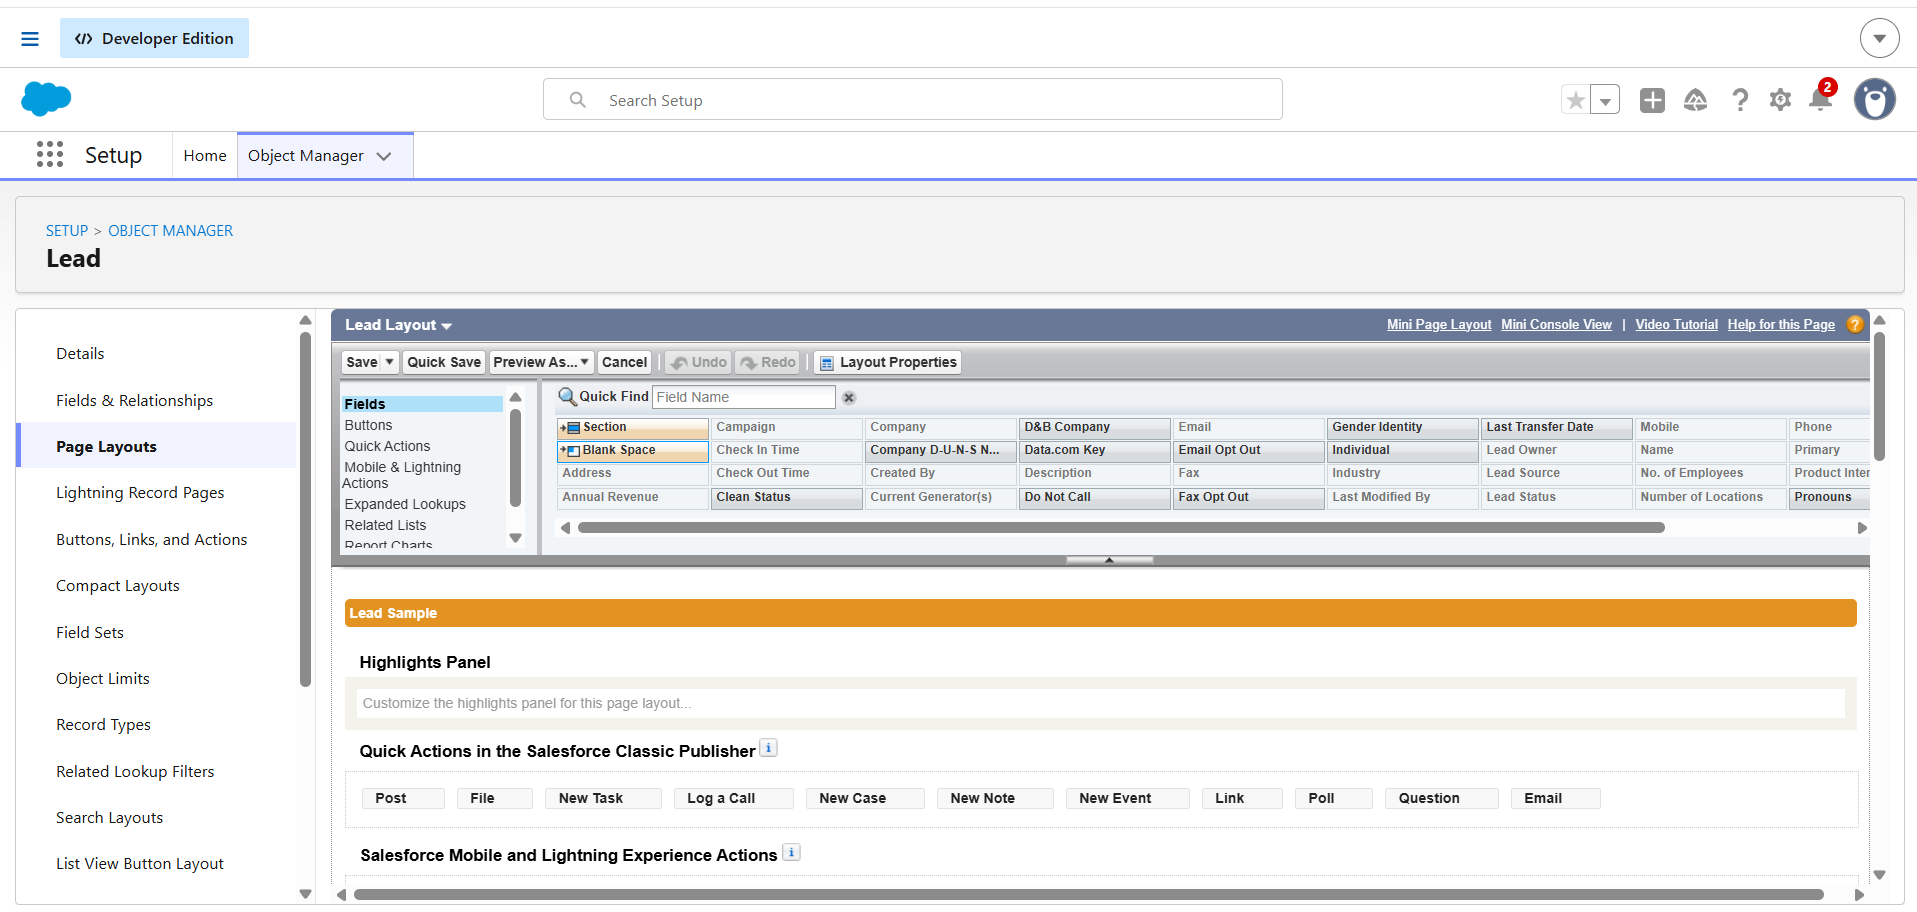
Tip: Why can’t I drag fields in Lightning App Builder? The “Details” component in Lightning App Builder is a single block that renders the entire classic page layout. To control which fields appear inside it, you edit the classic page layout, not the Lightning page. This is a common source of confusion.
Activate Your Lightning Record Page
If you’ve made changes in the Lightning App Builder (such as adding related lists or rearranging components), those changes won’t appear until you activate the page:
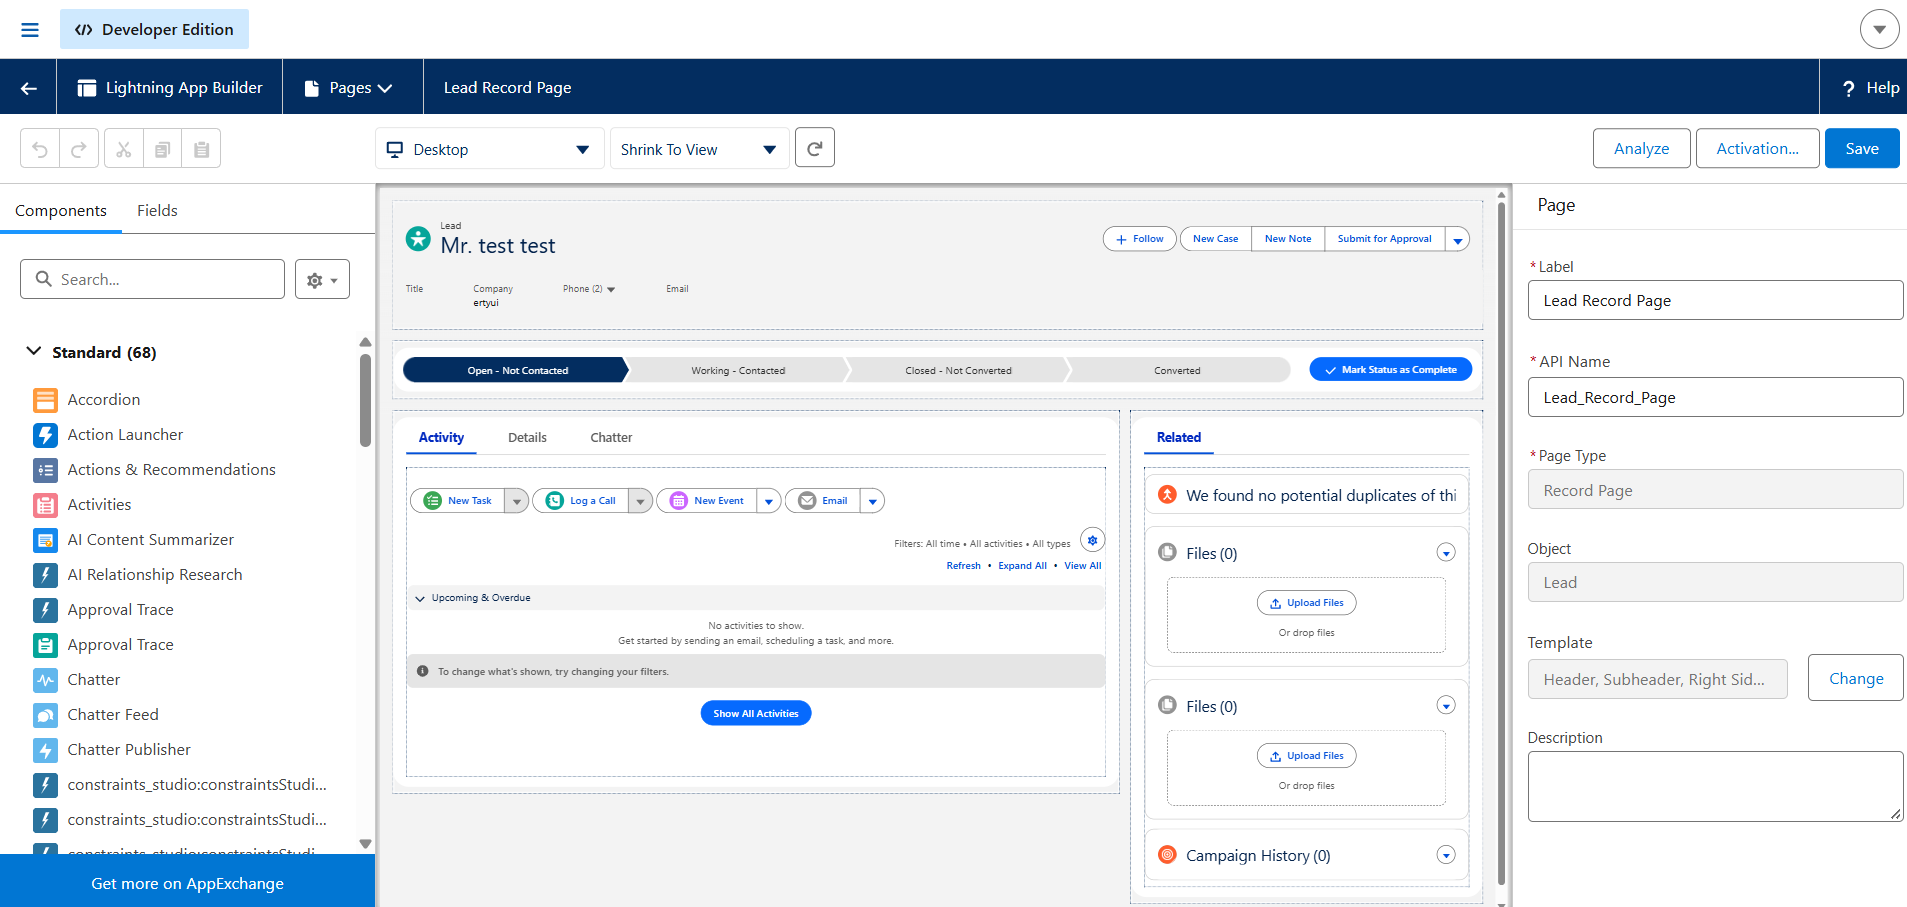
- Open any Lead record and click the gear icon → Edit Page to open Lightning App Builder.
- Make your changes (or just confirm the layout looks right).
- Click Save.
- Click Activation → Assign as Org Default → Save.
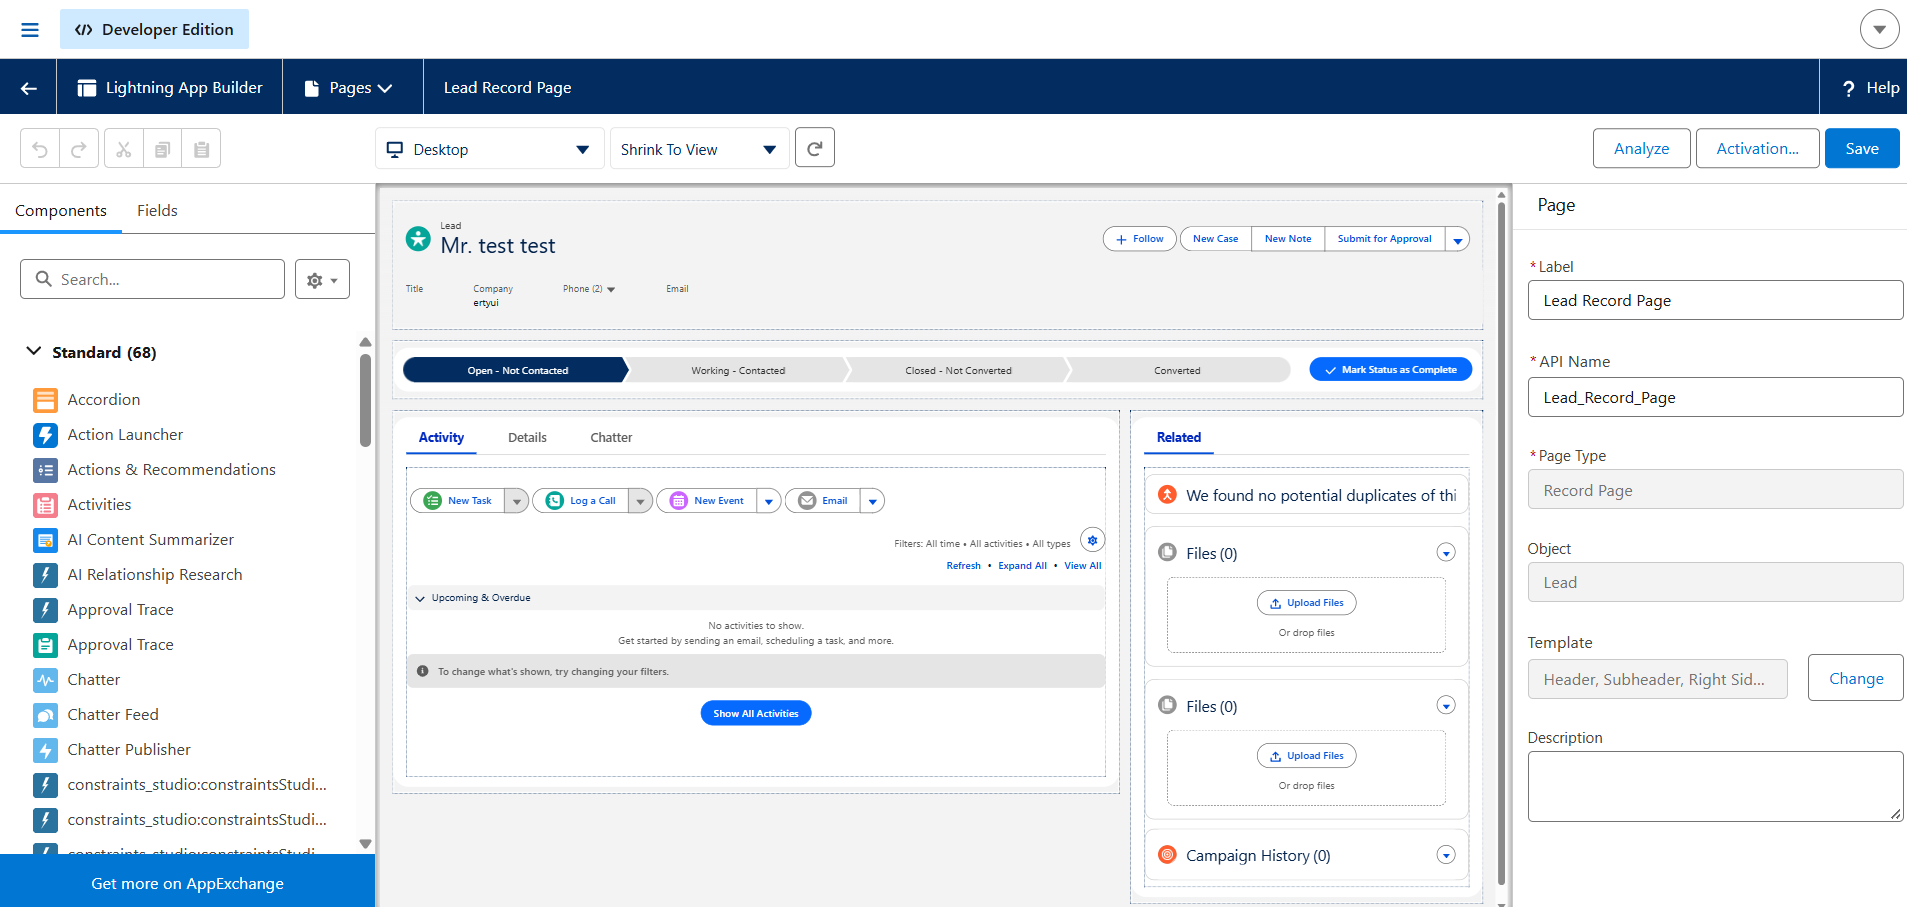
Important: Common mistake: Saving without activating is the most common reason Lightning page changes don’t appear. You must complete the Activation step for changes to take effect across the org.
Step 14: Show Visitor Documents on Leads
Visitor documents (ID photos, NDAs, signed forms) are synced to the Visitly Visit record in Salesforce. To also make them appear on the Lead record, you need two pieces of Apex code and a layout change. Salesforce Flows cannot work with ContentDocumentLink records directly, so this requires Apex.
1: Add the Apex Class (Required)
This class is called from the Flow to copy documents from the Visit record to the newly created Lead.
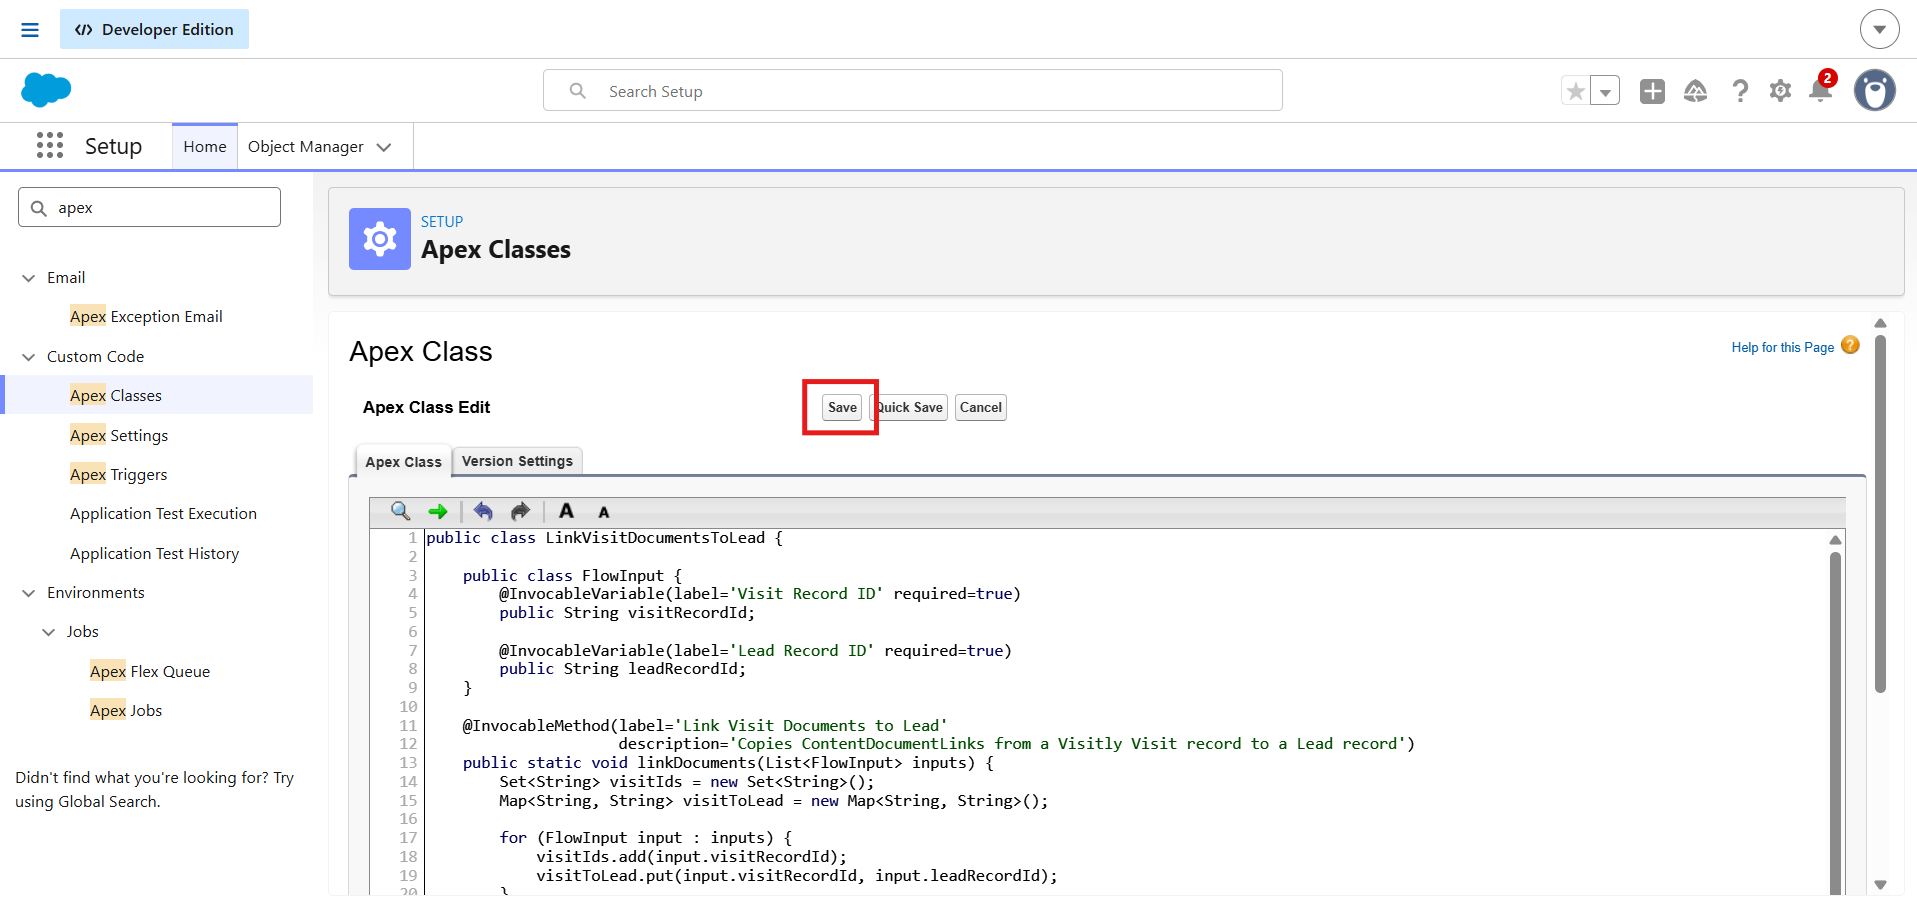
- Go to Setup → Apex Classes → New.
- Paste the code below and click Save.
- The class will appear as “Link Visit Documents to Lead” when you add an Action in Flow Builder.
public class LinkVisitDocumentsToLead {

    public class FlowInput {
        @InvocableVariable(label='Visit Record ID' required=true)
        public String visitRecordId;

        @InvocableVariable(label='Lead Record ID' required=true)
        public String leadRecordId;
    }

    @InvocableMethod(label='Link Visit Documents to Lead'
                     description='Copies ContentDocumentLinks from a Visitly Visit record to a Lead record')
    public static void linkDocuments(List<FlowInput> inputs) {
        Set<String> visitIds = new Set<String>();
        Map<String, String> visitToLead = new Map<String, String>();

        for (FlowInput input : inputs) {
            visitIds.add(input.visitRecordId);
            visitToLead.put(input.visitRecordId, input.leadRecordId);
        }

        List<ContentDocumentLink> existingLinks = [
            SELECT ContentDocumentId, LinkedEntityId
            FROM ContentDocumentLink
            WHERE LinkedEntityId IN :visitIds
        ];

        if (existingLinks.isEmpty()) { return; }

        List<ContentDocumentLink> newLinks = new List<ContentDocumentLink>();
        for (ContentDocumentLink cdl : existingLinks) {
            String leadId = visitToLead.get(cdl.LinkedEntityId);
            if (leadId != null) {
                newLinks.add(new ContentDocumentLink(
                    ContentDocumentId = cdl.ContentDocumentId,
                    LinkedEntityId = leadId,
                    ShareType = 'V',
                    Visibility = 'AllUsers'
                ));
            }
        }

        if (!newLinks.isEmpty()) { insert newLinks; }
    }
}
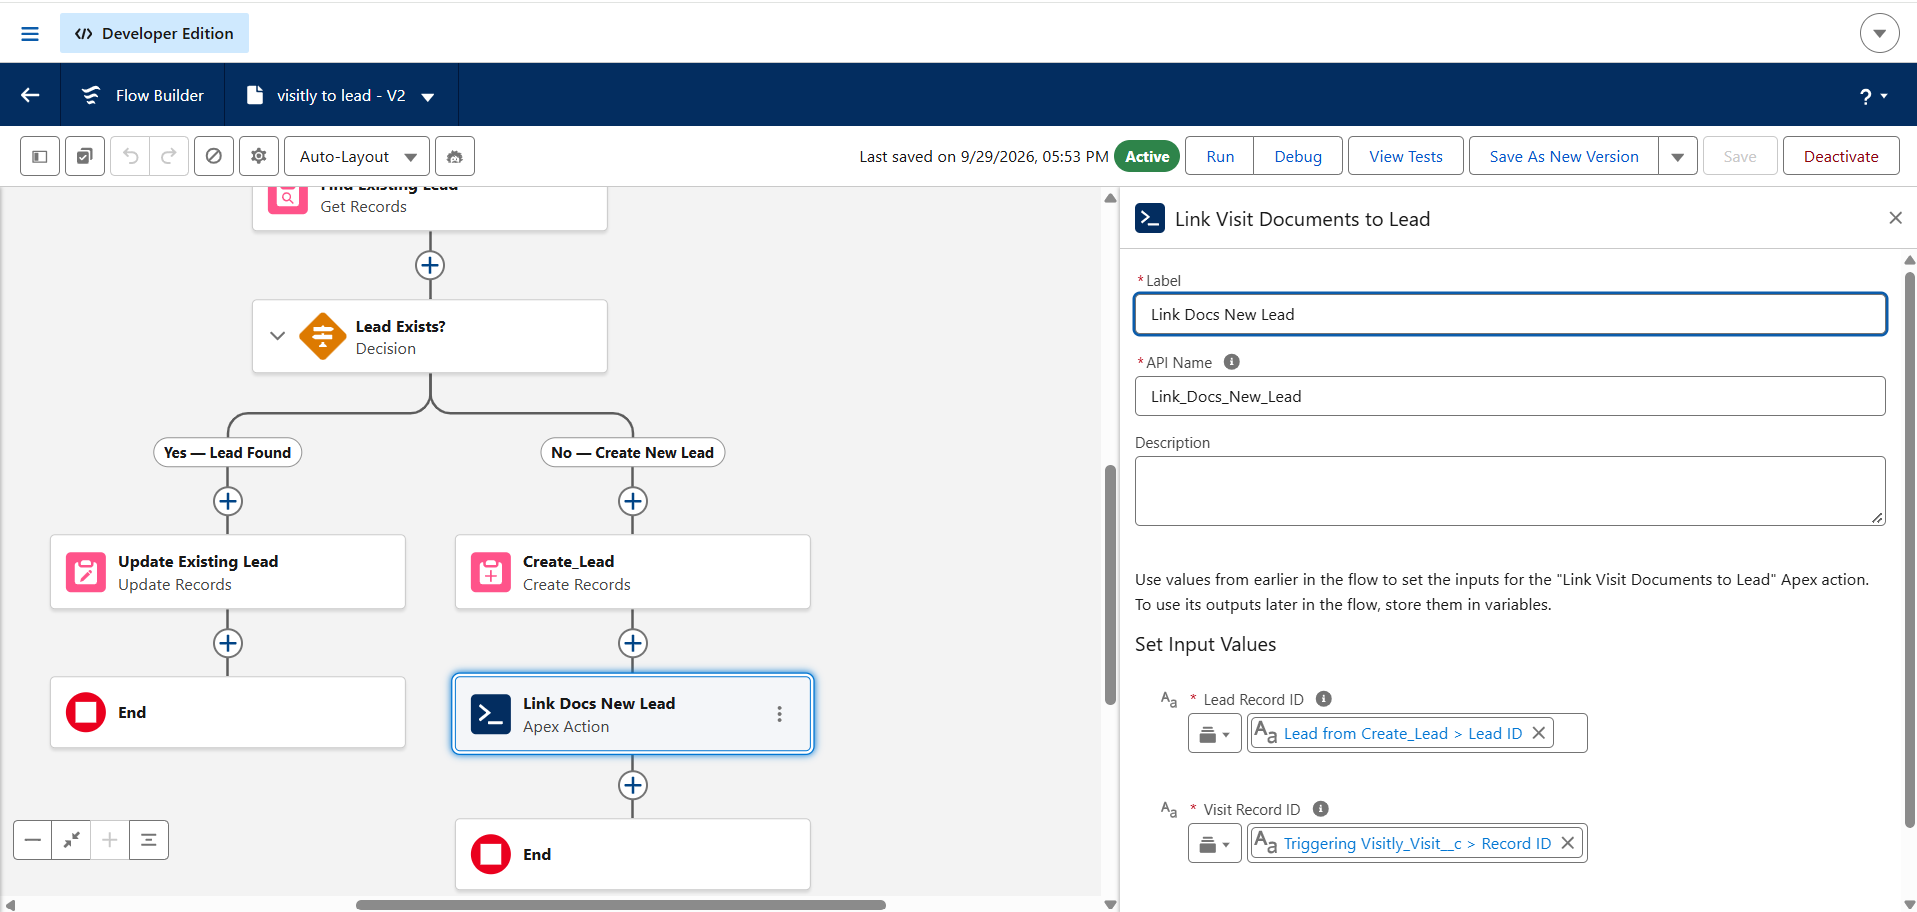
- Open your “Visitly to Lead” Flow in Flow Builder.
- After the Create Lead (or Update Lead) element, click + → Action.
- Search for “Link Visit Documents to Lead” and select it.
- Map the inputs: Visit Record ID =
{!$Record.Id}, Lead Record ID ={!Create_Lead}(or{!existingLead.Id}if updating). - Click Done, then Save and Activate the Flow.
2: Add the Apex Trigger (Optional)
This trigger runs automatically whenever a document is uploaded to a Visitly Visit record after the Flow has already run. It finds the matching Lead (by email, falling back to name) and links the document there too. Without this trigger, only documents that exist at the time the Flow runs will be linked.
- Open the Developer Console (gear icon in Salesforce → Developer Console).
- Go to File → New → Apex Trigger.
- Name it
LinkDocumentToLead, select ContentDocumentLink as the sObject, click Submit. - Replace the generated code with the code below and click Save (Ctrl+S).
trigger LinkDocumentToLead on ContentDocumentLink (after insert) {
    Set<Id> visitIds = new Set<Id>();
    for (ContentDocumentLink cdl : Trigger.new) {
        if (cdl.LinkedEntityId.getSObjectType() == Visitly_Visit__c.SObjectType) {
            visitIds.add(cdl.LinkedEntityId);
        }
    }
    if (visitIds.isEmpty()) { return; }

    Map<Id, Visitly_Visit__c> visits = new Map<Id, Visitly_Visit__c>([
        SELECT Id, Visitor_Email__c, Visitor_Name__c
        FROM Visitly_Visit__c WHERE Id IN :visitIds
    ]);

    Set<String> emails = new Set<String>();
    Set<String> names = new Set<String>();
    for (Visitly_Visit__c v : visits.values()) {
        if (v.Visitor_Email__c != null) emails.add(v.Visitor_Email__c);
        if (v.Visitor_Name__c != null) names.add(v.Visitor_Name__c);
    }
    if (emails.isEmpty() && names.isEmpty()) { return; }

    List<Lead> leads;
    if (!emails.isEmpty()) {
        leads = [SELECT Id, Email, Name FROM Lead
                 WHERE Email IN :emails ORDER BY CreatedDate DESC];
    } else {
        leads = [SELECT Id, Email, Name FROM Lead
                 WHERE Name IN :names ORDER BY CreatedDate DESC];
    }
    if (leads.isEmpty()) { return; }

    Map<String, Id> emailToLeadId = new Map<String, Id>();
    Map<String, Id> nameToLeadId = new Map<String, Id>();
    for (Lead l : leads) {
        if (l.Email != null && !emailToLeadId.containsKey(l.Email))
            emailToLeadId.put(l.Email, l.Id);
        if (!nameToLeadId.containsKey(l.Name))
            nameToLeadId.put(l.Name, l.Id);
    }

    Set<Id> leadIds = new Set<Id>(emailToLeadId.values());
    leadIds.addAll(nameToLeadId.values());
    List<ContentDocumentLink> existingLeadLinks = [
        SELECT ContentDocumentId, LinkedEntityId
        FROM ContentDocumentLink WHERE LinkedEntityId IN :leadIds
    ];
    Set<String> existingLinkKeys = new Set<String>();
    for (ContentDocumentLink cdl : existingLeadLinks) {
        existingLinkKeys.add(cdl.ContentDocumentId + '_' + cdl.LinkedEntityId);
    }

    List<ContentDocumentLink> newLinks = new List<ContentDocumentLink>();
    for (ContentDocumentLink cdl : Trigger.new) {
        if (cdl.LinkedEntityId.getSObjectType() != Visitly_Visit__c.SObjectType)
            continue;
        Visitly_Visit__c visit = visits.get(cdl.LinkedEntityId);
        if (visit == null) continue;

        Id leadId = null;
        if (visit.Visitor_Email__c != null)
            leadId = emailToLeadId.get(visit.Visitor_Email__c);
        if (leadId == null && visit.Visitor_Name__c != null)
            leadId = nameToLeadId.get(visit.Visitor_Name__c);

        if (leadId != null) {
            String linkKey = cdl.ContentDocumentId + '_' + leadId;
            if (!existingLinkKeys.contains(linkKey)) {
                newLinks.add(new ContentDocumentLink(
                    ContentDocumentId = cdl.ContentDocumentId,
                    LinkedEntityId = leadId,
                    ShareType = 'V',
                    Visibility = 'AllUsers'
                ));
                existingLinkKeys.add(linkKey);
            }
        }
    }
    if (!newLinks.isEmpty()) { insert newLinks; }
}
3: Add the Files Related List to the Lead Page
Documents are now being linked to Leads, but they won’t be visible until you add the Files related list to the Lead page:
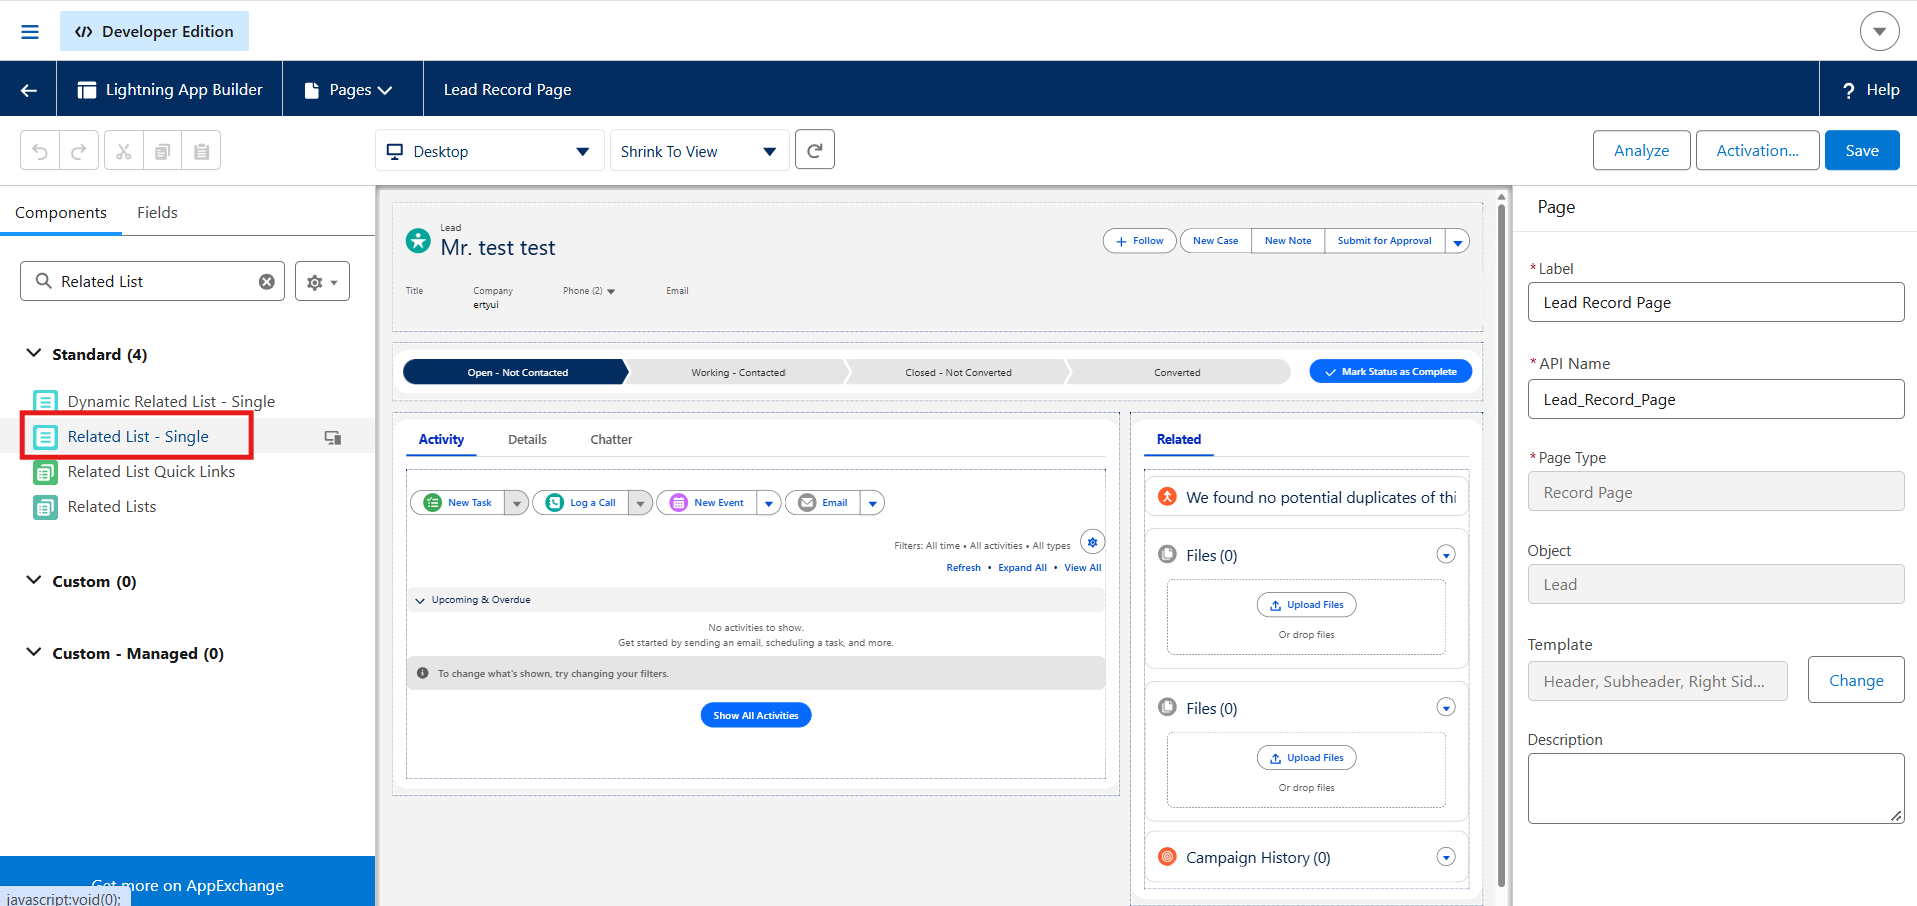
- Open any Lead record and click the gear icon → Edit Page to enter Lightning App Builder.
- From the left panel, drag the Related List — Single component onto the page (below the Details section is a good spot).
- In the component properties on the right, set the related list to Files.
- Click Save, then Activation → Assign as Org Default → Save.
Success: Files not showing up? If the Files section shows “0 items” after setup, the Lead was probably created before the Apex code was deployed. Only visits that happen after the code is in place will link documents. For older records, you can re-upload the document to the Visit record to re-trigger the linking.
Step 15: Timezone & Time Display
Salesforce stores all DateTime values in UTC internally and converts them to each user’s local timezone for display. If check-in or check-out times look wrong, there are two things to check.
Verify Your Salesforce Timezone Setting
Each user’s timezone setting controls how DateTime fields are displayed. If times look wrong by a round number of hours, this is the first thing to check.
- Click your avatar (top right) → Settings.
- Go to My Personal Information → Language & Time Zone.
- Set Time Zone to your local timezone (e.g., (GMT+05:30) India Standard Time).
- Click Save.
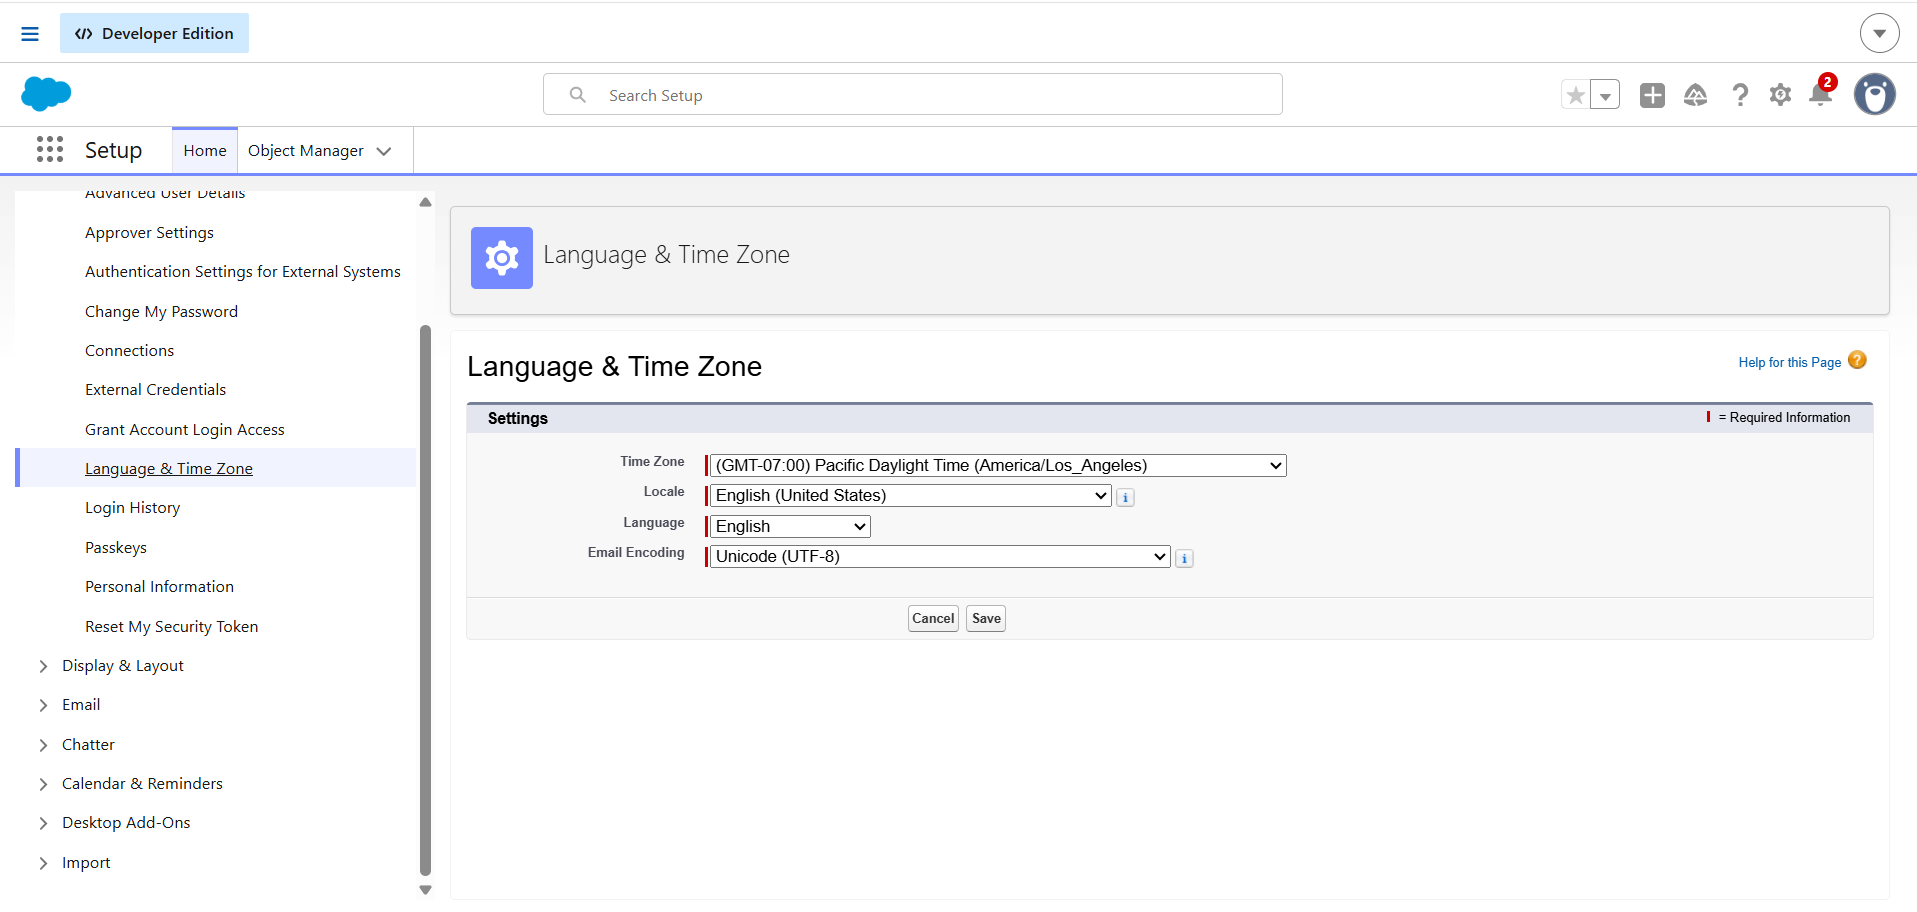
Your org admin can also set the org-wide default at Setup → Company Information → Default Time Zone.
Step 16: Complete Field Reference
All 20 fields on the Visitly_Visit__c custom object, with the types and lengths you need if creating them manually.
- Visit ID —
Visitly_Visit_ID__c— Text — 80 — External ID + Unique - Visitly Org ID —
Visitly_Org_ID__c— Text — 50 - Visitor Name —
Visitor_Name__c— Text — 255 - Visitor Email —
Visitor_Email__c— Email - Visitor Phone —
Visitor_Phone__c— Phone - Visitor Company —
Visitor_Company__c— Text — 255 - Host Name —
Host_Name__c— Text — 255 - Host Email —
Host_Email__c— Email - Purpose of Visit —
Purpose_of_Visit__c— Text — 255 - Location ID —
Visitly_Location_ID__c— Text — 50 - Location Name —
Visitly_Location_Name__c— Text — 255 - Visitor Type ID —
Visitly_Visitor_Type_ID__c— Text — 50 - Visitor Type Name —
Visitly_Visitor_Type_Name__c— Text — 100 - Event Type —
Event_Type__c— Text — 20 — sign_in or sign_out - Event Timestamp —
Event_Timestamp__c— Date/Time - Check-in Time —
Check_In_Time__c— Date/Time - Check-out Time —
Check_Out_Time__c— Date/Time - Is Returning Visitor —
Is_Returning_Visitor__c— Checkbox — Default: unchecked - Event Status —
Visitly_Event_Status__c— Text — 50 - Visit Count —
Visit_Count__c— Number — 5, 0
Troubleshooting
What Salesforce editions support this integration?
Any edition with API access: Professional (with API add-on), Enterprise, Unlimited, and Developer editions. Salesforce Essentials does not include API access.
Can I connect to a Salesforce Sandbox?
Yes. When connecting, select Sandbox as the environment on the Salesforce card. You’ll be redirected to the sandbox login page.
Check In / Check Out Time is showing the wrong time
This is almost always one of two issues:
1. Your Salesforce timezone is wrong. Check your personal timezone: Avatar → Settings → My Personal Information → Language & Time Zone. Set it to your local timezone and save.
2. The middleware isn’t converting to UTC. If the time is off by exactly your timezone’s UTC offset (e.g., +5:30 for IST), the middleware is sending local time without a timezone indicator. See Section 15 for details. This is a middleware change — there is no Salesforce-side fix.
Check In / Check Out Time fields don’t appear on the Lead
Fields exist but aren’t visible: You need to add them to the classic page layout, not the Lightning page. Go to Setup → Object Manager → Lead → Page Layouts → Lead Layout. Drag the fields from the palette into the layout and save. See Section 13.
Fields aren’t populated: Only Leads created after you added these field mappings to the Flow will have them populated. Earlier Leads won’t have them unless you update the records manually.
I can’t drag fields into the Details section in Lightning App Builder
This is by design. The “Details” component in Lightning App Builder renders the classic page layout as a single block. You can’t drag individual fields into it. Instead, edit the classic page layout: Setup → Object Manager → Lead → Page Layouts → Lead Layout. The classic editor lets you drag fields into sections, reorder them, and organize them into columns.
Files / documents aren’t showing on the Lead record
Check three things:
1. Is the Files related list on the Lightning page? Open the Lead → gear icon → Edit Page. Look for a “Related List — Single” component set to Files. If not, add it (see Section 14).
2. Is the Lightning page activated? In Lightning App Builder: Save → Activation → Assign as Org Default → Save.
3. Was the Apex code deployed before the visit? The trigger only links documents for visits that happen after it’s been deployed. Re-upload a document to the Visit record to re-trigger linking.
Duplicate Leads are being created for returning visitors
The basic Flow creates a new Lead for every visit. You need to add a duplicate check. See Section 12: Prevent Duplicate Leads for the full instructions.
Lightning page changes aren’t showing up
You likely saved without activating. In Lightning App Builder, click Save, then Activation → Assign as Org Default → Save. Without the activation step, your changes aren’t live. See Section 13.
Flow error: “Missing required input parameter: Company”
The Lead object requires the Company field. If a visitor doesn’t provide a company name, the Flow fails. Create a Formula resource in the Flow:
Map the Lead’s Company field to this formula instead of directly to the visitor company field. See Section 11.
IF(ISBLANK({!$Record.Visitor_Company__c}), "Not Provided", {!$Record.Visitor_Company__c})Flow error: “ContentDocumentId isn’t compatible with SObject element”
Salesforce Flows cannot work with ContentDocumentLink records directly — this is a platform limitation. Document linking must be handled through the Apex class provided in Section 14. Use it as an Action in your Flow rather than trying to create ContentDocumentLink records with a Flow element.
Deployment failed: “No package.xml found”
The zip file has a nested folder structure and Workbench can’t find package.xml at the zip root. Make sure Single Package is set to true in the Workbench deploy options. If that doesn’t help, recreate the zip so that package.xml is at the top level.
Deployment failed: Test level “NoTestRun” rejected
Trial orgs and Production orgs require test execution during deployment. Set the Test Level to RunLocalTests in Workbench.
What happens if a visitor signs in multiple times?
Each visit creates a separate Visitly_Visit__c record with a unique Visit ID. The Is Returning Visitor field will be true and Visit Count reflects their total visits. If you’ve set up duplicate prevention, the existing Lead will be updated rather than creating a new one.
My fields aren’t showing in Flow Builder
This is usually a Field-Level Security issue. Go to Object Manager → Visitly Visit → Fields & Relationships, click each field → Set Field-Level Security, and check Visible for your profile. Then refresh Flow Builder.
Can I create Contacts instead of Leads?
Yes. In Flow Builder, choose Contact as the object in the Create Records action. You can also create both by adding two Create Records actions. Note that Contact requires an AccountId, so you’ll need to link it to an existing Account.
How do I verify the full integration is working?
Create a test visit in Visitly (check in a visitor with a name, email, and company). Then in Salesforce:
1. Go to the Leads tab. A new Lead should appear with the visitor’s name and email.
2. Open the Lead. The Details tab should show Check In Time (matching the time in the Visitly visitor log, once the timezone fix is in place).
3. Scroll to the Files section. Any documents the visitor uploaded should appear here.
4. Have the same visitor check in again. With duplicate prevention, no new Lead should be created — the existing Lead’s check-in time should update.
The connection shows an OAuth error
“Invalid Client ID” — Connected Apps can take up to 10 minutes to activate. Wait and try again.
“Insufficient Privileges” — The Salesforce user lacks “API Enabled” permission. Ask your admin to enable it.
“Custom Object Not Found” — The Visitly_Visit__c object hasn’t been created. Follow Step 2.
How do I disconnect Salesforce?
Go to Settings → Integrations → Salesforce → Manage, then click Disconnect. Type DISCONNECT to confirm. Your field mapping is preserved if you reconnect later.
What data does Visitly access in my Salesforce org?
Visitly only writes to the selected custom object (default: Visitly_Visit__c) and, when document sync is enabled, uploads files via the ContentVersion API. Visitly does not read, modify, or delete any other Salesforce data.
Was this article helpful?
That’s Great!
Thank you for your feedback
Sorry! We couldn't be helpful
Thank you for your feedback
Feedback sent
We appreciate your effort and will try to fix the article