Admin role required: Global Admin and Location Admin

Feature availability varies by plan. Check What's in each plan on our pricing page to see if it's included in yours, or talk to our sales team about upgrading.
Notification Templates are where you design the actual content of the notifications your locations send for events like arrivals, pre-registration, and sign-outs. The template editor gives you full control over channel, sender details, and message design, so every notification looks polished and matches your organization's voice. After completing this guide, you'll be able to create, customize, and manage notification templates for any location.
How It Works
- Each location maintains its own set of notification templates, organized by channel — Email or SMS.
- You can build a template from scratch or start from a pre-built library template and customize it.
- Shortcodes pull live data — like visitor name, host, or visit details — into the notification automatically for each recipient.
- The editor previews your template across Desktop, Tablet, and Mobile before you save it, so you can confirm how it renders everywhere.
Setup Guide
Step 1: Open Notification Templates
- Go to Locations.
- Select the location you want to manage, and select Edit.
- Go to the Notification Templates tab.
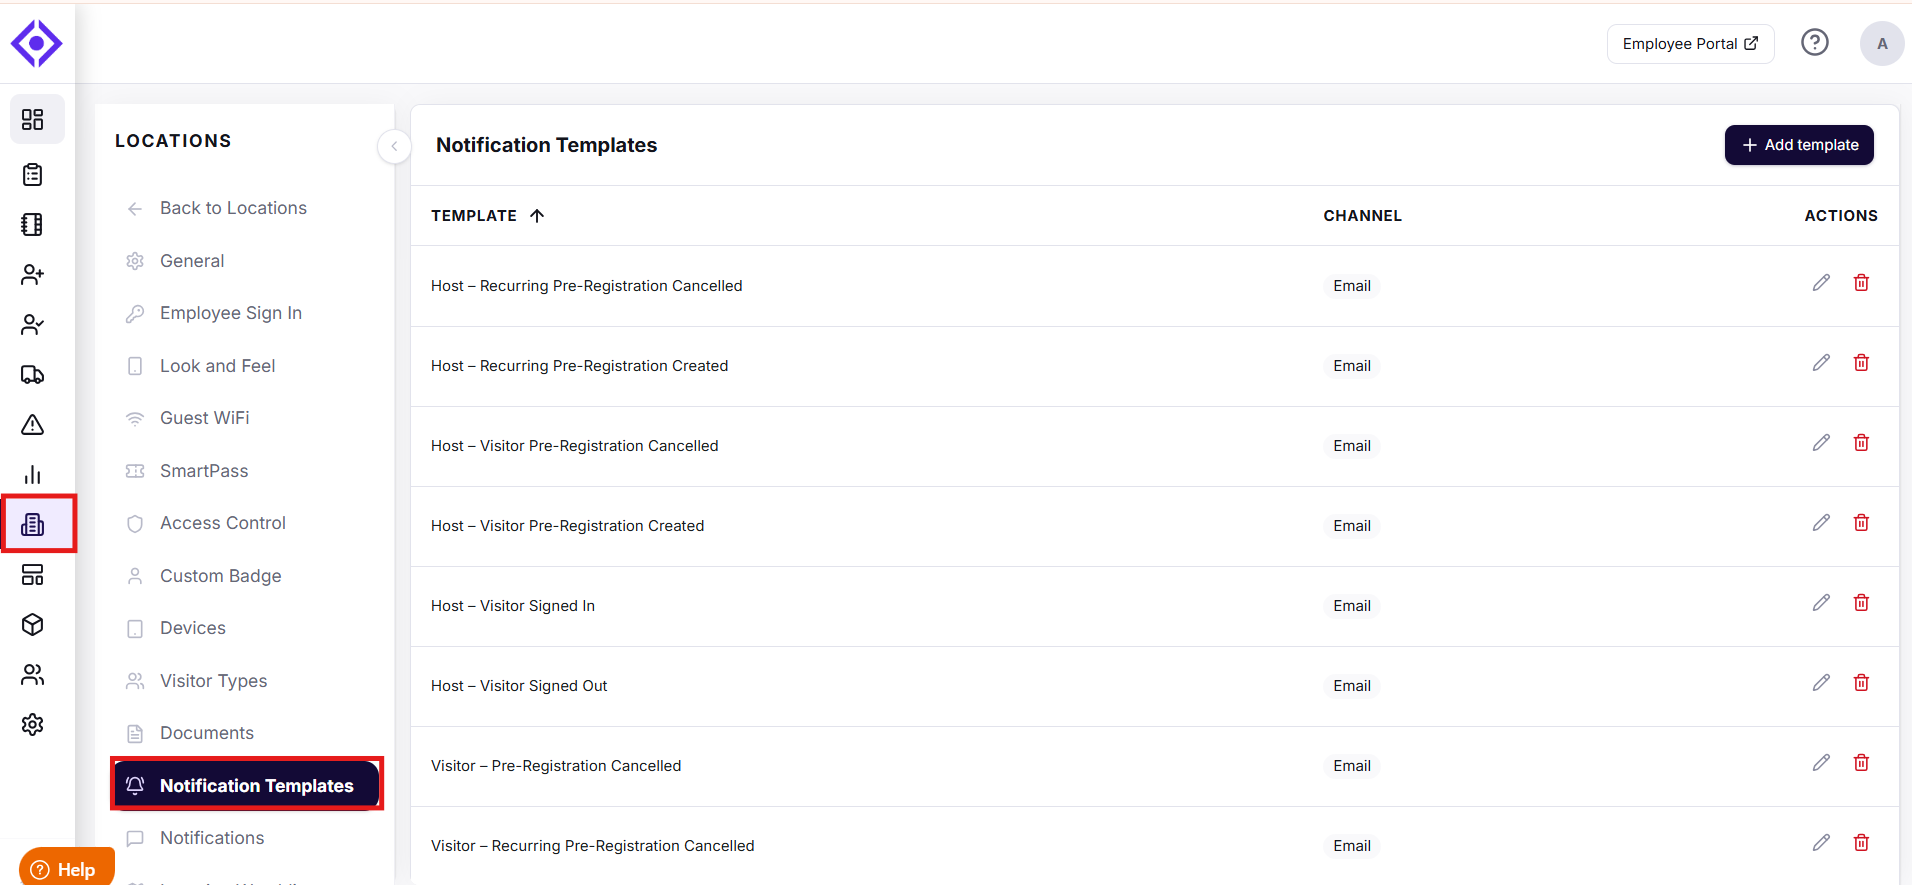
You now see every template created for this location, along with its channel and quick actions to edit or delete it.
Step 2: Start a new template
- Select Add template.
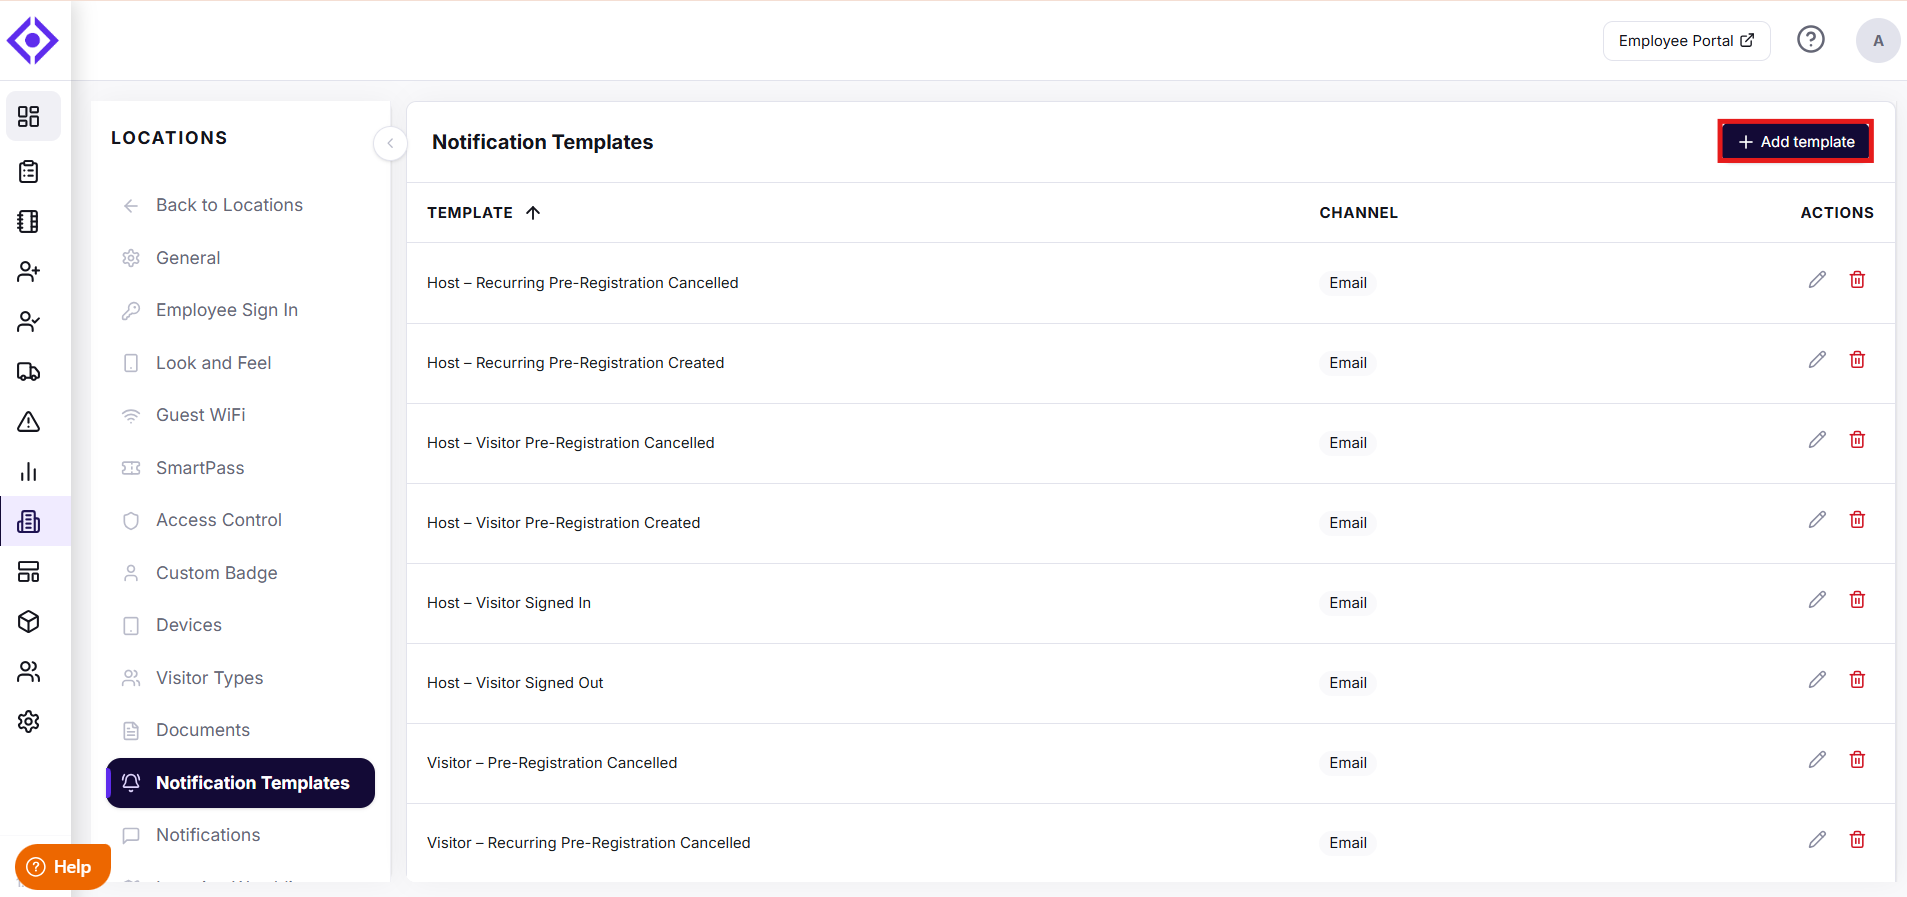
- Choose Start from blank to open an empty editor, or Browse the library to pick a pre-built template filtered by category or channel.
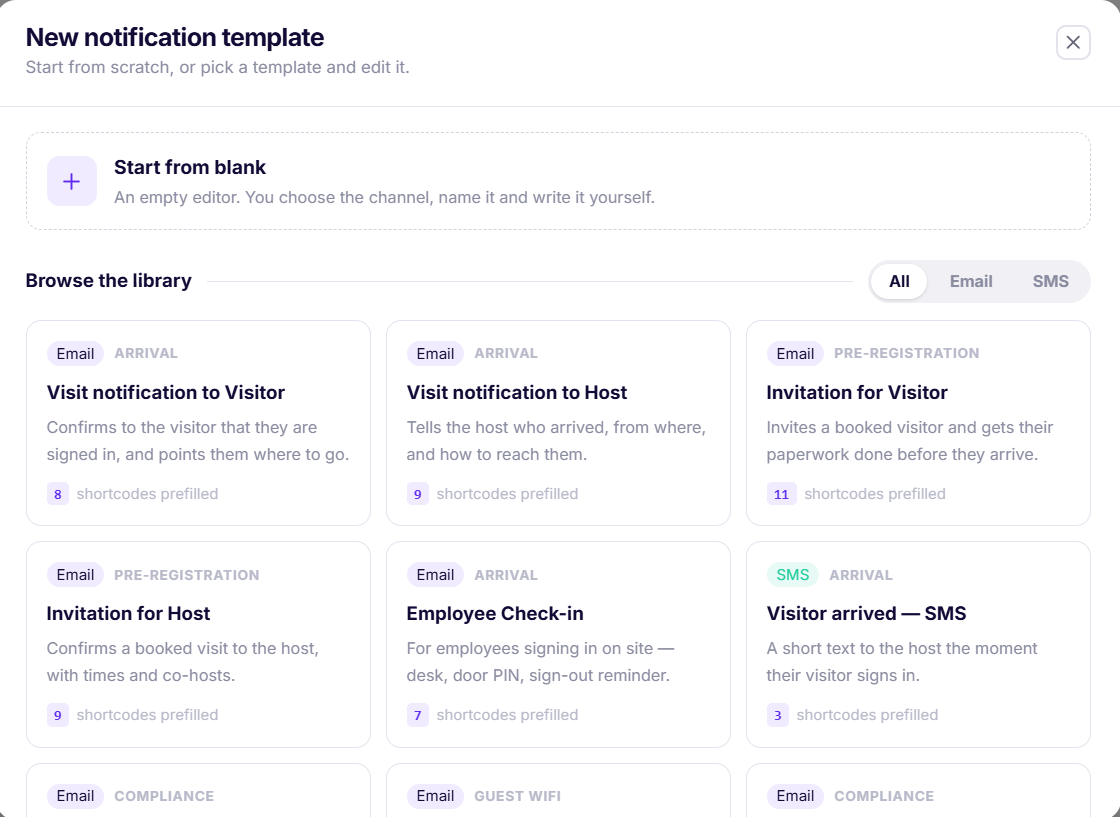
- If you choose a library template, review the content and shortcodes it comes with — they're ready to customize before you save.
Your template opens in the editor, ready for customization.
Step 3: Configure the template details
In the editor, set the following:
- Template Name — A clear, recognizable name for the template. (Required)
- Notification Channel — Choose Email or SMS. (Required)
- Sender Name — The name shown as the "From" in the recipient's inbox.
- Subject Line — The email subject, personalized with shortcodes if needed.
- Email Body — Your message content, built in the rich-text editor with headings, bold and italic text, lists, alignment, font color, tables, links, images, and buttons.
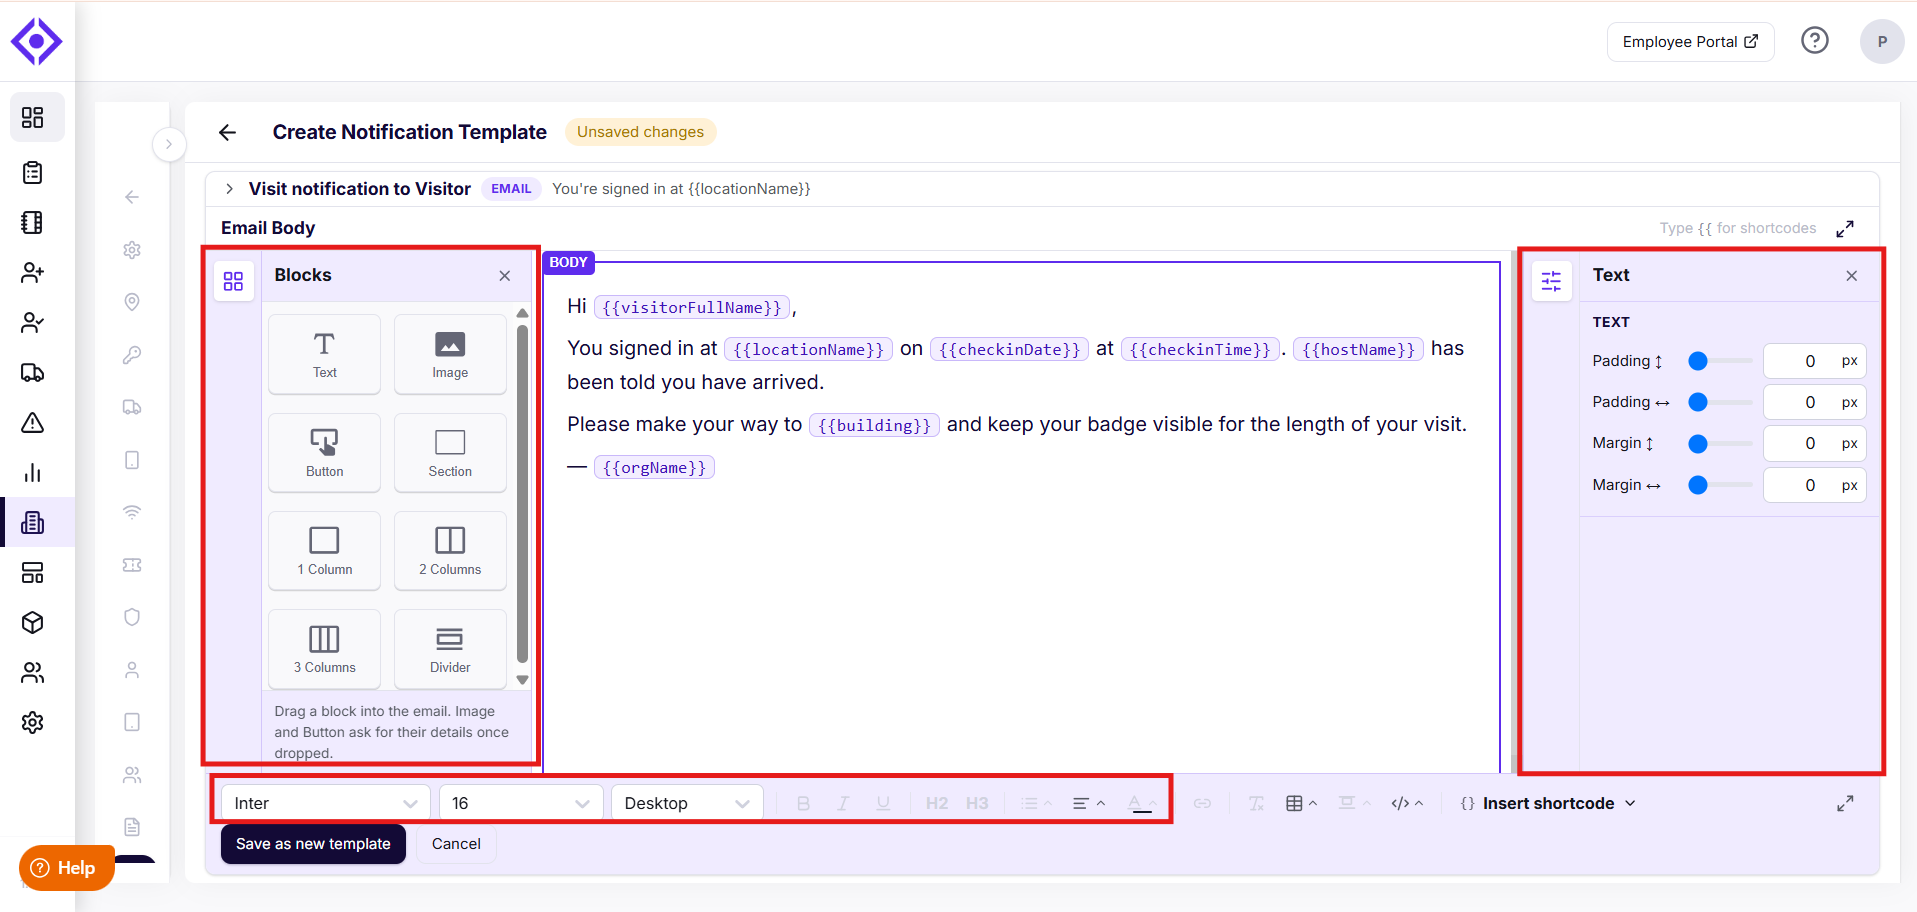
Note: The email body editor is built around three work areas, so you can structure, space, and style your message without writing any code.
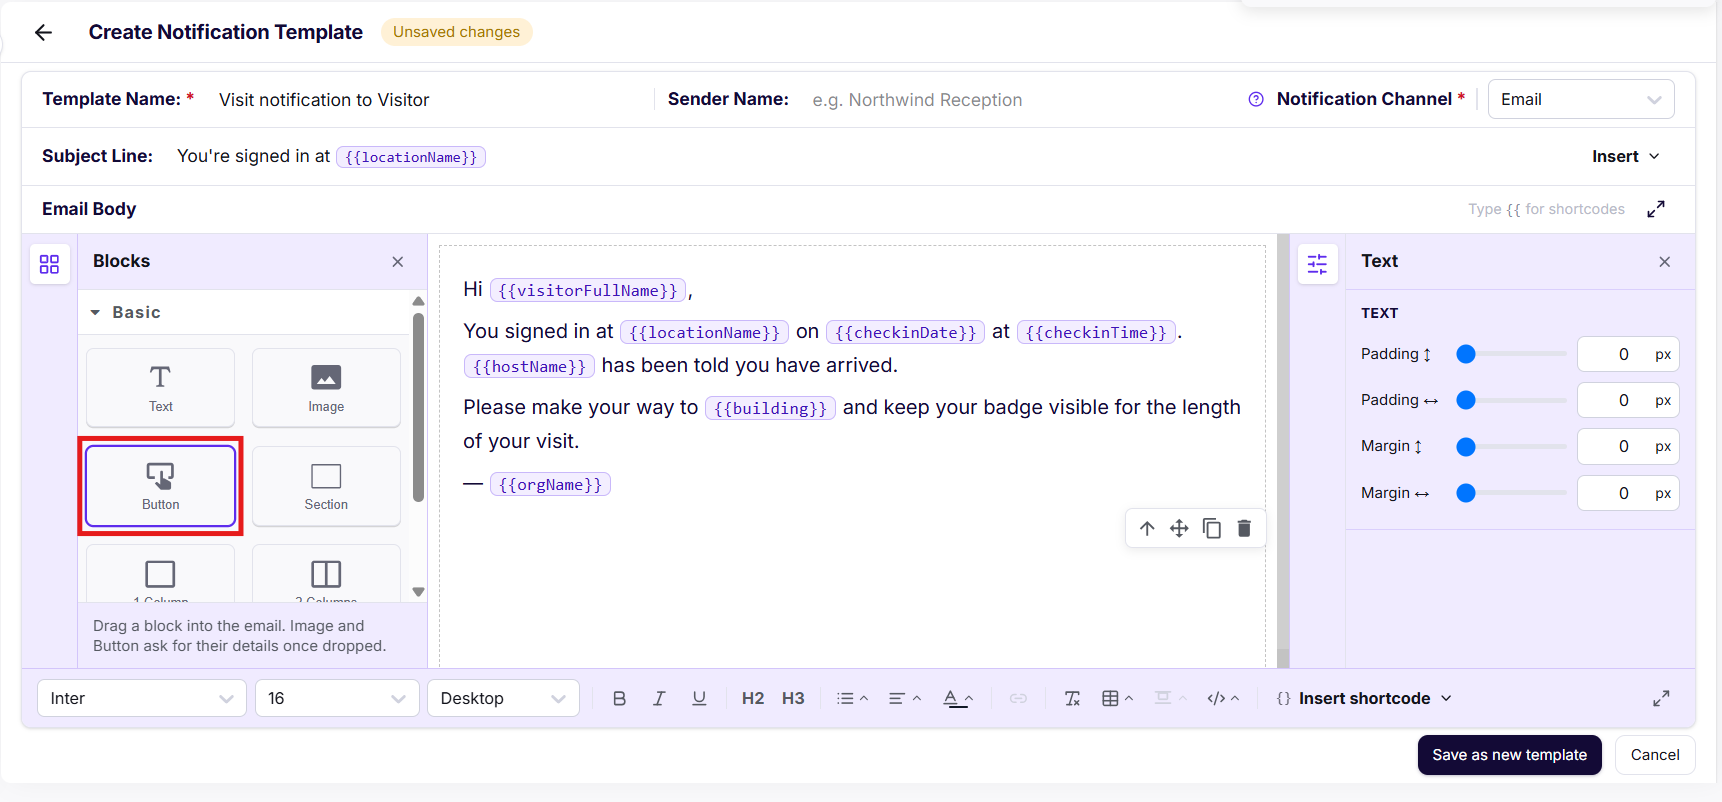
- Blocks panel (left): Use blocks to build the structure of your email. Content blocks add text, images, and buttons, while layout blocks let you group content into sections, split it into one, two, or three columns, or separate it with a divider. Drag a block to the exact spot you want it in the body. Image and Button blocks ask for their details as soon as you drop them, so your email never contains empty placeholders.
- Properties panel (right): Select any block in the body to fine-tune its spacing. Padding controls the space inside the block around its content, and margin controls the space between the block and the elements around it. You can adjust each vertically and horizontally using the slider or by typing an exact value in pixels, which helps you keep spacing consistent across the whole email.
- Formatting toolbar (bottom): Select text in the body to style it. The toolbar lets you change the font and size, emphasize words, add headings and lists, align text, and apply font color to match your organization's branding. Use the device dropdown to switch between Desktop, Tablet, and Mobile views and confirm your formatting renders well on every screen before you save.
Your template now has the details it needs to send.
Step 4: Insert shortcodes
- Select Insert to browse and search all available shortcodes, or filter by type — Visitor, Organization, Host, Visit, Employee, Documents, and more.
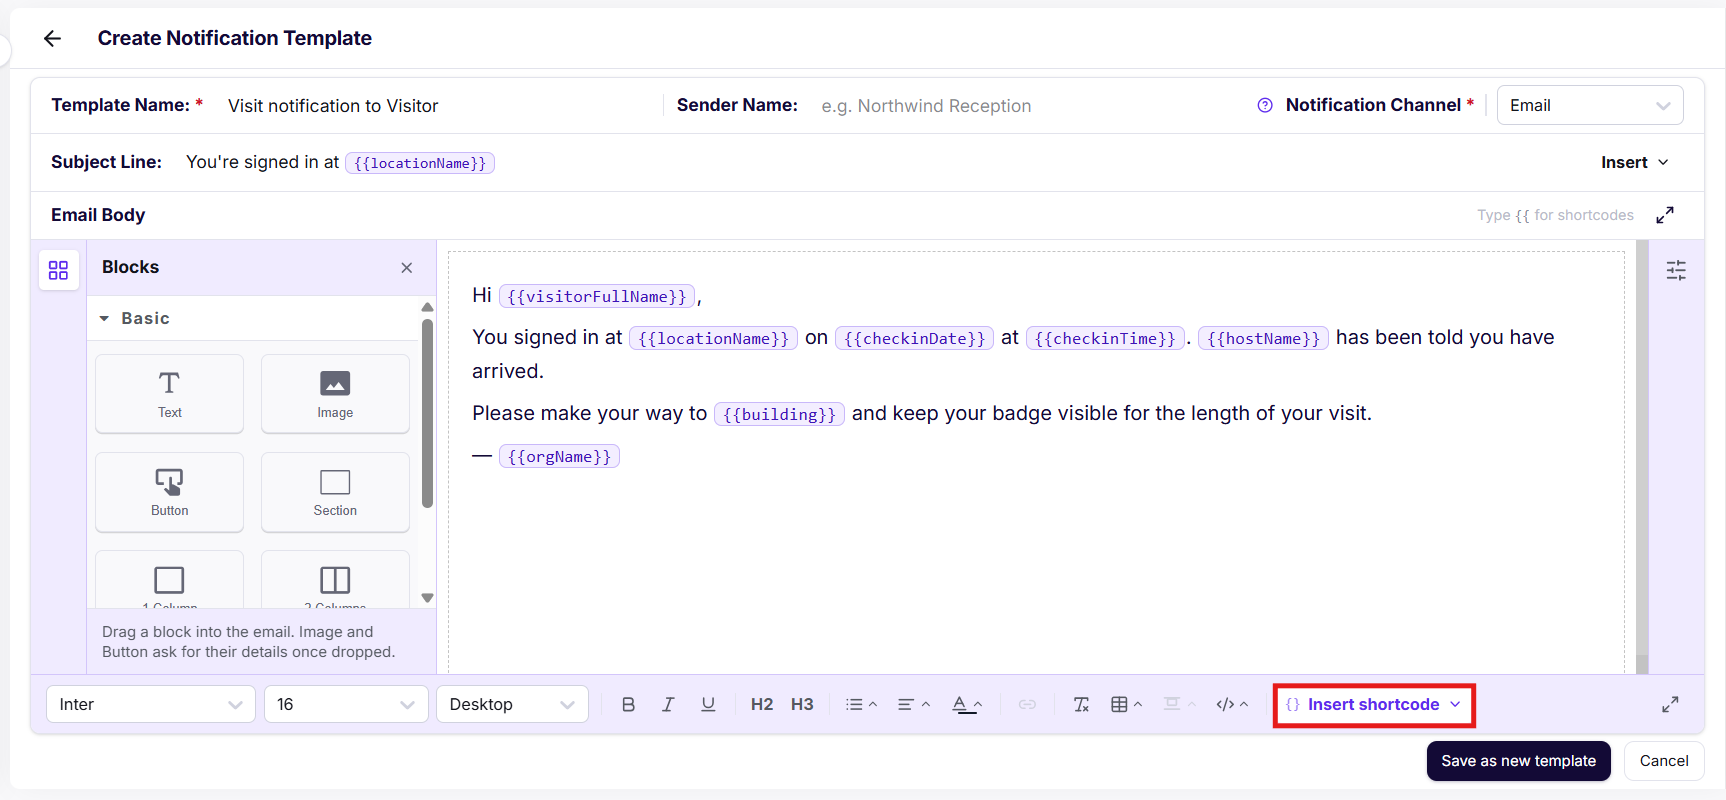
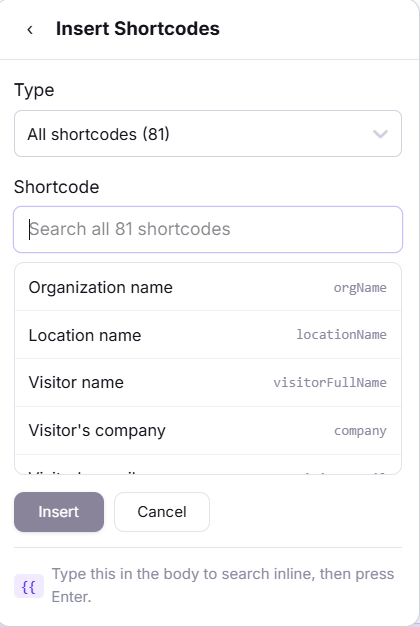
- Alternatively, type {{ directly in the body to search shortcodes inline, then press Tab to insert your selection.
Visitly now personalizes this notification automatically for each recipient.
Step 5: Insert a button (optional)
- Drag the button icon in the body to open Edit Button.
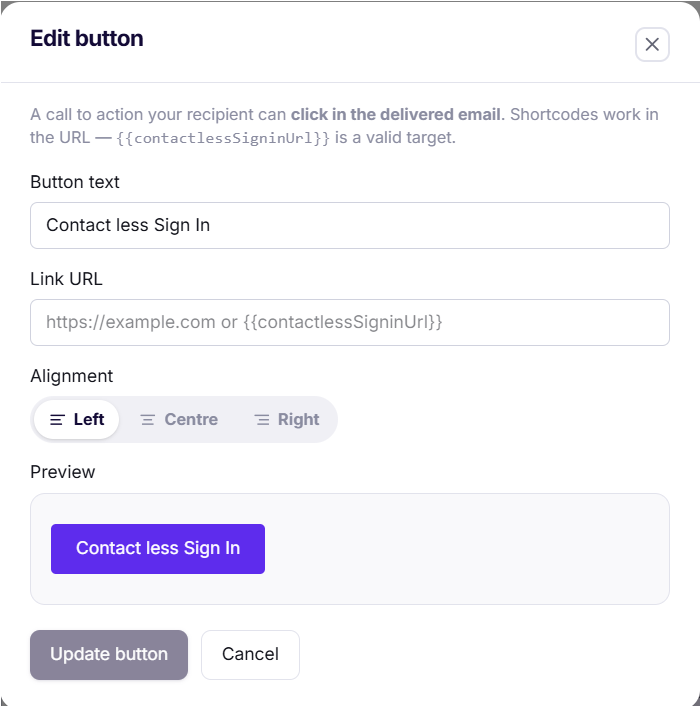
- Set the Button text and Link URL. Shortcodes work in the URL too, so you can link somewhere personalized, like a contactless sign-in link.
- Choose an Alignment — Left, Centre, or Right.
- Use the live Preview to check how it looks.
- Select Insert button.
Your button now appears in the email body, linked and ready to send.
Step 6: Preview across devices
- Use the device dropdown next to the font selector to preview how your email renders on Desktop, Tablet, or Mobile.
- Select the expand icon for a distraction-free, full-screen view of the editor.
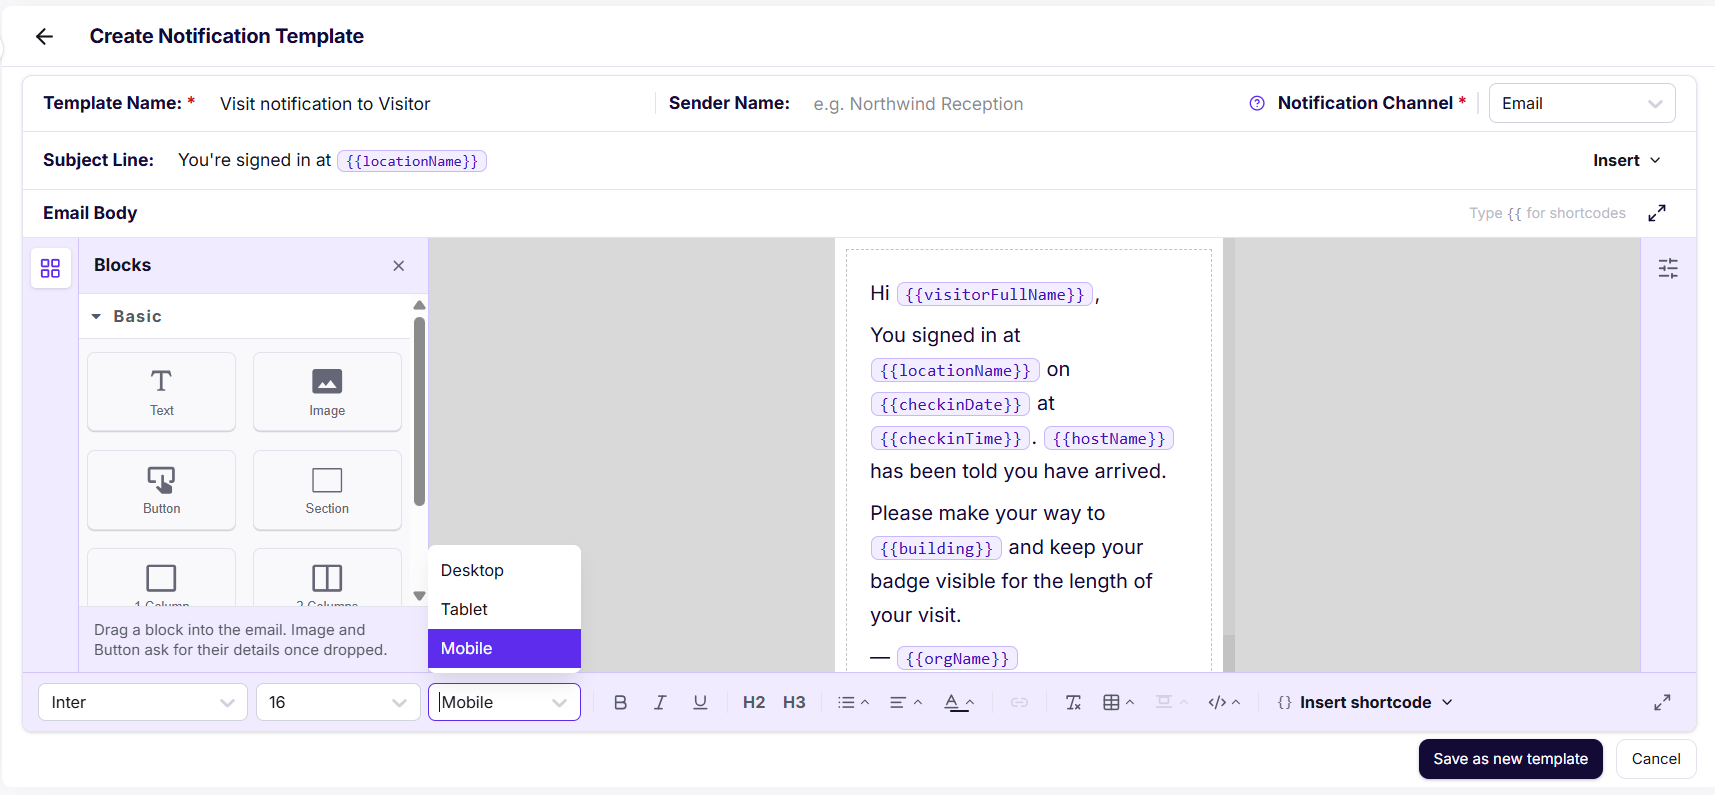
You've confirmed how the notification will look for every recipient.
Step 7: Save the template
- Select Save as new template when creating a template for the first time.
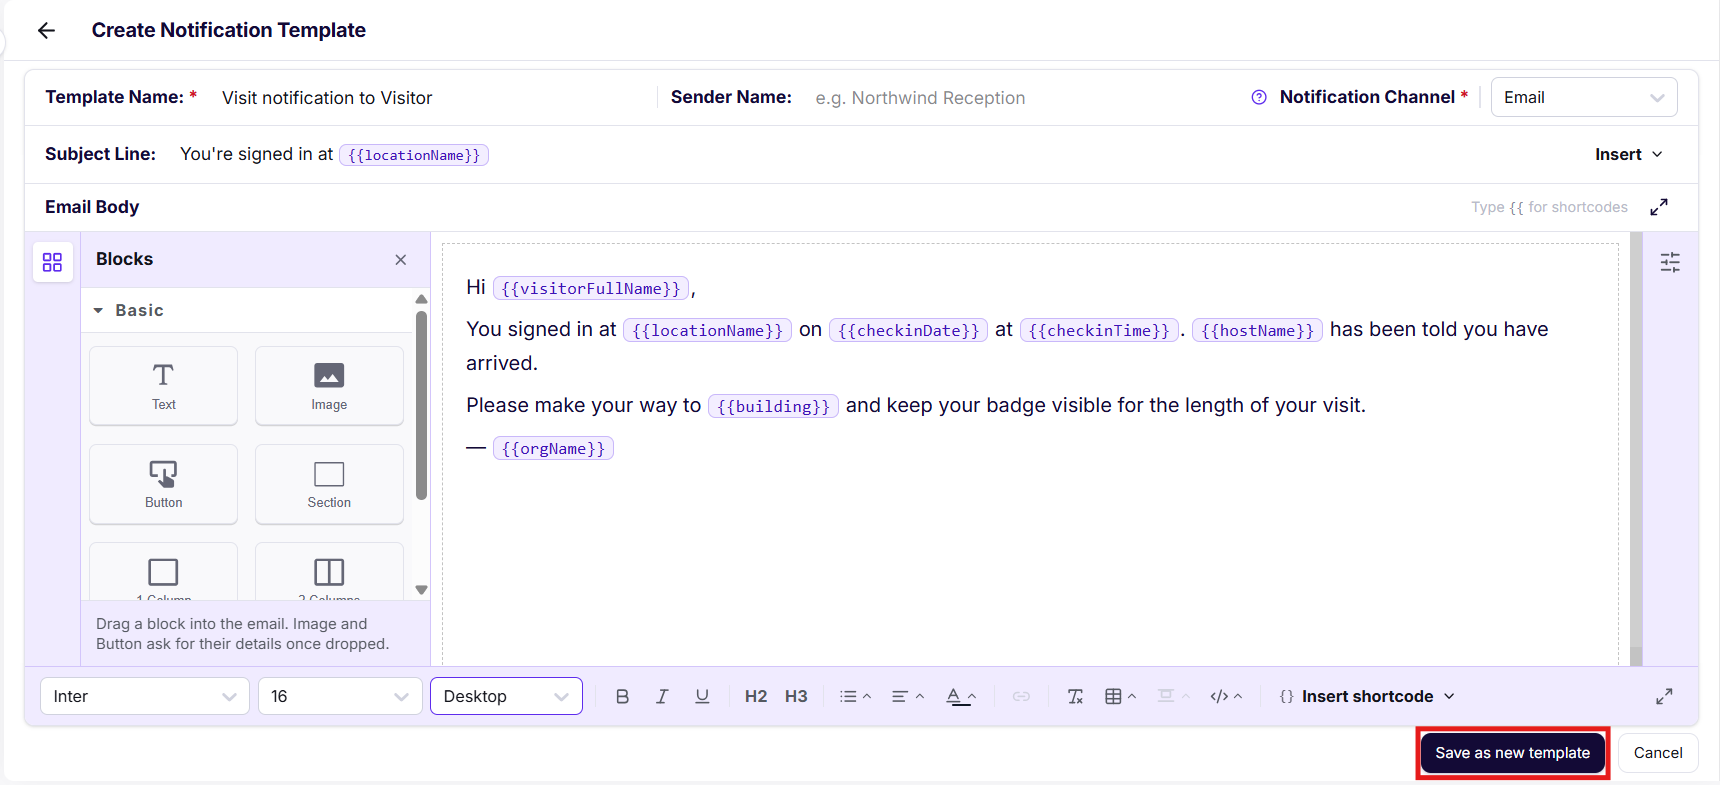
- When editing an existing template, select Update to save your changes to the same template rather than creating a new one.
Your notification template is now live for this location.
Managing multiple locations? Repeat this process for each location, since templates are managed per location and don't carry over automatically.
Using Your Templates
On the Notification Templates list:
- Every template you've created for the location is listed with its channel and quick actions to edit or delete it.
- Selecting a library template during creation pre-fills the content and shortcodes so you can adjust the wording rather than build the message from nothing.
Troubleshooting
Shortcodes are showing as raw text instead of visitor data.
Confirm the shortcode was inserted using the Insert menu or the {{ inline search rather than typed manually, and that it matches an available field for this notification's event type.
The button link isn't opening the right page.
Check the Link URL in Insert Button for typos, and confirm any shortcodes used in the URL are valid for this template's channel and event type.
My changes didn't save.
Confirm you selected Update on an existing template rather than Save as new template, and that Template Name and Notification Channel — both required fields — are filled in.
The template doesn't appear in the list after saving.
Refresh the Notification Templates tab, and confirm you saved the template while editing the correct location.
The email looks different on mobile than expected.
Use the device preview dropdown to check Mobile rendering directly, and simplify multi-column layouts or large images, which can resize unpredictably on smaller screens.
Need help? Contact the Visitly support team at support@visitly.io
Was this article helpful?
That’s Great!
Thank you for your feedback
Sorry! We couldn't be helpful
Thank you for your feedback
Feedback sent
We appreciate your effort and will try to fix the article